KSZ8061MNX Evaluation Board User’s Guide
DS50002449A-page 22 2016 Microchip Technology Inc.
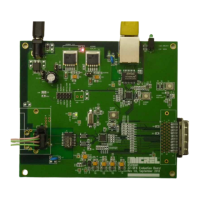
2.12 JUMPERS
The board has four jumpers:
• JP1: Install to enable the KSZ8081 (U2) 3.3V regulator. Remove to disconnect
power from the KSZ8081. Removing power from the KSZ8081 also isolates it
from the MII bus.
• JP2: When installed, the low voltage regulator (U6) that partially powers the
KSZ8061 is enabled/disabled by the KSZ8061 SIGD signal. When not installed,
the low voltage regulator is always enabled. When the KSZ8061 is properly con-
figured, this feature can be used to achieve ultra-low power standby power.
• JP3: (3-pin) Selects the power source for the board. Normally, install a jumper on
pins 2-3 for power from connector J8. To power the board from header J7 instead,
install the jumper on pins 1-2.
• JP4: Install to enable the KSZ8061 (U1) voltage regulator. Remove to disconnect
power from the KSZ8061.
FIGURE 2-9: LOCATION OF JUMPERS
2.13 KSZ8061MNX STRAPPING OPTIONS
Resistors R36-R44 are used to select optional strapping configurations to the
KSZ8061MNX. When a resistor is not installed, the internal resistor for each pin pulls
it to its default level during reset. Installing a resistor pulls the pin to the opposite logic
level. See the chip data sheet and/or board schematic for details.