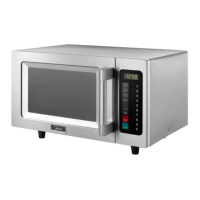
This document is an instruction manual for a commercial microwave oven, specifically models 1817G1A and 2117G1A, manufactured by Midea. It provides comprehensive information on the oven's function, technical specifications, usage, and maintenance.
Function Description
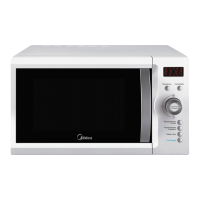
The Midea commercial microwave oven is designed for heating, cooking, or drying food in a commercial setting. It is not intended for industrial, laboratory, or household use. The oven operates by generating microwave energy to cook food efficiently. It features a control panel with various buttons for setting cook times, power levels, and accessing user options. The oven supports manual cooking, preset program cooking, multi-stage cooking, double/triple quantity cooking, and time defrost functions. A unique feature is the ability to update data and settings via a USB drive, allowing for custom programming of cook menus. Safety interlocks are built into the door to prevent operation when open, and the manual emphasizes precautions to avoid exposure to excessive microwave energy.
Important Technical Specifications
The manual provides specifications for two models:
Model 1817G1A:
- Oven Capacity: 0.6 Cu.ft.
- Rated Voltage: 208/230V~60Hz
- External Dimensions: 16.5 x 22.2 x 13.4 inches
- Rated Input Power: 2800 W
- Rated Output Power: 1800 W
- Net Weight: Approx. 66.1 lbs
Model 2117G1A:
- Oven Capacity: 0.6 Cu.ft.
- Rated Voltage: 208/230V~60Hz
- External Dimensions: 16.5 x 22.2 x 13.4 inches
- Rated Input Power: 3200 W
- Rated Output Power: 2100 W
- Net Weight: Approx. 66.1 lbs
Both models require proper grounding and connection to a power supply system with a maximum permissible system impedance Zmax of 0.3 Ohms at the interface point of the user's supply. The appliance is equipped with a 3-wire grounding plug.
Usage Features
The microwave oven offers a range of features for flexible and efficient cooking:
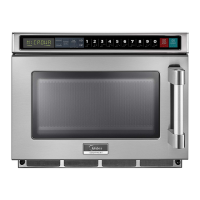
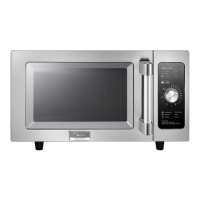
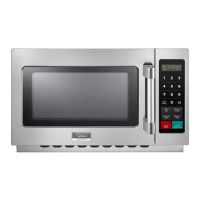
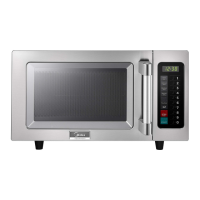
- Control Panel: Features a display, defrost button, USB buttons, power level button, time entry button, double and triple quantity buttons, number buttons (0-9), stop button, and start button. The control panel also includes braille for accessibility.
- Power Up: Upon first electrification, the oven displays voltage options (208V or 230V) for selection.
- Idle Mode: The oven enters Idle Mode (blank screen) after a period of inactivity in Ready Mode or Pause Mode. Opening and closing the door exits Idle Mode and enters Ready Mode.
- Ready Mode: In this mode, the fan and oven lamp operate. The oven should not be operated empty.
- Pause Mode: Activated by opening and closing the door during cooking or by pressing the "STOP" button. The screen displays remaining cook time.
- End of Cook Cycle Mode: Displays "DONE" when cooking is complete. Beep tones can be configured (3 seconds, continuous, or 5 quick beeps repeating).
- User Option Mode: Allows customization of oven configurations, including EOC (End of Cook) tone, beeper volume, keybeep on/off, keyboard timeout window, "On the Fly" cooking, door reset behavior, maximum cook time, manual programming enablement, double digit mode for programs, and filter cleaning reminders.
- Manual Cook Mode: Users can input desired cooking time and select a power level (default 100%). Multi-stage cooking is supported, allowing up to three stages with different power levels and times.
- Preset Program Cook Mode: The oven can store up to 100 custom cooking programs (depending on the "Double Digit Mode" user option). Programs can be set with specific cook times and power levels for single or multi-stage cooking. These programs are saved even if power is cut off.
- Double/Triple Quantity Cooking: Allows for automatic adjustment of preset cook times when "X2" or "X3" buttons are pressed, effectively doubling or tripling the cooking duration for larger quantities.
- Time Defrost Function: Enables defrosting for a specified time (up to 99 minutes and 99 seconds) at a default power level of 20%.
- USB Function: Facilitates updating the computer board's data by inserting a U-drive into the port. This is used for setting custom menus and other configurations. The manual details how to set up the U-disk with custom menus, including multi-stage cooking and power levels, and export the configuration file ("UTABLE.C").
- Factory-Default Setting: A combination of "START" and "0" buttons can reset the oven to its factory default settings.
Maintenance Features
The manual provides detailed instructions for cleaning and maintenance to ensure longevity and safe operation:
- General Cleaning:
- Glass Viewing Window, Inner Door Panel, and Oven Front Face: Should be kept free of food or grease build-up. Wipe with a mild detergent, rinse, and dry. Abrasive powders or pads should not be used.
- Control Panel and Plastic Parts: Clean with a dry cloth. Avoid detergents or alkaline liquid sprays, which can cause damage.
- Oven Interior: Spilled liquids, spattered oil, and food debris should be cleaned immediately after use. Operating a dirty oven can reduce efficiency and cause dirt to stick to surfaces.
- Caution: Bleach, thinners, or other cleaning agents should not be used on plastic and painted sections of the oven, as they can cause dissolution or discoloration.
- Filter Cleaning:
- The front filter serves as the air inlet and requires regular cleaning based on kitchen conditions.
- Procedure: Unscrew the filter counterclockwise, remove it, wash in warm soap and water, rinse, sanitize, and allow to dry. Then, reinstall and tighten clockwise.
- Reminder: The oven has a factory setting to remind the user to clean the filter every 30 days. This reminder can be cleared by pressing and holding the "STOP" button for 3 seconds.
- Splatter Shield Cleaning:
- Detaching: Hold the two tabs on the splatter shield, push them in the direction of the arrows, and pull downwards.
- Cleaning: Wash, rinse, sanitize, and dry the splatter shield.
- Installation: Insert the pins at the rear into the positioning holes on the chamber's rear plate, then push the other side to insert all positioning pins. Finally, push the front of the splatter shield up to set the tabs in position.
- Troubleshooting: A chart is provided to help diagnose common issues (e.g., oven not starting, arcing, unevenly cooked food, overcooked food, undercooked food, improper defrosting) and offers possible causes and remedies. For unresolved issues, users are directed to contact an authorized service center or call the help center.