12
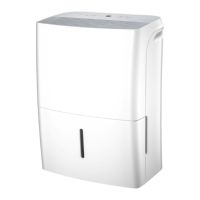
Remove compressor terminal box cover and disconnect wires from terminals. Using an
ohmmeter, check continuity across the following:
Terminal "C" and "S" - no continuity
- Open winding - replace compressor.
Terminal "C" and "R" - no continuity
- Open winding - replace compressor.
Terminal "R" and "S" - no continuity
- Open winding - replace compressor.
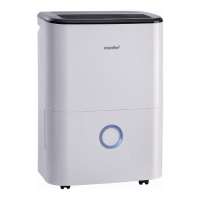
8.1.2 Ground test
Use an ohmmeter to set on its highest scale. Touch one lead to the compressor body (clean point of
contact as a good connection is a must) and the other probe in turn to each compressor terminal.
If a reading is obtained, the compressor is grounded and must be replaced.
8.1.3 Checking the compressor efficiency
The reason for compressor inefficiency is normally due to broken or damaged suction and/or
discharge valves, reducing the ability of the compressor to pump refrigerant gas.
This condition can be checked as follows:
1. Install a piercing valve on the suction and discharge or liquid process tube.
2. Attach gauges to the high and low sides of the system.
3. Start the system and run a “cooling or heating performance test.”
If test shows:
A. Below normal high side pressure.
B. Above normal low side pressure.
 Loading...