Do you have a question about the Midea MDDG-20DEN7-QA3 and is the answer not in the manual?
Explains WARNING/CAUTION symbols and general do's and don'ts for safe operation.
Covers preventing electric shock, fire hazards, and proper unit operation.
Details electrical safety, grounding, cords, and fuse specifications.
Introduces specific safety warnings for R290/R32 refrigerants.
Covers safety checks, work procedures, and fire prevention during refrigerant servicing.
Details safety checks for refrigeration equipment, electrical devices, and sealed components.
Procedures for detecting refrigerant leaks and safe removal/evacuation processes.
Safe procedures for charging refrigerant and decommissioning the unit.
Explains the Power, Mode, Humidity, Timer, and Turbo pads for operating the unit.
Describes the indicator lights and digital display for status, humidity, and error codes.
Details features like Bucket Full Light, Auto Shut Off, Auto Defrost, and Smart Dehumidifying modes.
Explains how to set timers and use the optional Dryer mode for enhanced dehumidification.
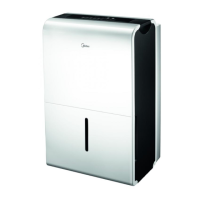
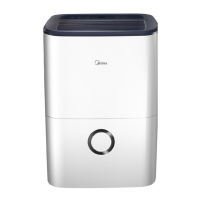
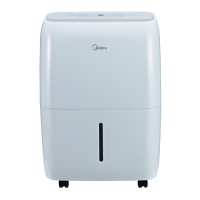
Identifies the control panel, handle, air outlet, water bucket, and water level window.
Identifies the drain hose outlet, casters, power cord, air intake grille, and air filter.
Provides instructions on where and how to place the dehumidifier for optimal performance.
Guides on first-time use, operating environment, and electrical connections.
Explains how to remove collected water using the bucket or continuous draining.
Instructions for cleaning the grille, case, and bucket using mild detergent.
Details how to remove, clean, and reattach the air filter for optimal performance.
Guidelines for cleaning and storing the unit when not in use for extended periods.
Solutions for common issues like the unit not starting or not drying the air properly.
Troubleshooting steps for loud noises, frost on coils, and water leaks.
Guidance on interpreting and resolving error codes displayed on the unit.
This document serves as an owner's manual for a dehumidifier, providing comprehensive instructions for its operation, maintenance, and troubleshooting. The device is designed to reduce humidity levels in indoor environments, contributing to a more comfortable atmosphere and preventing moisture-related issues.
The dehumidifier's primary function is to extract excess moisture from the air. It operates by drawing in humid air, passing it over a cooling coil where moisture condenses, and then releasing drier air back into the room. This process helps to prevent the growth of mold, mildew, and bacteria, protect household items from moisture damage, and alleviate discomfort caused by high humidity.
The unit features various operational modes to suit different needs. The "Dehumidifying" mode is the standard operation for general moisture removal. An optional "Dryer" mode is available for maximum dehumidification, particularly useful for drying wet clothes. In this mode, the fan speed is fixed at a high setting to facilitate faster drying. The manual emphasizes that the Dryer mode should be operated in a closed room with doors and windows shut for optimal effectiveness, and airflow should be directed at the wet clothes. Pre-dehydrating wet clothes is recommended for best results. Caution is advised against covering the air outlet or placing wet clothes directly on the unit to prevent overheating, fire, or electrical hazards.
An optional "Smart Dehumidifying" mode allows the unit to automatically control room humidity within a comfortable range of 45% to 55% relative humidity, adjusting based on the room temperature. In this mode, the manual humidity setting function becomes inactive.
The dehumidifier incorporates several safety and convenience features. The "Bucket Full Light" illuminates when the water collection bucket is full or incorrectly positioned, indicating that it needs to be emptied or re-seated. An "Auto Shut Off" feature automatically turns off the unit under these conditions. For some models, the fan motor may continue to run for 30 seconds after shut-off. The "Auto Defrost" function prevents frost buildup on the evaporator coils by temporarily cycling off the compressor while the fan continues to run until the frost disappears. During auto defrosting, the unit may produce a sound of refrigerant flowing, which is normal. A "Wait 3 minutes before resuming operation" feature protects the unit by preventing immediate restarts after being turned off, ensuring a 3-minute delay before operation can resume. The "Auto-Restart" function ensures that if the unit unexpectedly shuts off due to a power cut, it will automatically restart with its previous settings once power is restored.
The unit also includes a timer function, allowing users to set an "Auto Start" and "Auto Stop" time from 0.0 to 24 hours in 0.5-hour increments up to 10 hours, and then 1-hour increments up to 24 hours. The timer can be initiated by pressing the Timer button, with indicator lights showing whether the Auto Stop or Auto Start program is active. The selected time registers after 5 seconds, and the system reverts to displaying the current humidity setting. The timer function is canceled if the unit is turned ON or OFF manually, or if the timer setting is adjusted to 0.0. It is also canceled if the LED display shows the code P2 (bucket full or incorrectly positioned).
The dehumidifier is designed for indoor residential use and should not be used outdoors or for commercial/industrial applications. Proper positioning is crucial for effective operation. The unit should be placed on a smooth, level floor capable of supporting its weight when the water bucket is full. A minimum of 20cm of air space should be maintained on all sides for good air circulation. It should be kept away from heat sources like clothes dryers, heaters, or radiators. The operating temperature range is between 5°C (41°F) and 32°C (90°F), and humidity between 30%RH and 80%RH. Operating below 5°C (41°F) can lead to frost buildup on coils, reducing performance. For maximum effectiveness, the dehumidifier should be operated in an enclosed area with all doors, windows, and other outside openings closed. When first using the unit, continuous operation for 24 hours is recommended.
The collected water can be removed in two ways: using the internal bucket or through continuous draining. When the bucket is full, the "Bucket Full Light" illuminates, and the digital display shows "P2." The bucket should be carefully pulled out using its handles, emptied, and then securely replaced to allow the unit to resume operation. The manual warns against touching internal parts when removing the bucket and advises drying any residual water in the unit. For continuous draining, a water hose (not included, ID=13.5mm) can be attached to the drain hose outlet at the back of the unit. The rubber plug must be removed first. The hose should be secured to prevent leaks, directed towards a floor drain or suitable drainage facility, and positioned to allow smooth water flow without kinks, ensuring the hose end is lower than the drain hose outlet. When continuous draining is not in use, the drain hose should be removed, and the rubber plug reinstalled.
The control panel features several pads:
Regular care and cleaning are essential for maintaining the dehumidifier's performance and longevity. Before any cleaning, the unit must be turned off, and the power plug removed from the wall outlet.
The manual also includes a troubleshooting guide for common issues, such as the unit not starting, not drying air effectively, making loud noises, frost appearing on coils, or water on the floor. It advises checking power connections, bucket position, air filter cleanliness, humidity settings, and room conditions. Error codes (AS, ES, P2) are explained with corresponding actions.
Safety precautions are extensively detailed, covering electrical information, handling of flammable refrigerants (R290/R32), and general operational guidelines. Users are warned against modifying the power cord, operating with wet hands, inserting foreign objects, or using the unit in wet rooms. It emphasizes the importance of proper grounding, avoiding extension cords, and contacting qualified service technicians for repairs. The manual also outlines specific procedures for handling units with flammable refrigerants, including transport, storage, servicing, leak detection, removal, evacuation, charging, and decommissioning, all to be performed by certified technicians in accordance with national regulations and safety standards.
| Model | MDDG-20DEN7-QA3 |
|---|---|
| Category | Dehumidifier |
| Operating Temperature | 5-35°C |
| Weight | 13.5 kg |
| Color | White |
| Dehumidifying Capacity | 20 liters per day |
| Tank Capacity | 3 liters |