8
6. Remove accessory carriage handles.
7. Carefully remove the entire oil system.
8. Wipe down with warm water and soap.
9.
Removing/Installing the Cutting Wheel
WARNING
Use two people whenever it is
Removing/Installing the
Power Drive from the Cart
When using another means of lift or device, ensure
the lift sling is secure under the accessory carriage
handles and accessory arms. Always lift according
to sling manufacturer's instructions. Ensure the sling
is in good repair and rated for the total weight of tool,
any attached accessories, and oil. If in doubt use an
experienced professional to lift the machine.
Removing/Installing the Reamer
Removing/Installing the Jaw Inserts
Transportation
4.
5.
Continue removing the eight screws from the cart
rear mount brackets.
Lift the power drive away from the cart using a
device or two person lift by holding the accessory
carriage handles and accessory arms.
necessary to lift or carry the ma-
chine. Machine is heavy. Lift with legs, not back.
Do not use cart to transport other loads or add
additional accessories.
Always unarm the machine before transporting.
Ensure the foot pedal cord is properly wrapped
and the pedal is stored before transporting.
Always clear the area of obstructions before
transporting.
To roll cart from place to place, grasp the cart handles
and tilt the machine onto the tyres. Push, don't pull,
the machine.
the lift sling on the accessory carriage handles
and accessory arms.
6. To install the power drive using a device, secure
1. Ensure pipe threader's cart is fully set up and
remove the battery pack. Remove pipe and drain
oil reservoir.
2.
3. Using an impact driver with a 6 mm bit remove
eight M8-1.25 screws from the cart front mount
brackets.
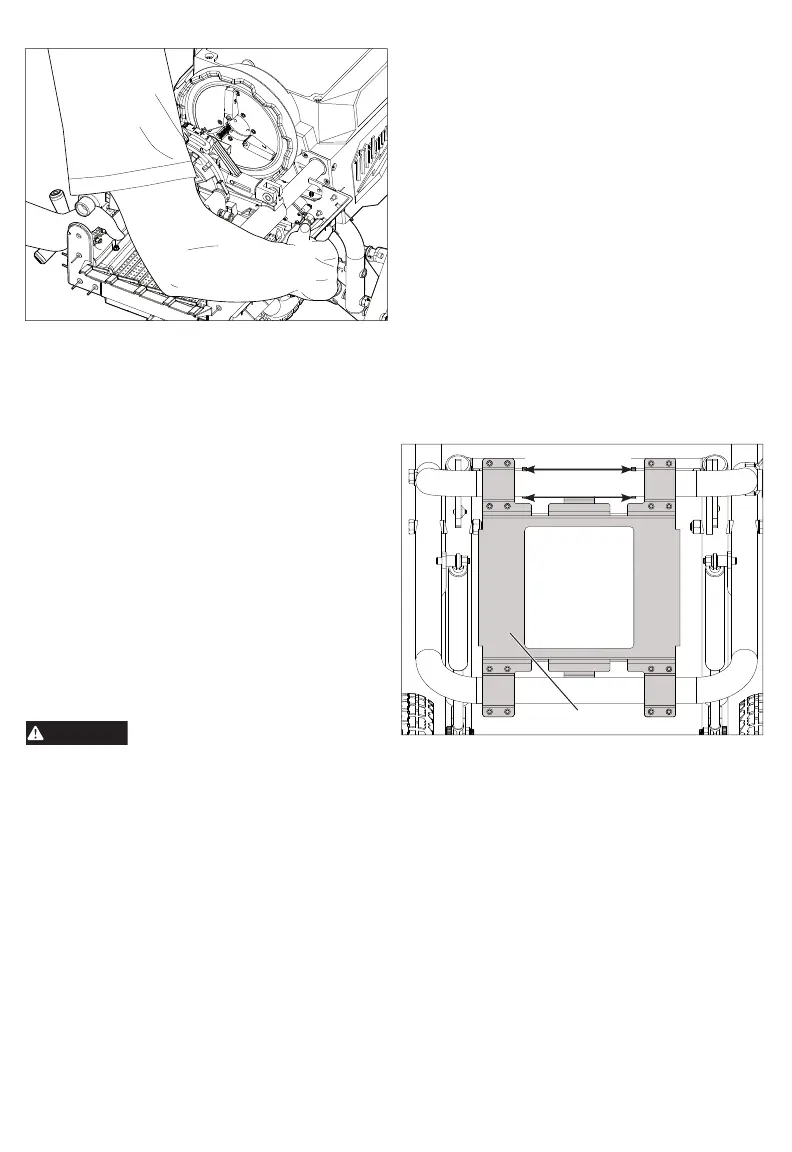
Alignment pins
Mounting plate
7. Place mounting plate on cart. Make sure the align-
ment pins are towards the centre of the cart on the
front end of the cart.
8. Lift the power drive onto the cart and align the
mounting plate holes with the power drive holes.
9.
10.
Remove battery pack. To remove, take a flat punch
and hammer the pin holding the reamer until the pin
is fully removed.
To install, attach the reamer to the assembly and
hammer the pin until secure.
Remove battery pack. To remove, using a flat-head
screwdriver, twist off the jaw insert. Pull the pin and
spring.
To install, push in spring and pin. Insert the jaw
insert and tighten with flat head screwdriver.
Always use a two person lift when necessary. To lift,
grasp the accessory carriage handles and tilt the
machine back onto the tyres. Have a second
person grasp the accessory arms. Always maintain
a firm footing.
Remove battery pack. To remove, using a hammer
and flat punch, remove the pin holding the cutting
wheel.
To install, insert the cutting wheel in the bushings.
Hammer the pin until secure.
Reassemble Oil system by reversing above
steps .
Tighten the eight M8-1.25 screws on the rear
mount brackets to the machine to torque
18.4 Nm (163 in-lbs).
Continue tightening eight screws on front mount
brackets to the machine to torque
18.4 Nm (163 in-lbs).
Ensure the lifting device is securely in place and
supporting the power drive itself and the cart is
able to easily be removed.
 Loading...