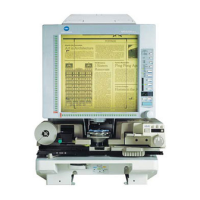
3. Control Panel Keys and Indicators
2-10
Scanner Chapter 2
Memory Input Key:
To store one of the following functions into the memory of
the Scanner, first set one of the functions on Control Panel
and then press this button with the head of a pen or other
device. The next time the scanner is turned ON, that func-
tion will appear as a default setting until a new one is en-
tered. (Maximum three kind of setting can be memorized.)
1) Negative or positive
2) Print mode
3) Output Format
4) Print image density
5) Exposure mode
6) Centering or Fit
7) Masking
8) Auto Skew Correction
9) Horizontal Area setting
10) Vertical Area setting
11) Electrical Zoom
12) Resolution
NOTE
If you do not press the pinhole for at least 60 seconds
after a setting has been made with the Auto Reset
function set to ON, the previous setting remains valid.
Clear/Stop Key:
Press to clear the setting on the Multi-Print Display, reset-
ting it to “1” or to stop a multi-print cycle.
Multi-Print Keys:
This key is used to set the number of prints when printing
continuous, multiple pages.
The value of this setting increases by one (1, 2, 3...) with
every push of the key. (Maximum 19)
* PR mode only.
Start Key:
Press to make a print (scan) of the image shown on the
Screen.
0820771003.book Page 10 Monday, March 19, 2001 2:49 PM