10
NOTE: Remove the hex wrench after
installation is nished.
CAUTION: If worn nut and cup for blade are used,
there is a danger of blade geing loose. Replace
them with new ones.
CAUTION: Fasten output shaft using locking tool
securely in order to avoid the possibility of output
shaft rotating when mounting cuing blade
which will prevent the cuing blade fastening nut
from being tightened suiciently.
CAUTION: Wear gloves to reduce the risk of
injury caused by unintentional contact with the
blade.
FOR GRASS TRIMMER
ASSEMBLE GRASS TRIMMER HEAD
1. Dismount the brush cuer head if the machine
under this brush cuer mode.
Note: To dismount the blade, insert the
hex wrench through the hole on lower
blade retainer and gear case. Loosen
the nut (turn clockwise) by using a
socket hex wrench to disassemble nut,
protection cup, upper blade retainer,
blade and lower blade retainer.
2. Tighten four bolts to install the grass trimmer
safety guard and brush cuer safety guard by
using the screwdriver(Fig3A/Fig3B).
3. Fix the grass trimmer safety guard into gear
case with three bolts by using hex wrench.
Same as Fig 2A.
4. Insert the hex wrench to hole of lower blade
retainer to x the machine. Same as Fig 2B.
Note: The hex wrench should be inserted
inside the hole till whole assembling
done.
5. Install the trimmer head by turning
anticlockwise(Fig3C).
6. To remove the trimmer head, turn the nylon
cuing head clockwise while holding the
lower blade retainer with the hex wrench.
Fig3A Fig3B
Fig3C
NOTE: Remove the hex wrench after
installation is nished
CAUTION: Only use the nylon trimmer head with
the guard and guard extension in place. Failure to
do so can cause serious personal injury.
NOTICE: Be sure to use genuine nylon trimmer
head. Turn the tool upside down so that you can
replace the nylon cuing head easily.
WARNING: Never use the tool unless the guard is
properly ed.
WARNING: Take care against injury from the
safety guard for trimming the line to length. After
extending new line, always return the trimmer to
its normal operating position before switching on.
WARNING: Never t metal cuing elements.
WARNING: Never use it without the safety
guard properly installed. Failure to adhere to this
warning can cause serious personal injury.
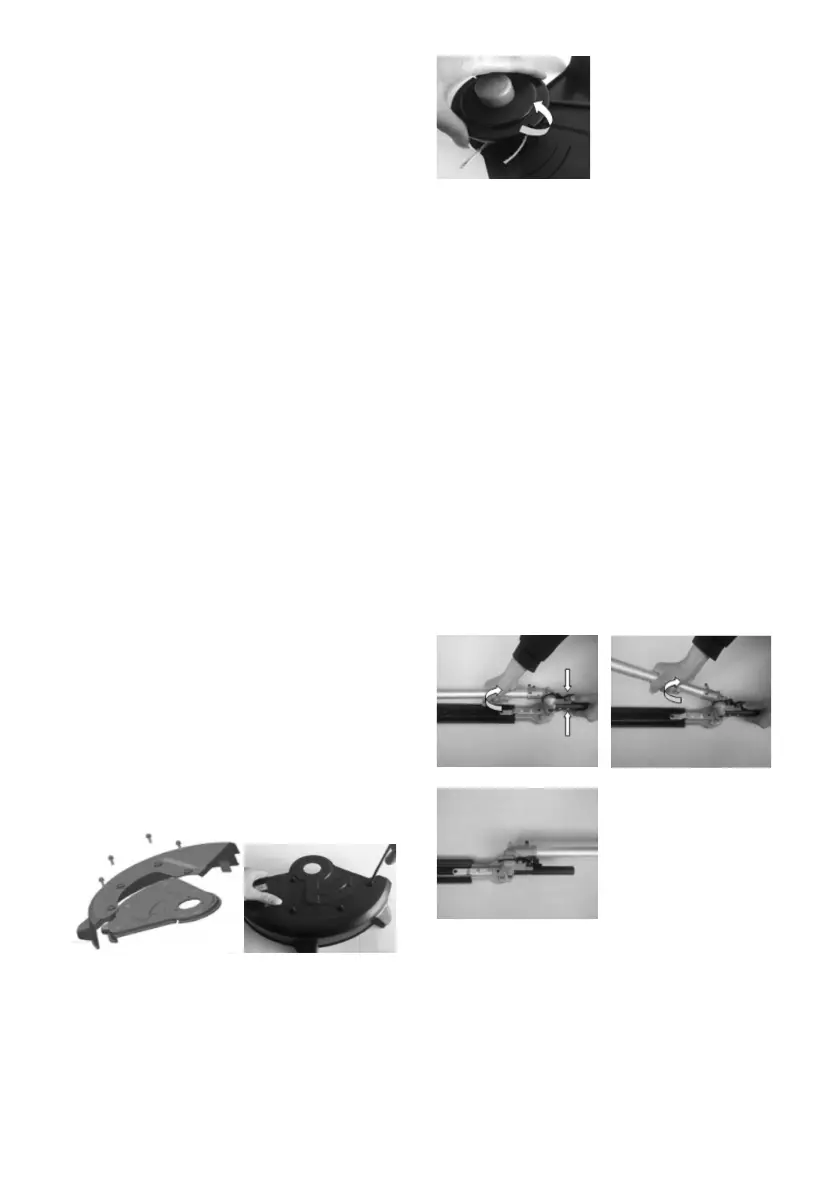
ASSEMBLE HEDGE TRIMMER HEAD
Press the rotation buon and rotate the tube 180º.
(Fig.4A/4B/4C)
Fig.4A Fig.4B
Fig.4C
ASSEMBLE THE GUIDE BAR AND SAW
CHAIN
WARNING: Wear gloves before assembly.
1. Remove the nut counterclockwise ( Fig 5A).
2. Then take o the side cover( Fig 5B).
3. Place the chain in the slot of the guide bar,
making sure the saw teeth are facing the
correct direction by matching the arrow on the
guide bar ( Fig 5C).
 Loading...