9
Operation
Unpacking
1. Carefully remove the product and any
accessories from the box.
2. Inspect the product carefully to make sure no
breakage or damage occurred during shipping.
3. Do not discard the packing material until you
have carefully inspected and satisfactorily
operated the product.
Warning: The equipment and packaging
material are not toys. Do not let children
play with plastic bags, foils or small
parts. There is a danger of swallowing or
suocating!
Warning: Never remove or bridge the
switching devices.
Assembly Instruction
The machine is supplied with some components
not assembled. To assemble these, proceed as
follows:
WARNING: Always be sure that the tool is
switched o before carrying out any work on the
tool. Failure to switch o may result in serious
personal injury from accidental start-up.
WARNING: Never start the tool unless it is
completely assembled. Operation of the tool in
a partially assembled state may result in serious
personal injury from accidental start-up.
FOR BRUSH CUTTER
CAUTION:
1. The cuer blade must be well polished, free of
cracks or breakage. Polish or replace the cuer
blade every three hours of operation.
2. Always wear gloves when handling the cuer
blade.
3. Always aach the blade cover when the tool is
not in use or is being transported.
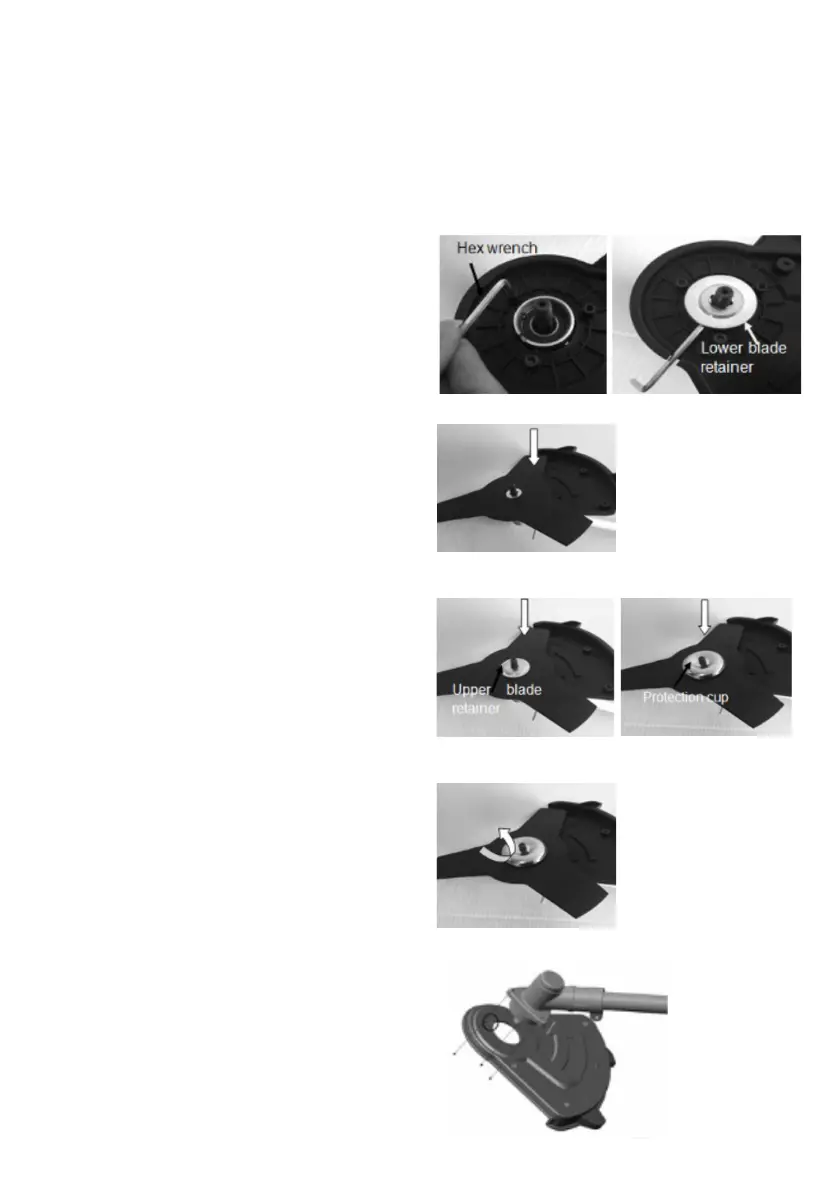
ASSEMBLE BRUSH CUTTER HEAD
1. Fix the brush cuer safety guard into gear case
with three bolts by using hex wrench(Fig.2A).
NOTE: To avoid of reverse assembling.
Please follow Fig2G.
2. Install the lower blade retainer on safety guard
and insert the hex wrench into the hole of lower
blade retainer to x the machine(Fig.2B).
Note: The hex wrench should be inserted
inside the hole till whole assembling
done.
3. Install the blade onto lower blade
retainer(Fig.2C).
NOTE: Remember the marks on blade
should be faced to the lower blade
retainer.
4. Install the upper blade retainer on the
blade(Fig.2D)
5. Install the protection cup to cover the upper
blade retainer(Fig.2E).
6. Tighten the nut (turn anticlockwise) by using
a socket hex wrench(Fig.2F).
Fig.2A
Fig.2B
Fig.2C
Fig.2D Fig.2E
Fig.2F
Fig.2G
 Loading...