3
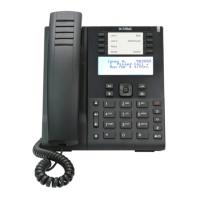
Description
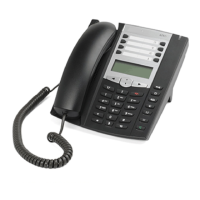
Affordable and easy to use, the 6390 puts information and easy access
to features right at your fingertips. While it is as affordable as many
other telephones, the 6390 is far from ordinary. When it comes to
making calls, the 6390’s modern design and large display screen make
a world of difference. Save up to 200 numbers in your Directory for fast,
simple dialing. Place calls without lifting the receiver. Subscribe to
network services like Call Display and Visual Call Waiting, and you will
see the caller’s name and number before you answer. With six
“softkeys” that provide different options based on activity, the 6390
provides step-by-step instructions and menus for ease of use. You will
never have to flip through pages of information to use the features.
The 6390 is a telephone that offers flawless performance in any
environment.
Phone Features
• Large 8-line 3.5” backlit display.
• 6 programmable softkeys (4 pages of softkeys for a total of 20
f
unctions).
• Press-and-hold memory key configuration feature.
• 200-name and number Directory.
• 100-name and number Callers List.
• 15-name and number Redial List.
• English/French/Spanish language display prompts.
• Enhanced speakerphone for handsfree calls.
• Analog headset support.
• AC power adapter (included).
Supporting Documentation
To access phone and system-specific documentation:
1. In your browser, go to www.mitel.com.
2. Click Product Manuals u
nder the Support section
3. Select PDF Guides and Online Help under the End User
Documents drop-down menu.
4. In the left-hand menu, navigate to Analog Phones.
Phone Cord and Power Connections (See Figure
)
1. Insert the analog phone cable into the cable jack on the back of
the telephone marked l1 until it clicks into place.
2. Insert the power adapter cord into the power jack on the back of
the telephone marked k.
3. Connect the other end of the analog phone cable the analog
phone jack on the wall.
4. Plug the power adapter into a power outlet (surge protector or
p
ower bar is recommended).
(Optional) Additional Device Connection
The 6390 has a secondary cable jack that enables an additional device
(such as a second phone or fax machine) to share the telephone
network connection.
1. Insert an analog cable into the cable jack on the back of the
telephone marked l2 until it clicks into place.
2. Connect the other end of the analog cable into the cable jack of
the additional device.
Handset and Headset Connections (See Figure
)
Connecting a Handset
1. Turn the phone over and locate the handset jack marked j.
2. Insert one end of handset cord into the handset jack until it clicks
into place.
3. Route the handset cord through the available grooves.
4. Attach the handset to the other end of the handset cord.
Connecting a Headset (Not Included)
1. Turn the phone over and locate the headset jack marked
f.
2. Insert the headset cord into the jack until it clicks into place.
Desk Installation (See Figure
)
For desk installation of the 6390 analog phone a reversible stand is
included that attaches to the back of the phone above the various
jacks. Two viewing angles (30° low angle and 60° high angle) are
available allowing users to personalize their phone viewing
preference.
1. Locate the stand insertion area on the back of the phone (above
the various jacks).
2. Carefully insert the stand into the insertion area and slide the
s
tand towards the right until it snaps in place.
NOTE: The orientation of the stand determines the viewing angle. If
the bottom of the stand is installed facing the top of the phone the
viewing angle will be 30°. If the bottom of the stand is installed facing
the bottom of the phone the viewing angle will be 60°.
3. Route the analog phone cable and power cord through the open-
ing of the stand (located on the bottom center of the stand.)
NOTE:
This product is designed for indoor use only and for ambient
temperatures from 0° C (32° F) to 40° C (104° F).
Wall Installation
The 6390 analog phone can be mounted to a wall using the 6300
Series Wall Mount Kit (optional accessory). The 6300 Series Wall
Mount Kit is designed to be used with all 6300 Series analog phones
allowing you to easily and securely mount your phone in one of two
ways:
• Directly to the wall.
• On top of an existing telco wall plate.
NOTE: Se
e the 6300 Series Wall Mount Kit Installation Guide for
additional product and installation details.
 Loading...