(2) Unit ON/OFF button
When the remote control batteries become weak, or if the remote control is lost or malfunctioning, this button may be used to turn the
unit on and off.
(a) Operation
Push the button once to place the unit in the automatic mode. Push it once more to turn the unit off.
(b) Details of operation
The unit will go into the automatic mode in which it automatically determines, from room temperature (as detected by sensor),
whether to go into the cooling, thermal dry or heating modes.
(3) Auto restart function
(a)
A
uto restart function records the operational status of the air-conditioner immediately prior to be switched off by a power cut,
and then automatically resumes operations after the power has been restored.
(b)
The following settings will be cancelled:
(i)
Timer settings
(ii)
HIGH POWER operations
Notes (1) Auto restart function is set at on when the air-conditioner is shipped from the factory. Consult
with your dealer if this function needs to be switched off.
(2) When power failure ocurrs, the timer setting is cancelled. Once power is resumed, reset the timer.
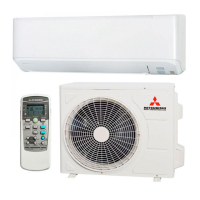
(3)
If the jumper wire (J1) “AUTO RESTART” is cut, auto restart is disabled. (See the diagram at right)
(4) Custom cord switching procedure
If two wireless remote control are installed in one room, in order to prevent wrong operation
due to mixed signals, please modify the printed circuit board in the indoor unit’s control box
and the remote control using the following procedure. Be sure to modify both boards. If
only one board is modied, receiving (and operation) cannot be done.
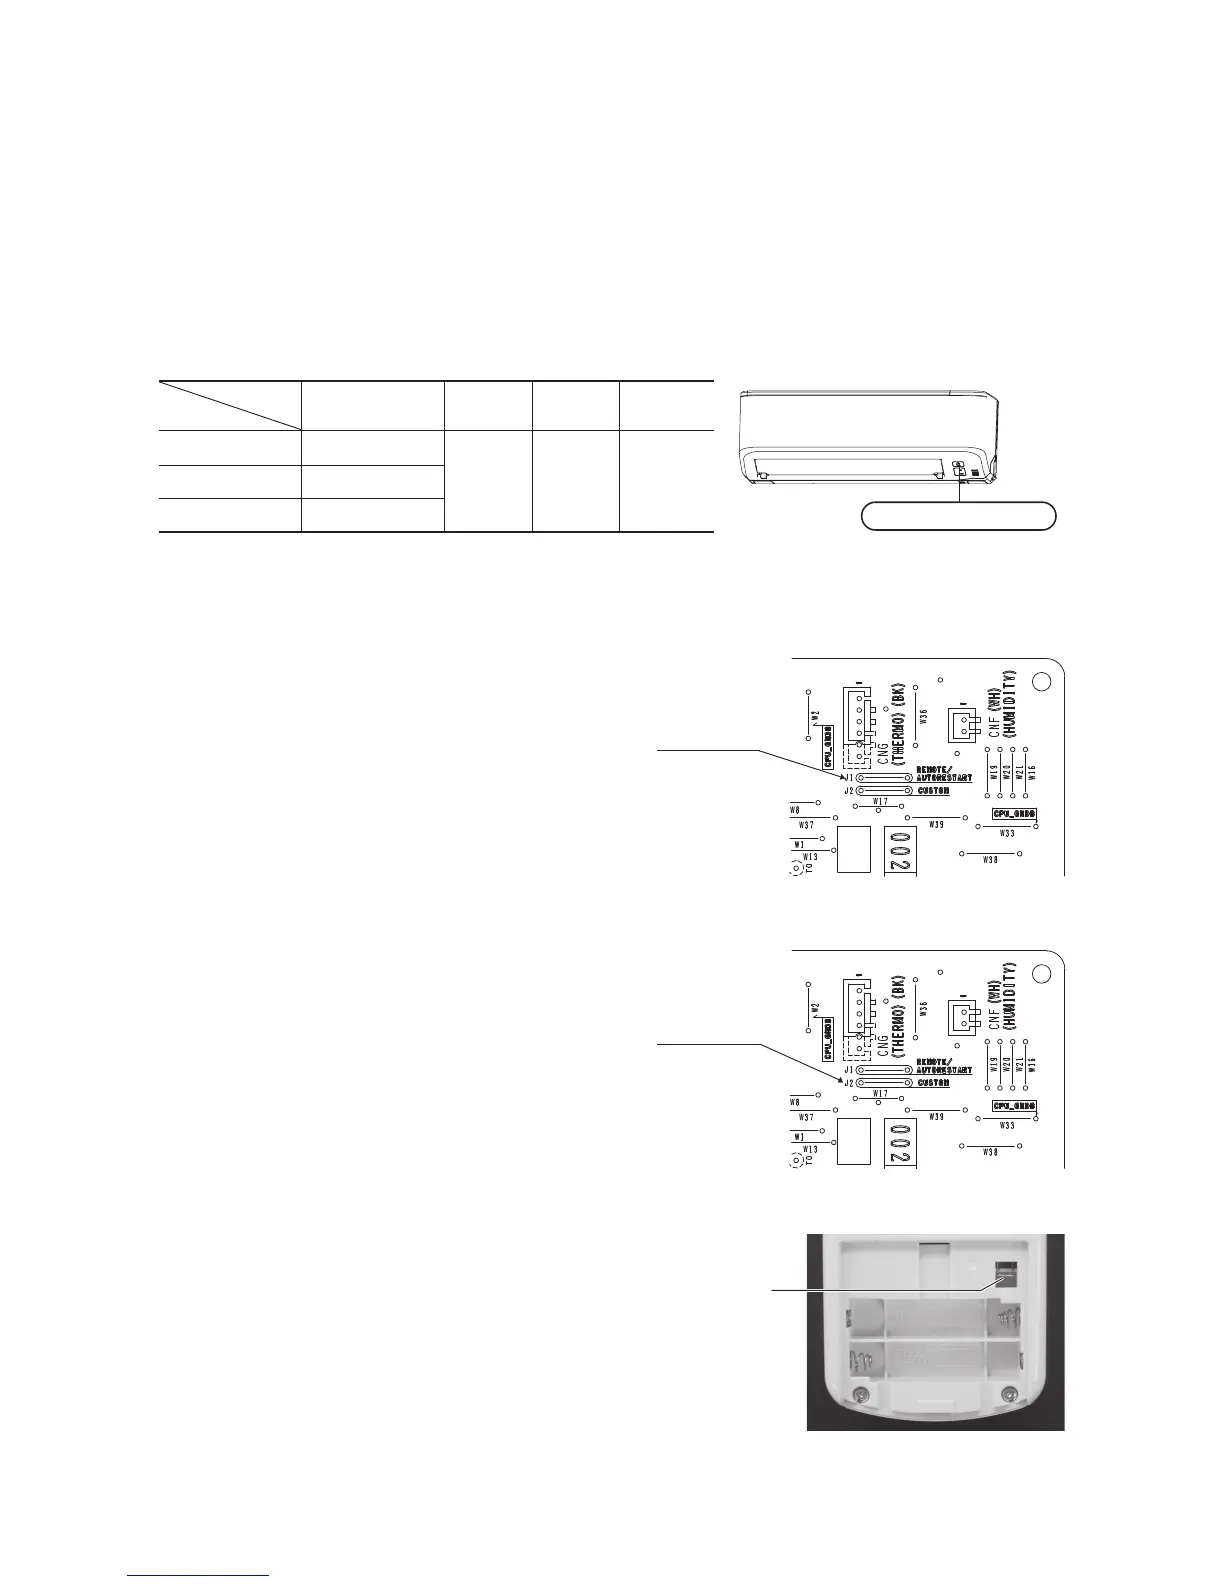
(a) Modifying the indoor unit’s printed circuit board
Take out the printed circuit board from the control box and cut off jumper wire (J2)
using wire cutters.
After cutting of the jumper wire, take measures to prevent contact with the other the lead
wires, etc.
(b) Modifying the wireless remote control
(i)
Remove the battery.
(ii)
Cut the jumper wire shown in the gure at right.
Jumper wire (J1)
Jumper wire (J2)
– 6 –
NOTE
• Do not use old and new batteries together.
• Remove the batteries when the remote control is not used for a long period.
•
The recommended effective period of a battery conforming to JIS or IEC should
be 6 to 12 months with normal use. If used longer, or when an unspecified
battery is used, liquid may leak from the battery, causing the remote control to
malfunction.
• The recommended effective period is printed on the battery. This may be
shorter due to manufacturering time to the unit. However, the battery may
still be in working order after expiry of its nominal life.
Pull out the cover and take
out old batteries.
Insert new batteries. R03
(AAA, Micro) x2
Close the cover.
■ When the display shows any abnormal condition, Press the ACL switch with
the tip of a ballpoint pen.
1
2
3
Pay attention to
the ª and ·
marks
Press the ACL switch with
the tip of a ballpoint pen.
The timer setting mode is displayed.
Page 7
4
Using the remote control holder
The remote control can be attached to a wall or pillar
by using a remote control holder. Before installing the
remote control, check that the air-conditioner receives
the signals properly.
For installing or removing the remote control, move it
up or down in the holder.
• Are the batteries running down?
“Replacing the batteries” above.
Replace the batteries with new ones and retry the operation.
Warning note for remote control handling
Operation failure with the remote control
• If the operation fails, operate the unit
with temporary operation function.
Contact your dealer to have the remote control
checked.
Below
Strictly prohibited
• Do not drop the remote control.
Handle with care.
• Do not go near high temperature
places, such as an electric carpet
or stove.
• Do not place heavy objects on the
remote control, or step on it.
• Do not put any obstructing obsta-
cles between the remote control
and the unit.
• Do not spill any liquid on the
remote control.
• Do not leave the remote control ex-
posed to direct sunlight or other
strong lighting.
Temporary run operation
• The unit ON/OFF button on the unit operates ON/OFF temporarily when the remote control is not used.
Operation program
• OPERATION MODE : AUTO
• FAN SPEED : AUTO
• AIR FLOW : AUTO
• Operation starts by pressing the unit ON/OFF button; it stops if you press
the button again.
• Do not hold the Unit ON/OFF button down for more than 5 seconds.
(Holding it down longer than 5 seconds sets the automatic cooling used during servicing or when relocating the air-conditioner.)
NOTE
Unit ON/OFF button
Remote control handling
Replacing the batteries
The following cases signify exhausted batteries. Replace old batteries with new ones.
• Receiving beep is not emitted when a signal is transmitted.
• Display fades away.
RLC012A002_EN_001-020 11/13/12, 11:39 AM6
 Loading...