EN
21
File operations: This button navigates to the
le operations page.
System info: This button displays the system
version and software information.
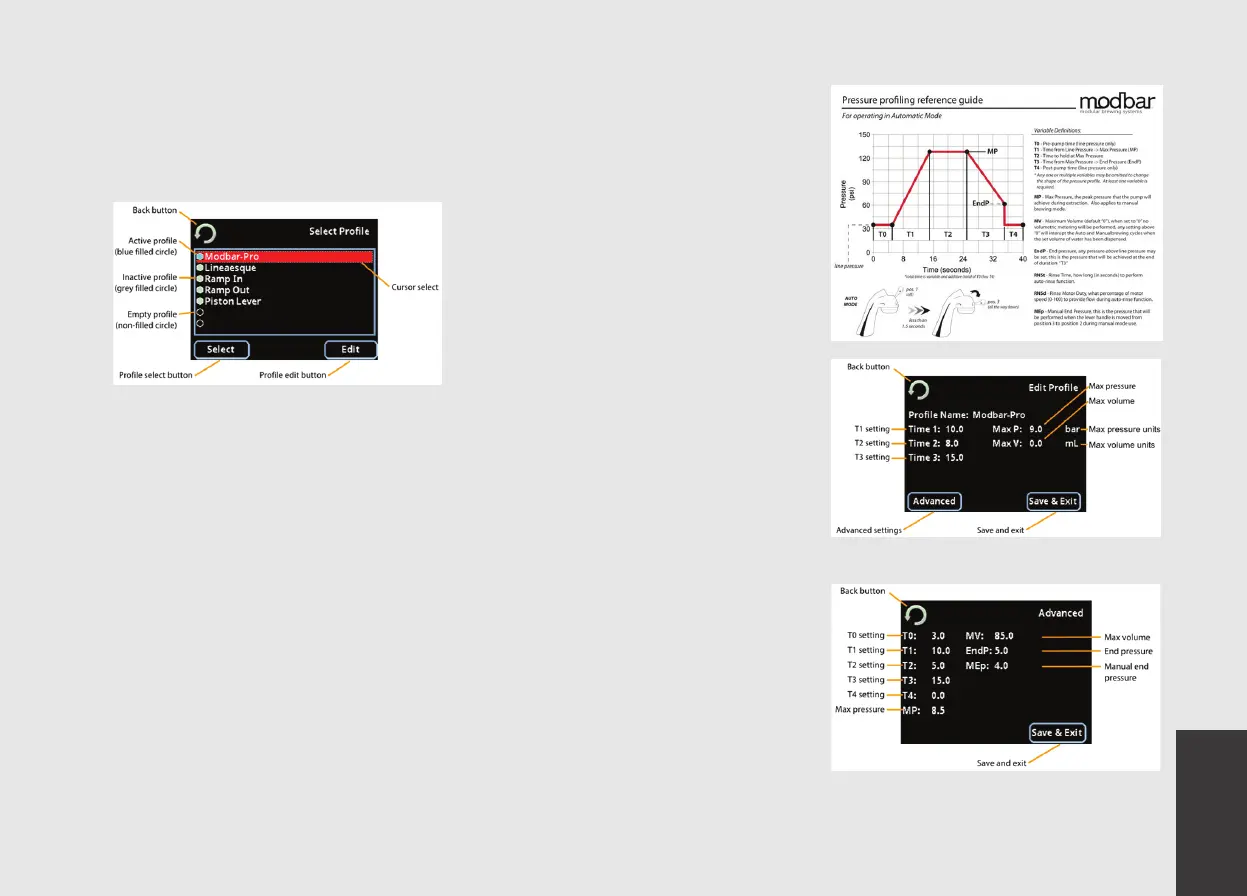
3) Prole Selection Screen:
Back button: Wherever you see the back
button it will take you to the previous
screen.
Active prole: This is the prole that is active
and is used when the espresso tap lever
is positioned to the Automatic brewing
position, indicated by the blue lled circle.
Inactive prole: This is a prole that has prole
information but is not active, indicated by
a purple/grey lled circle.
Empty prole: These are empty prole slots
and may not be used until proling data is
entered. Empty proles are indicated by a
non-lled circle.
Prole select: Pressing prole select will set
the current cursor selected prole to the
active prole.
Prole edit: Press the prole edit button to
edit the prole data for the current cursor
selected prole.
Cursor select: The dotted outline cursor select
indicates which prole is selected on screen.
You may use the rotary encoder or up/down
function of the joystick to navigate the
proles list. Pressing the pushbutton will
activate a selected prole.
Tip: When selecting a prole, this menu is also
duplicated on the tap display. Depending
the installed distance between the module
and tap, it is possible to navigate the menu
from the tap screen and scroll through the
proles using the encoder button. Pressing
the center encoder button selects the prole
highlighted on the tap. The center encoder
button also navigates to the prole selection
menu from the home screen.
4) Pressure proling:
The pressure proling capability of the
Modbar espresso system can be programmed
in “simple” or “advanced” modes, each of
which have their own settings screen. It is
important to understand the variables, their
denitions, and how they work together
to design successful proles that provide
desirable extraction characteristics.
The system is quite extensive and is capable
of simulating almost any espresso machine
or pressure condition available on the
market today.
Study of the following reference guide will
allow you to successfully use the simple and
advanced programming menu interfaces
that follow:
5) Prole edit screen (simple):
6) Prole edit screen (advanced):