EasyManua.ls Logo

Moen S73709 User Manual

Moen S73709
8 pages
To Next Page IconTo Next Page
Page #1 background imageLoading...
Page #1 background image
Installation Guide
Guía de Instalación
Guide d’installation
INS10200 - 1/14
Please Contact Moen First
For Installation Help, Missing or
Replacement Parts
(USA)
1-800-BUY-MOEN (1-800-289-6636)
Mon - Fri 8:00 AM to 7:00 PM, Eastern
Sat. 9:00 AM to 3:00 PM Eastern
WWW.MOEN.COM
(Canada)
1-800-465-6130
Mon - Fri 7:30 AM to 7:00 PM, Eastern
WWW.MOEN.CA
Por favor, contáctese primero con Moen
Para obtener ayuda de instalación, piezas
faltantes o de recambio
01-800-718-4345
Lunes a viernes de 8:00 a 20:00 hs.
(Costa Este)
Sáb. 8:00 a 18:30 hs. (Costa Este)
WWW.MOEN.MX
Veuillez d’abord contacter Moen
en cas de problèmes avec l’installation, ou pour
obtenir toute pièce manquante ou de rechange
1-800-465-6130
Du lundi au vendredi:
de 7 h 30 à 19 h, HE
WWW.MOEN.CA
HERRAMIENTAS ÚTILES
Para que el cambio de la llave sea fácil y
seguro, Moen le recomienda usar estas
útiles herramientas.
OUTILS UTILES
Par mesure de sécurité et pour faciliter
l’installation, Moen suggère l’utilisation des
outils suivants.
HELPFUL TOOLS
For safety and ease of faucet replacement,
Moen recommends the use of these
helpful tools.
ONE HANDLE PULLOUT KITCHEN FAUCET
MEZCLADORA MONOMANDO RETRÁCTIL
PARA COCINA
ROBINET DE CUISINE À BEC RÉTRACTABLE
ET UNE POIGNÉE
S73709
Question and Answer IconNeed help?

Do you have a question about the Moen S73709 and is the answer not in the manual?

Moen S73709 Specifications

General IconGeneral
Model NumberS73709
BrandMoen
FinishChrome
Handle TypeLever
Number of Handles1
Flow Rate1.5 GPM
WaterSense CertifiedYes
ADA CompliantYes
Mounting TypeDeck Mount
Spout Reach4.5 inches
StyleModern
Valve TypeCeramic Disc
Number of Holes Required1

Summary

Faucet Parts and Preparation

Caution: Remove Old Faucet Safely

Important safety tips for turning off water and relieving pressure before removing an old faucet.

Install Faucet Body and Mount

Mounting Options (Thin/Thick Deck)

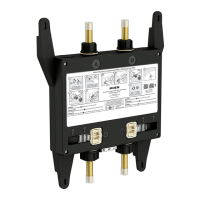
Details two options for mounting the faucet based on deck thickness, using support bracket and washer.

Hose Connection and Supply Lines

Connect Pullout Hose and Adapter

Connects the pullout hose to the quick connect adapter and tests engagement.

Install Hose Weight

Locates the hose weight mark and installs the hose weight on the pulldown hose.

Test Faucet and Check Leaks

Turns on the faucet for 15 seconds, turns it off, and checks for leaks.

Final Assembly and Hose Clearance

Ensure Hose Travel Clearance

Recommends maintaining a clear 8x8 inch area for hose and weight movement.

Troubleshooting and Flow Modes

Related product manuals