4
Review default factory configuraon sengs and make any
necessary changes—sample rates, triggers, alarms, etc. Be sure that
the me and date is set properly.
Click the “Send Config” buon under the Device Configuraon
secon of the window. Your data logger is now operaƟonal!
3.0 INSTALLATION
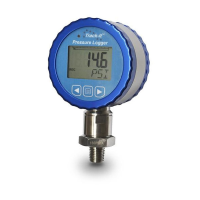
The logger can be ordered with various pressure sensor ranges to cover
most applicaons. Sensors have a ¼” NPT or ½”-NPT thread, dependent
on pressure range, that is intended to screw into the pressure source.
Make sure to use suitable tape or thread sealant/dope on the threads
before inserng the logger into the port. Use an adjustable wrench on
the SENSOR NUT to ghten the device into the port and test for leaks.
Once installed the dial can be rotated 300
degrees about the sensor to the intended
viewing direction. The gauge face can also be
rotated ±90 degrees by undoing the blue bezel,
lifting the front panel and associated electronics
and rotating it to the desired position. Ensure the
O-ring is in place before replacing the bezel. Do
not stress any of the internal wiring.
w ww . . co m
information@itm.com1.800.561.8187
 Loading...