(8) Return to measuring mode after finishing count down.
Note: Please make sure the transmitter has been energized for at
least one hour before attempting a gain calibration.
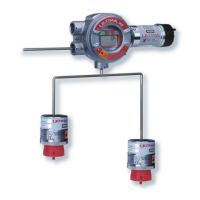
[M-03] -- Detector parameter view
This menu item displays the device information, including gas type, measuring
range, and firmware version.
(1) Press “+” to select the menu item M-03.
(2) Press the “ON” key and the scroll display will show “parameter name = parameter
value” which represent the name and content of the parameter displayed. Multiple
parameters can be displayed. Press the “+” or “-” on the submenu to select the
parameter you want to view (TEST GAS=..., SENSOR USED DAYS=..., GAS=...).
[M-04] -- Calibration parameter setting
This menu item is used to set some parameters that are needed when setting
operation and calibration of the instrument.
(1) Press “+” to select the menu item M-04.
(2) Press “ON” and the screen will display the menu for entering password.
(3) Enter the password (see Section 4.4).
(4) If the password is correct, you will enter the next submenu and be able to set
multiple numerous parameters. When you enter the next submenu, the scroll display
will display "parameter name = parameter value", which represents the name and
content of the parameter being set. You will be able to set multiple parameters. The
parameters (TEST GAS =..., CURRENT OFFSET=...) that need to change can be
selected by using “+” or “-” in this submenu item.
(5) When the parameters that need to be changed are addressed, press “ON” and
then the parameters will flicker to indicate that the device has enter the edit status.
(6) Change the parameters (see Table below).
(7) After the parameters are changed, you can continue to change other parameters
by pressing “+” or “-” , or return to the upper menu M-04 by pressing “OFF.”