Blade and Belt
7
Blades
The condition of the blades will greatly effect the quality of the cut.
The blades should be sharpened and balanced after every hour of cutting, depending on local conditions. A dull
blade tears the grass instead of cutting it. Torn grass blades leaves a rough look and makes the grass vulnerable to
diseases.
Blades need to be examined for damage before sharpening. Blades must be balanced after sharpening to
reduce the vibrations felt from the deck.
Bent blades are a sign of a blade impact. The blades must be replaced and the engine inspected for a bent
crankshaft if a bent blade is found.
Blades come in a variety of styles; side discharge, mulching, bagging, combination, there are even de-thatching
blades on the market. The A and B Series mowers come equipped with a 3-in-1 blade from the factory. The outer part
of the leading edge cuts the grass. A wing on the back edge lifts the grass for the next blade and propels clippings
toward the bag or side discharge chute if the path to either is open. A stepped-up cutting edge just in-board of the
outer cutting edge mulches clippings as they fall, if the side and/or rear discharge chute(s) are closed and the mulch
plug is in place.
The air flow in the cutting deck is generated by the spinning blades. If the blades are mounted upside down, the
air flow will be reversed pushing the grass down instead of standing up.
NOTE: Blades that are mounted upside down, increase the risk of impacting an object.
Blade removal
To remove the cutting blade:
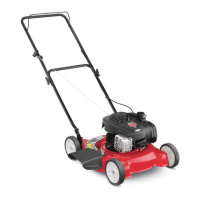
1. Tip the mower with the muffler side down, or tilt the
mower back on a work bench, with the front wheels
up. See Figure 2.1.
2. Block the blade from rotating using a block of wood
or a blade holder tool.
NOTE: MTD blade holding tool, part number 490-850-
0005, can be used block the blade. See Figure 2.1.
An incorrect or improperly mounted blade can crate a thrown object hazard.
! CAUTION! CAUTION
Figure 2.1
490-850-0005
! WARNING! WARNING
Allow the engine to cool.
Disconnect and ground
the spark plug wire.
Drain the fuel into an approved container.
CHAPTER 2: BLADE AND BELT