PART NO. 769-05575 P00 (1/10)
Quick Instructions to
Replace SplitLine
®
Trimmer Line
For replacement line, call
1-800-800-7310 or go to an
authorized service dealer.
For complete line installation,
refer to Line Replacement
replacement section of the
unit’s manual.
Quick Instructions
to Start Engine
for complete instructions, refer to the
Starting/ Stopping Instructions of the
unit’s manual.
Quick Instructions to
Assemble The Unit
for complete instructions, refer to the
Assembly Instructions of the unit’s
manual.
IMPORTANT: READ OPERATOR’S MANUAL THOROUGHLY AND FOLLOW THE SAFE OPERATION PRACTICES BEFORE OPERATING THE UNIT.
Min. 6”
Read and understand all instruction, warning and danger labels on the unit.
Remove the cap from the
boom. Push the bottom add-on
into the coupler. Turn the knob
clockwise to tighten.
Install the handle a minimum of
6 inches from the grip. Do not
tighten the screws until you have
held the unit in the operating
position and have adjusted the
handle to give you the best grip.
Tip unit so that the back of the engine
is facing up in a vertical position.
Remove the oil fill plug from the
crankcase and pour the entire bottle
of 4-cycle oil into the oil fill hole.
NOTE: Do not mix gas and oil
Insert 10' of 0.095"SplitLine
®
through
hole in top of reel. Pull most of line
through hole until 3"-4" remains.
Wind line tightly in direction of arrow.
Split other end of SplitLine
®
back 6"-7".
Push 6"-7" ends into
0.095" holding slots.
Insert or slide lines into the
eyelets in spool. Insert spring
and reel into spool.
Pull lines firmly to release
from holding slots.
Bend short end and push it
into the other hole. Pull tight.
Bump
Knob
Inner
Reel
Spool
Spring
Unscrew bump knob
counterclockwise. Remove
inner reel and spring.
3
"
-4
"
Hold the inner reel in place.
Tighten Bump Knob
clockwise.
Press the primer
bulb 10 times, or
until fuel is visible.
DO NOT sqeeze the
throttle control.
Pull the starter rope in
a controlled motion
until unit starts.
Then squeeze the throttle for an
additional 30 to 60 seconds to
let the engine warm up. The unit
may be used during this time.
Crouch in the
starting position.
Check oil level and fill
fuel tank with fresh fuel.
For weather conditions below 40º F
only! Flip the Cold Weather Start
Lever down to the start position
Primer
Bulb
10 X
Start
Wait
60 seconds.
DIDN’T START?
Repeat these instructions
or consult operator’s manual.
NOTE: If the unit is hot and fails to
start within 3 pulls of the rope,
squeeze the throttle control and pull
the rope until the unit starts.
Slide the shield’s slot onto the
mounting bracket. Rotate the
shield onto the shaft. Push
square bolt through shield
and bracket. Tighten washer
and wing nut onto bolt.
Slot
Bracket
Español — Page 10 English — Page 2Français — Page 6
Operator’s Manual
DO NOT RETURN THIS PRODUCT
For Assistance please call 1-800-800-7310 (U.S.) or 1-800-668-1238 (Canada)
or visit www.mtdproducts.com or www.mtdproducts.ca
NEED HELP? CALL 1-800-800-7310 IN U.S. OR 1–800–668–1238 IN CANADA
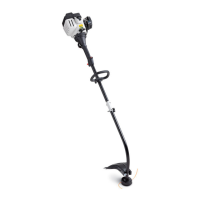
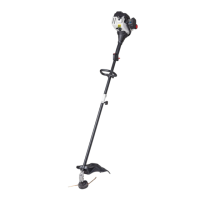
MP425
4-Cycle Trimmer