BEFORE FIRST USE
CLEAN
● Remove any packaging and protective films.
● Remove any residue oil or grease from the manufacturing process:
COOKTOP: Wash the removable parts (Burner Grates, Griddle, Burner Caps and
Burner Heads) of the cooktop in a mild solution of warm water and liquid dish soap.
Dry thoroughly. Wipe the cooktop surface with a damp cloth and dry thoroughly.
Assemble the burner parts in the correct order. (See ‘COMPONENT PART ASSEM-
BLY’.)
OVEN: Wash the oven racks in a mild solution of warm water and liquid dish soap and
dry. Wipe down the interior of the oven and the Oven Rack Guides with a clean damp
cloth. Dry thoroughly before installing the parts. (See ‘COMPONENT PART ASSEM-
BLY’.)
IMPORTANT: The oven and broiler should be turned on to burn off the manufacturing
oils. Turn Oven 1 to 450°F and Oven 2 to 500°F for 20 to 30 minutes. Then turn Oven
2 to ‘BROIL’ for the same length of time. You may wish to turn on the ventilator above
your range at this time. Turn the ovens off and allow to cool with the door closed.
CHECK
● Check for gas leaks at all gas connections (using a gas detector, never a flame).
● Check ignition of cooktop burners.
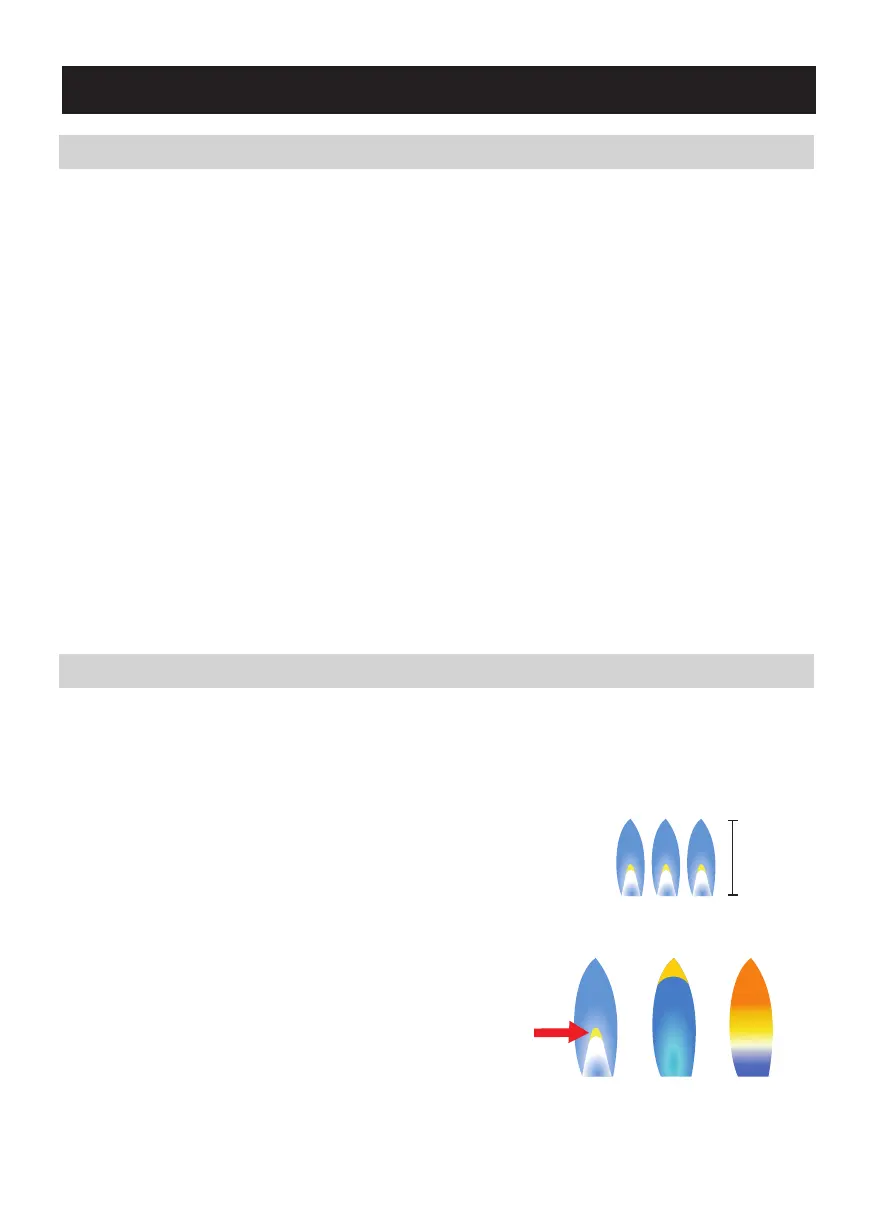
● Check the flame. When properly installed, the flame will be steady and quiet and
approximately 1” in height.
To light the surface burners, push and turn the corre-
sponding Burner Control Knob counterclockwise to
the ‘IGNITE’ position. You will hear a clicking noise –
the sound of the electric spark igniting the burner.
IMPORTANT: When one burner is turned to the
‘IGNITE’ position, all the burners will spark. Do not
touch any burner cap, burner base, or igniter while the
igniters are sparking. Do not attempt to disassemble
or clean around any burner while another burner is on.
When a flame is visible, keep the Burner Control Knob
pressed and continue to turn the knob counterclock-
wise to adjust the flame size. If the knob stays at
‘IGNITE’, it will continue to click.
The burner can be continuously regulated between
highest and lowest flame.
Note: The outer flame of the Double Burner will go out
when the Burner Knob is rotated to simmer (SIM).
Rotate clockwise to re-ignite the outer flame.
To turn OFF, turn the Burner Control Knob clockwise
back to the dot/off position. The gas supply will stop
and the flame will go out.
● Check ignition of oven burner.
● Visually check heating elements of both ovens. Carefully lift the panel on the interi-
or floor of each oven. Turn on the ovens to check the heating elements heat fully. Turn
off ovens and allow to cool before returning the floor panels.
● Visually check the broil heating element of Oven 2.
● Check operation of convection fan of Oven 2.
IMPORTANT:
● Metal components have a protective coating which may give off a slight odor the
first time your new appliance is heated.
● The harmless odor will dissipate after a short time and does not indicate a faulty
connection or appliance defect.
20
A B C
NG LP
Yellow at tip of
primary flame
1”
Service
Required
When burning natural gas (NG), the burner
flames should be sharp and almost completely
blue with possibly a small hint of yellow in the
center of the flame as seen in figure ‘A’.
When burning liquid propane (LP), the flames
will usually have a yellow tip as seen in figure ‘B’.
If the flame is mostly yellow in color as seen in
figure ‘C’, this indicates a problem. Discontinue
use and seek assistance from a licensed gas
service. Note: foreign material in the gas line
may cause an orange flame during initial opera-
tion.