This document is a service manual for the NAD 602 Cassette Deck, providing comprehensive information for its maintenance, repair, and optimal operation.
The NAD 602 is a stereo cassette deck designed for high-fidelity audio recording and playback. Its primary function is to record audio onto magnetic tape cassettes and play back pre-recorded or user-recorded cassettes. The deck is equipped with features that allow for precise control over the recording and playback process, ensuring quality audio performance.
Usage Features:
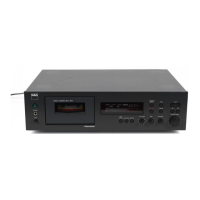
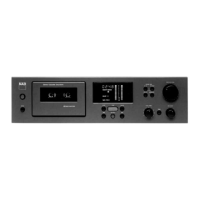
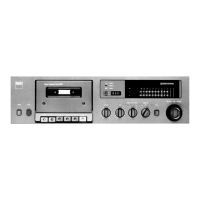
The front panel of the NAD 602 offers a user-friendly interface with a range of controls for various functions.
- Power: A dedicated button to turn the unit on and off.
- Cassette Compartment: The main bay where audio cassettes are inserted for recording or playback. An "Open" button facilitates access to this compartment.
- Transport Controls: Standard controls include "Play" for playback, "Pause" to temporarily stop playback or recording, "Stop" to halt all transport functions, "Rewind<<" to quickly move the tape backward, and "Fast Forward>>" to quickly move the tape forward.
- Recording Functionality: A "Record" button initiates the recording process. The "Record Level" knob, along with a "Balance" knob, allows users to adjust the input audio level and balance between left and right channels during recording, crucial for preventing distortion and achieving optimal sound.
- Dolby Noise Reduction: A "Dolby" button enables or disables Dolby noise reduction, which helps to reduce tape hiss during recording and playback, improving the signal-to-noise ratio. The manual indicates support for Dolby B and Dolby C, offering different levels of noise reduction.
- Play Trim: A "Play Trim" control is available, which can be used to fine-tune the high-frequency response during playback, compensating for variations in tape formulations or recording conditions.
- Display and Counter: The unit features a "Display" and a "Tape Counter" to show relevant information, such as elapsed tape time or counter units. A "Reset" button is provided for the tape counter.
The rear panel of the NAD 602 includes essential connections for integrating the deck into an audio system.
- AC Line Cord: For connecting the unit to mains power.
- Output: Audio output jacks (likely RCA) to connect the cassette deck to an amplifier or receiver for playback.
- Input: Audio input jacks (likely RCA) to connect audio sources (e.g., a CD player, turntable pre-amp, or mixer) to the cassette deck for recording.
Maintenance Features:
The service manual provides detailed instructions and diagrams essential for maintaining the NAD 602 in optimal working condition.
- Disassembly Instructions: Clear steps are outlined for removing the top cover, including specific screw types and locations, to access internal components for service. This is crucial for technicians to perform repairs or internal adjustments safely and correctly.
- Alignment Method: This section is vital for ensuring the deck's performance. It covers:
- Tape Speed Adjustment: Instructions for connecting a wow and flutter meter or frequency counter and adjusting a semi-variable resistor to achieve the correct tape speed (e.g., 3kHz or 3.15kHz).
- Azimuth Adjustment: Guidance on using a VTVM or oscilloscope to adjust the azimuth screw for maximum output and in-phase signals, ensuring proper head alignment for optimal high-frequency reproduction.
- Playback EQ Adjustment: Procedures for adjusting playback equalization (EQ) after head replacement or repairs to the head amplifier circuit, using specific test tapes and adjusting potentiometers for identical output at specified frequencies.
- Playback High Frequency EQ Adjustment: Detailed steps for fine-tuning high-frequency playback response, involving cutting and connecting specific links on the PCB to adjust the level at 14kHz relative to 400Hz.
- Playback Level Adjustment: Instructions for setting the Dolby NR level using a test tape and adjusting potentiometers for the correct RMS voltage.
- Bias Trap Adjustment: Procedure for minimizing bias leakage during recording by adjusting inductors with a blank tape.
- Record Level Adjustment: Steps for calibrating recording levels using an audio oscillator and adjusting potentiometers to ensure recorded levels match playback levels.
- Bias Adjust (Type I, II, and IV Tapes): Comprehensive instructions for adjusting bias for different tape types (Normal, CrO2, Metal) to achieve flat frequency response during recording and playback. This involves recording and playing back specific frequencies (400Hz, 6.3kHz, 14kHz) and adjusting potentiometers to ensure consistent levels across the frequency range. The manual emphasizes the importance of these adjustments for accurate Dolby NR tracking.
- Peaking Circuit Adjustment: For Type I tapes, this involves adjusting the peaking circuit for 14kHz signals to match the 400Hz signal level, compensating for high-frequency losses.
- Troubleshooting Guide: A flowchart-based guide helps diagnose common issues, such as power problems, transport malfunctions (e.g., tape not playing, mechanism locked), and audio signal path issues (e.g., no signal, level meter not lighting up). It directs technicians to check specific components, voltages, and switches.
- Schematic Diagrams and PCB Layouts: Detailed schematic diagrams for the main PCB and display PCB, along with corresponding PCB layouts, are provided. These are indispensable for understanding the circuit design, identifying components, and tracing signal paths, which is critical for advanced troubleshooting and component replacement.
- Exploded Views and Parts Lists: Exploded diagrams of the entire unit and its mechanism, coupled with comprehensive parts lists, allow technicians to identify and order specific replacement parts. This includes mechanical components, electronic parts, and fasteners, ensuring that repairs can be performed with the correct components.
The NAD 602 Cassette Deck is designed for enthusiasts who appreciate precise control over their audio recording and playback experience, backed by thorough service documentation to ensure its longevity and performance.