Do you have a question about the Nakamichi 582 and is the answer not in the manual?
All safety and operating instructions should be read before operation.
Safety and operating instructions should be retained for future reference.
All warnings on the appliance and instructions must be adhered to.
All operating and use instructions should be followed.
Do not expose appliance to rain or moisture.
Ensure proper ventilation; do not block openings.
Site away from heat sources like radiators.
Connect only to the specified power supply type.
Ensure grounding/polarization means are not defeated.
Route power cords to prevent damage from pinching or walking.
Clean appliance only as recommended by manufacturer.
Unplug appliance when left unused for a long period.
Prevent objects falling or liquids spilling into the enclosure.
Appliance requires service if cord, plug, or internal parts are damaged.
User should not attempt service beyond instructions; refer to qualified personnel.
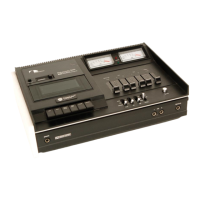
Cover for access to heads, capstans, pressure rollers for maintenance.
Ejects the cassette smoothly via a pneumatic damper.
Ensures cassette alignment for insertion; see-thru design.
Accepts standard 1/4-inch diameter stereophone plug.
Factory-calibrated adjustments; should only be made by qualified service technicians.
For noise-free stopping and cueing in rewind/fast-forward modes.
Puts the 582 into record mode.
Moves tape rapidly in the forward direction.
Moves tape rapidly in the reverse direction.
Stops transport from any mode; head assembly retracts.
Starts transport motion forward at standard speed.
Controls output level during record/playback; no effect on record levels.
Controls relative balance between left and right inputs.
Controls input (record) levels for left and right channels.
Activates the 582; illuminates meters and compartment.
Selects input signal ("source") or playback signal ("tape") for monitoring.
Activates Dolby NR and MPX filter for FM stereo broadcasts.
Indicate peak program levels from -40 to +7 dB.
Selects one of two built-in test tone oscillators for calibration.
Selects 120 or 70 microseconds equalization for optimum tape performance.
Selects sensitivity and bias level for different tape types.
Enables memory for re-locating points or unattended recording/playback.
Screwdriver adjustments for record bias current using 15 kHz test tone.
Screwdriver adjustments for record level calibration using 400 Hz test tone.
Indicates relative position of tape; used for indexing selections.
Resets the tape counter to 000.
Connects left input signal.
Connects right input signal.
DIN connector for audio input/output.
Connects right audio output signal.
Connects left audio output signal.
Provides regulated 10 Volts DC to power Nakamichi Black Box components.
Socket for optional RM-200 Remote Control unit.
Standard power cord.
AC voltage selector for different countries; may be absent.
Avoid heat, direct sunlight, dust, or moisture for safe operation.
Ensure switch is "off" or "Memory" to prevent accidental recording.
Keep Test Tone switch "off" for normal recording/playback.
Insert cassette with exposed tape facing down to avoid damage.
Connect using RCA plugs to preamplifier/amplifier/receiver.
Connect using DIN cable to preamplifier/amplifier/receiver.
Standard stereo headphones connect to the front jack.
Powers Nakamichi BlackBox Series components; requires specific DC power cord.
Power on the unit; compartment and meters will illuminate.
Use pencil/finger to tighten tape for proper contact.
Push eject button to open the lid.
Load cassette with tape facing down; close lid.
Set Eq switch (20) for tape type; tape selector has no playback effect.
Set Dolby NR switch (17) "in" for Dolby-encoded tapes.
Set monitor switch (16) to "tape" position.
Press play button (11) to start tape motion.
Press pause/cue button (6) to stop; press play again to resume.
Press stop button (10) to stop; eject with eject button (2).
Important operational notes for playback mode.
Power on unit; compartment and meters illuminate.
Ensure tape is snug for proper contact with capstans/rollers.
Push eject button (2) to open lid.
Load cassette with tape down; close lid.
Set Eq (20) and Tape (21) switches per tape type; consider calibration.
Set Dolby NR (17) "in" for low-noise recording; label tape.
Use "Mpx" for FM stereo to prevent 19 KHz carrier interference.
Press reset button (26) to set counter to 000.
Press play (11) to start recording; stop at count 003.
Set monitor switch (16) to "source" for setting levels.
Use input level control (14) and peak level meter for setting record levels.
Press and hold record (7), then press pause/cue (6); red lamp indicates mode.
Press play button (11) to start recording once levels are set.
Press pause/cue (6) to pause; press play (11) to resume.
Press stop (10); return Dolby NR/MPX switch (17) to normal.
Monitor playback signal by setting monitor switch (16) to "tape".
Remove tabs to protect recordings from accidental erasure.
Guidance on setting record levels for optimal sound quality and tape usage.
Method for re-locating tape points or unattended recording/playback.
Enables unattended recordings or playback using an external timer.
Detailed steps for adjusting record head azimuth using test tone.
Important notes and warnings regarding azimuth adjustment procedure.
Steps for calibrating record levels using the 400 Hz test tone.
Steps for adjusting bias using the 15 kHz test tone.
Important notes regarding record calibration and bias adjustment process.
Explains the importance of level calibration for Dolby system compatibility.
Procedure for cleaning heads, capstans, and pressure rollers.
Specific instructions and cautions for cleaning internal parts.
Moving parts use oil-less bearings; periodic lubrication not necessary.
How to clean the front panel using mild detergent.
Factory-calibrated head height; readjustment by qualified technicians only.
Consult dealer for service; do not attempt user repairs.
Issues with tape not moving, causes, and solutions.
Problems preventing recording, potential causes, and remedies.
Issues with playback functionality, causes, and solutions.
Solutions for excessive noise during playback.
Causes and remedies for distorted audio playback.
Causes and solutions for irregular tape movement.
Problems with incomplete erasure of tape content.
Reasons for reduced high-frequency response and how to fix.
Causes and remedies for hum noise.
| Track System | 4-track, 2-channel stereo |
|---|---|
| Tape Speed | 4.76 cm/s |
| Output | 0.5 V (line) |
| Type | 3-head cassette deck |
| Frequency Response | 20 Hz to 20 kHz (Metal tape) |
| Heads | 1 x record, 1 x playback, 1 x erase |
| Tape Type | Normal, CrO2, Metal |
| Noise Reduction | Dolby B |
| Input | 50mV (line) |
| Motor | 1 x capstan, 1 x reel, 1 x mechanism |