Do you have a question about the NDS DTB01 and is the answer not in the manual?
The NDS DISPLAY BUS (DTB01) is an optional controller designed to enhance the user interface for NDS devices that utilize the N-BUS communication protocol. It allows users to connect N-BUS devices to each other and to the data cable, enabling the DTB01 Display Bus to network and provide full power management of the NDS power system at your fingertips. The DTB01 can control all N-BUS equipped devices, such as Tempra Lithium Battery, Power Service PSB DC-DC, and Suncontrol2 SCE. Additionally, the DTB01 display can be used with the App for iOS and Android smartphones, if there is an NDS device with Bluetooth in the N-BUS network. It's important to note that NDS devices from previous generations are not compatible with DTB01, and only NDS devices with N-BUS can be monitored and controlled by DTB01.
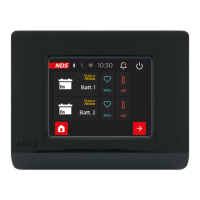
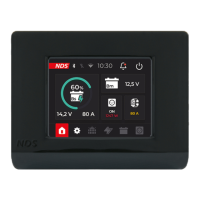
The DTB01 provides N-BUS device energy parameter monitoring, including the State of Charge (SoC) of Tempra battery, Solar Energy, and DC-DC charge when the vehicle is in motion. It offers accurate, real-time consumption monitoring and allows for the control of all N-BUS devices to activate or deactivate them, choose a charge curve, and select general settings. The display also shows voltage and ampere charge, along with the date and time.
The DTB01 features a touch screen display for intuitive operation. Installation involves removing the mounting frame, placing it on the wall, drilling holes for fixing screws (3mm diameter) and the communication cable (7.2mm diameter), drilling holes for the mounting frame, and passing the communication cable through the hole. The display is then fastened to the anchor bracket.
The initial setup guides the user through several steps:
The Home screen, accessible after completing the setting screens, displays key information such as battery charge percentage, voltage, current, and device status.
The Home screen consists of an upper status bar, a central part dedicated to device widgets, and a lower navigation bar (Tab Bar).
Users can set a customized charging curve for their batteries to match the manufacturer's requirements. This involves navigating to the settings menu from the home screen, selecting "Charging Profile," and then adjusting values for Vabs (Absorption voltage), Vfloat (Float voltage), Vstart (Starting voltage), Float (enables the float function), and Recondition (desulphation function, ideal for Lead/Acid batteries). Caution: Ensure the values are set correctly to avoid issues.
The settings menu allows users to select various options by ticking boxes, such as activating/deactivating Bluetooth or Silent Mode for Power Service PSB and SunControl2 SCE360. Sub-menus are available for Display settings, Battery, Charging Profile, Solar Panels, Date & Time, Language, and N-BUS devices.
Clicking on the battery icon on the tab bar displays all data of the TEMPRA batteries connected with the N-BUS. If two or more TEMPRA batteries are connected, a screen displaying information for each battery will be shown.
If a battery charger or DC-DC with N-BUS is present in the N-BUS network, the display will show the charging data of the leisure battery (voltage and current) and the voltage of the starter battery. The charging stage of the charger is also shown.
If SunControl2 (SCE320, SCE360) is present in the N-BUS network, clicking on the solar panel icon on the Tab Bar displays all data concerning the solar panels and the controller. During charging, the charge status of the leisure batteries is shown. Clicking on the History icon displays a history of the daily Ah and Wh values loaded by the SunControl2.
The manual emphasizes safety instructions, including:
This electronic product is subject to the European Directive 2012/19/EU. It must be disposed of in compliance with local waste disposal regulations. Do not dispose of old products with normal household waste. The proper disposal of products prevents potential negative consequences for the environment and for the population.