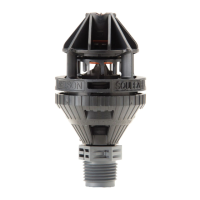
The Nelson R75 End of Pivot Sprinkler is designed for irrigation systems, offering detailed installation and performance specifications. This manual covers both the R75LP (low pressure) and R75 (standard pressure) models, along with their associated 7TN nozzles.
Function Description
The R75 End of Pivot Sprinkler is an irrigation device primarily used at the end of a pivot system to distribute water over a specified area. It is designed to be easily installed and adjusted to achieve desired coverage. The sprinkler operates by threading in a nozzle, which then directs water flow. A shift lever mechanism allows for arc adjustment, enabling users to customize the coverage area. The device is engineered to deliver consistent water distribution, with performance varying based on pressure, nozzle size, and environmental factors.
Important Technical Specifications
Models and Pressure Ranges:
- R75LP (#11936-002): Operates at 25-40 psi (1.75-2.75 bar).
- R75 (#11936-001): Operates at 40-60 psi (2.75-4.00 bar).
Nozzles:
The sprinkler uses 7TN Nozzles (#12178-xxx), which are ordered separately. Available nozzle sizes and their corresponding colors are:
- #052 (13/32") Beige
- #056 (7/16") Red
- #060 (15/32") Yellow
- #064 (1/2") Green
- #068 (17/32") Blue
- #072 (9/16") White
Performance Data (U.S. Units):
The manual provides extensive performance tables detailing flow rates (gpm) and radius (ft) for various pressures (psi) and nozzle sizes.
-
R75LP (25-40 psi):
- Nozzle #52 (13/32"): Flow ranges from 23.6 gpm (25 psi) to 30.0 gpm (40 psi), with radii from 49.0 ft to 54.0 ft.
- Nozzle #56 (7/16"): Flow ranges from 27.3 gpm (25 psi) to 34.6 gpm (40 psi), with radii from 51.0 ft to 56.0 ft.
- Nozzle #60 (15/32"): Flow ranges from 31.2 gpm (25 psi) to 39.7 gpm (40 psi), with radii from 53.0 ft to 56.0 ft.
- Nozzle #64 (1/2"): Flow ranges from 35.4 gpm (25 psi) to 44.9 gpm (40 psi), with radii from 55.0 ft to 59.0 ft.
- Nozzle #68 (17/32"): Flow ranges from 39.8 gpm (25 psi) to 50.6 gpm (40 psi), with radii from 55.0 ft to 60.0 ft.
- Nozzle #72 (9/16"): Flow ranges from 44.4 gpm (25 psi) to 56.4 gpm (40 psi), with radii from 56.0 ft to 61.0 ft.
-
R75 (40-60 psi):
- Nozzle #52 (13/32"): Flow ranges from 30.0 gpm (40 psi) to 36.8 gpm (60 psi), with radii from 57.0 ft to 59.0 ft.
- Nozzle #56 (7/16"): Flow ranges from 34.6 gpm (40 psi) to 42.7 gpm (60 psi), with radii from 59.0 ft to 62.0 ft.
- Nozzle #60 (15/32"): Flow ranges from 39.7 gpm (40 psi) to 48.8 gpm (60 psi), with radii from 61.0 ft to 65.0 ft.
- Nozzle #64 (1/2"): Flow ranges from 44.9 gpm (40 psi) to 55.0 gpm (60 psi), with radii from 65.0 ft to 69.0 ft.
- Nozzle #68 (17/32"): Flow ranges from 50.6 gpm (40 psi) to 61.9 gpm (60 psi), with radii from 65.0 ft to 68.0 ft.
- Nozzle #72 (9/16"): Flow ranges from 56.4 gpm (40 psi) to 69.2 gpm (60 psi), with radii from 64.0 ft to 67.0 ft.
Performance Data (Metric Units):
The manual also provides performance tables detailing flow rates (m³/h) and radius (m) for various pressures (bar) and nozzle sizes.
-
R75LP (1.75-2.75 bar):
- Nozzle #52 (13/32"): Flow ranges from 5.4 m³/h (1.75 bar) to 6.8 m³/h (2.75 bar), with radii from 14.9 m to 16.5 m.
- Nozzle #56 (7/16"): Flow ranges from 6.3 m³/h (1.75 bar) to 7.8 m³/h (2.75 bar), with radii from 15.5 m to 17.1 m.
- Nozzle #60 (15/32"): Flow ranges from 7.1 m³/h (1.75 bar) to 9.0 m³/h (2.75 bar), with radii from 16.2 m to 17.1 m.
- Nozzle #64 (1/2"): Flow ranges from 8.1 m³/h (1.75 bar) to 10.2 m³/h (2.75 bar), with radii from 16.8 m to 18.0 m.
- Nozzle #68 (17/32"): Flow ranges from 9.2 m³/h (1.75 bar) to 11.5 m³/h (2.75 bar), with radii from 16.8 m to 18.3 m.
- Nozzle #72 (9/16"): Flow ranges from 10.2 m³/h (1.75 bar) to 12.7 m³/h (2.75 bar), with radii from 17.1 m to 18.6 m.
-
R75 (2.75-4.00 bar):
- Nozzle #52 (13/32"): Flow ranges from 6.8 m³/h (2.75 bar) to 8.2 m³/h (4.00 bar), with radii from 17.4 m to 18.0 m.
- Nozzle #56 (7/16"): Flow ranges from 7.8 m³/h (2.75 bar) to 9.5 m³/h (4.00 bar), with radii from 18.0 m to 18.9 m.
- Nozzle #60 (15/32"): Flow ranges from 9.0 m³/h (2.75 bar) to 10.9 m³/h (4.00 bar), with radii from 18.6 m to 19.8 m.
- Nozzle #64 (1/2"): Flow ranges from 10.2 m³/h (2.75 bar) to 12.3 m³/h (4.00 bar), with radii from 19.8 m to 21.0 m.
- Nozzle #68 (17/32"): Flow ranges from 11.5 m³/h (2.75 bar) to 13.9 m³/h (4.00 bar), with radii from 19.8 m to 20.7 m.
- Nozzle #72 (9/16"): Flow ranges from 12.7 m³/h (2.75 bar) to 15.4 m³/h (4.00 bar), with radii from 19.5 m to 20.4 m.
Required Plumbing:
- A minimum of 6" (15.24 cm) of straight pipe before the sprinkler is required for optimal performance.
- Drainage is required.
- Poor entrance conditions (e.g., inadequate straight pipe length) can diminish performance.
Patents:
This sprinkler may be covered by U.S. Patent Numbers 6,814,305 and 6,827,291, and other U.S. Patents pending or corresponding issued or pending foreign patents.
Usage Features
Installation:
- Access Nozzle Area: Squeeze the tabs on the side of the plate assembly and pull to remove it, exposing the nozzle installation area.
- Install Nozzle: Thread in the chosen 7TN nozzle. It is crucial that the nozzle is installed before operation.
- Replace Plate Assembly: Replace the plate assembly, ensuring the shift lever is guided between its designated stops. A "CLICK!" sound indicates proper seating.
- Adjust Shift Lever: Verify that the shift lever is positioned between the stops. These stops can be adjusted to achieve the desired arc of coverage, allowing for customization of the irrigation pattern.
Operation:
- The sprinkler is designed for use in pivot irrigation systems, specifically at the end of the pivot.
- The shift lever provides a simple mechanism for adjusting the arc of coverage, enabling users to fine-tune water distribution to suit specific field requirements.
- Optimal performance is achieved under ideal test conditions; however, factors like wind and poor hydraulic entrance conditions can adversely affect performance.
Maintenance Features
Nozzle Replacement:
The design allows for easy removal and replacement of nozzles by simply squeezing the tabs on the plate assembly. This facilitates changing nozzle sizes to adjust flow rates and coverage or to replace worn nozzles.
Warranty:
Nelson Irrigation's End of Pivot Sprinklers are warranted for one year from the date of original sale. This warranty covers defective materials and workmanship when the products are used within their designed working specifications and under normal use and service. The manufacturer's liability is limited to the replacement or repair of defective parts. The warranty explicitly disclaims liability for installation, removal, unauthorized repair, crop damage, or other consequential damages. It also states that the warranty is in lieu of all other express or implied warranties, including those of merchantability and fitness for particular purposes. No agent, employee, or representative of the manufacturer has the authority to alter or add to the warranty provisions.