EasyManua.ls Logo

Nelson Traveling Sprinkler User Manual

Nelson Traveling Sprinkler
16 pages
To Next Page IconTo Next Page
Page #1 background imageLoading...
Page #1 background image
1. Assembling the spray arm
Tighten the black tee into
the top of the motor. Next,
insert spray arms in the
tee as far as they will go,
and then tighten the arm
retainer nuts untiI the
arms feel snug when you
twist them.
2. Pointing
the arms in
the right direction
It is important that the
arms are positioned
correctly; otherwise, the sprinkler won't move
properly or may not move at all.
Correct
Sprinkler will
Move forward
Wrong
Sprinkler will
move backwards
Wrong
Sprinkler will
not move
Wrong
Sprinkler will
not move
Once you have the spray arms pointing in the
right direction, adjust the angle of both arms to
throw the water from 15 to 55 feet.
To cover a
narrow 15 foot
path, point the
arms slightly
downward. Spin
the arms in a
clockwise circle
to make sure they
clear the sprinkler.
For maximum
55 foot
coverage,
turn the arms
upward to an
approximate
30 degree angle.
If it is very
windy, position
the arms
horizontally.
Don't point the
arms too far
downward, or
they will hit the sprinkler and get stuck in
one position.
1
Assembly and operating instructions for
your Nelson Traveling Sprinkler
Question and Answer IconNeed help?

Do you have a question about the Nelson Traveling Sprinkler and is the answer not in the manual?

Nelson Traveling Sprinkler Specifications

General IconGeneral
TypeTraveling Sprinkler
Automatic Shut-offYes
Hose CompatibilityStandard garden hose
MaterialPlastic
Coverage AreaUp to 13, 500 square feet
Power SourceWater pressure
Speed SettingsVariable

Summary

Assembling the Nelson Traveling Sprinkler

Assembling the Spray Arm

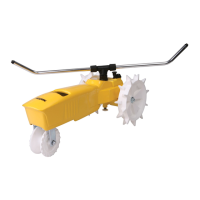
Tighten the black tee into the motor, insert spray arms, and secure with retainer nuts until snug.

Pointing the Arms Correctly

Ensure arms are positioned correctly for proper movement; adjust angle for water throw distance (15-55 ft).

Operating the Traveling Sprinkler

Laying Out the Hose

Lay out the hose path, avoid sharp turns, and create a 3-foot loop to prevent kinking.

Setting Up the Shut-Off Ramp

Snap the shut-off ramp onto the hose where you want the sprinkler to stop, ensuring 5 ft of straight hose on each side.

Connecting the Sprinkler

Position the sprinkler wheels over and straddling the hose correctly.

Setting the Speed

Select HIGH, LOW, or NEUTRAL speed to adjust travel rate and water application.

Starting the Sprinkler

Pull out the stopper, turn on the faucet, and ensure the sprinkler moves along the set hose pattern.

Sprinkler Maintenance and Repair

Stopping the Sprinkler

The stopper is pushed up by the ramp to shut off the sprinkler; reset it after repositioning.

Maintaining Your Sprinkler

Keep the filter washer clean, clean spray arms if flow is sluggish, and drain the sprinkler before storing.

Preventing Gear Stripping

Avoid pushing/pulling the sprinkler while operating or letting it bog down in wet conditions.

Removing Motor Assembly

Disassemble by removing spray arms, tee, motor assembly screws, body, and wheels/hubs.

Repair Instructions

Details on disassembling and reassembling various parts like body, selector, hubs, motor tee, and gears.

Parts and Warranty Information

Parts Price List

List of available parts with item numbers, descriptions, list prices, and order quantity.

Nelson Warranty

Two-year warranty covering defects; excludes damage from accident, misuse, or normal wear and tear.

Related product manuals