Keep batteries/batteries out of the reach of children. Do not
leave batteries within their reach as they may be swallowed by
them.
Guidelines for the power source of the appliance
• Replace the battery with a new one when the battery charge is
zero.
• Remove the battery/battery when the device is not in use for an
extended period of time.
• Do not use old and new batteries/batteries at the same time.
Mixing old and new batteries/batteries may result in
damage/leakage which may cause damage to the device.
• Rechargeable batteries/batteries should not be disposed of in
household waste, nor should they be thrown into fire or water.
Damaged or used batteries/batteries must be properly recycled
in accordance with the current directive on the disposal of
batteries and accumulators.
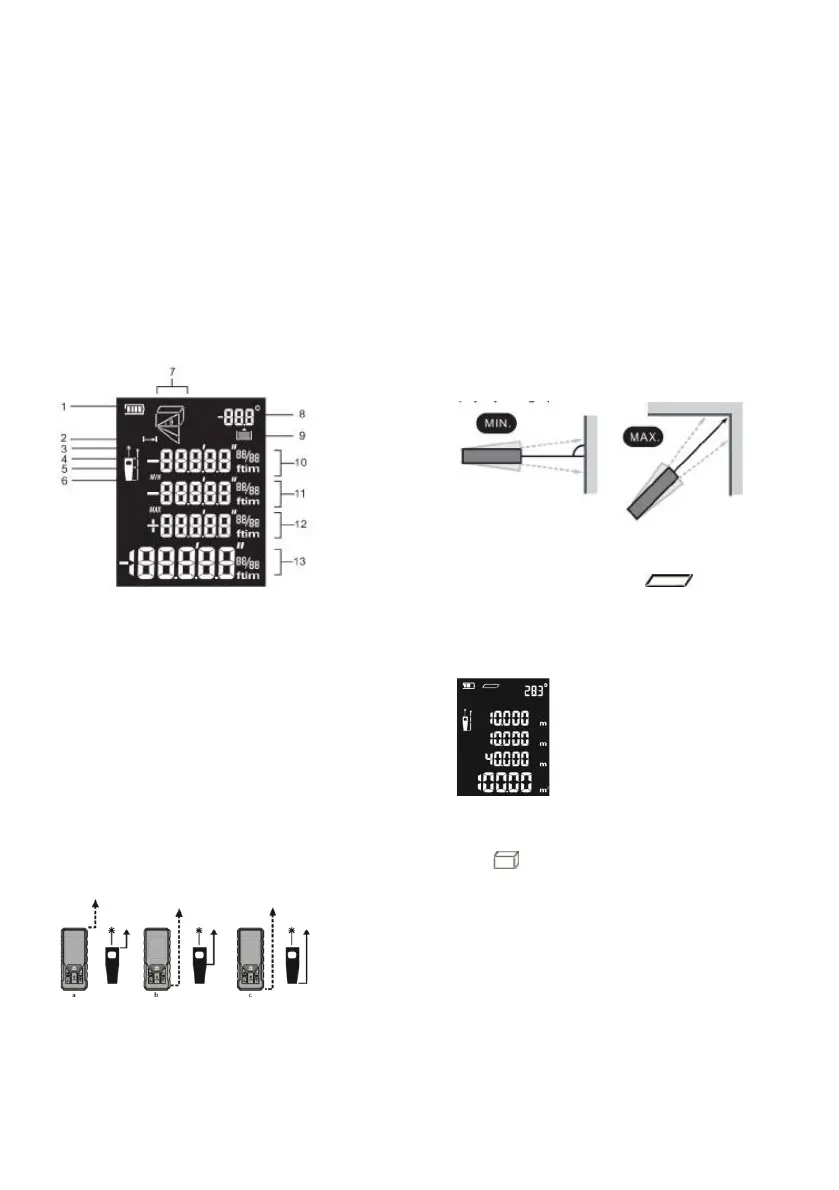
SCREEN DESCRIPTION
1. Battery status
2. Measurement indicator
3. Laser ON indicator
4. Reference point of measurement - from the front edge
of the device (a)
5. Reference point for measurement - from tripod thread
(b)
6. Measurement reference point - from the rear edge of
the device (c)
7. Measurement function
8. Angle measurement
9. Stored measurement (symbol displayed when
accessing the device history)
10. First measurement
11. Second measurement/minimum value
12. Third measurement/maximum value
13. Last measured value/composite measurement result
CHANGE OF MEASUREMENT REFERENCE POINT
Change the measurement reference point by pressing the UNIT
button (3).
DEVICE MUTE/MEMORY
To read out the last measurement taken, briefly press the
mute/memory button on the unit (6). The last measurement taken
will be displayed, to go to the previous measurement briefly press
the button (6) again. The device remembers the last 20
measurements taken. To mute/enable the unit's sound, long press
the mute/memory button (6).
MAKING A SINGLE MEASUREMENT
When the device is switched on with the CLEAR button (7), it is
automatically set in single measurement mode. To measure, aim the
laser at the measurement point and press the MEAS measurement
button (1).
TO MAKE A CONTINUOUS MEASUREMENT
When the instrument is switched on with the CLEAR button (7), the
single measurement function is automatically set. To switch to the
continuous measurement function, hold down the MEAS
measurement button (1) for approx. 3 seconds. Continuous
measurement will be switched on and the minimum and maximum
values will be shown (the minimum/maximum value can help to read
an accurate measurement, e.g. horizontal distance or to a corner, as
shown in the figure below). To measure, briefly press the MEAS
measurement button (1).
Pressing the CLEAR button (7) will switch to the single
measurement function
MEASUREMENT OF SURFACE AREA
After switching on the unit with the CLEAR button(7), select the area
measurement function using the function change button (2).
The area measurement function is designed to measure rectangular
areas. Measure the length of one side of the rectangle by pressing
the MEAS measurement button (1). The length of the other side of
the rectangle should be measured identically. The display will show
successively:
length of the first side of the rectangle,
length of the second side of the
rectangle, perimeter of the rectangle,
area of the rectangle.
VOLUME MEASUREMENT
After switching on the device using the CLEAR button (7), select the
measurement function
volume using the change function button (2). The volume
measurement function is designed to measure the volume of a
cuboid. Measure the length of one of the sides of the cuboid by
pressing the MEAS measurement button (1). The lengths of the next
two sides of the cuboid should be measured identically. The display
will show successively: