1. Press F1
2. Swipe the Merchant Card
3. Select Control Panel
4. Select Terminal Settings
5. Select Comm Means
6. Select Wifi, followed by Enable
7. Scan the Network and select the available
network
8. Enter your password using the up/down
buttons on the terminal
(use F1 and F4
for side navigation)
9. Select OK (green key)
Result: The new profile is now connected. Go
to Status Option to verify that the status shows
Connected.
Using the Shortcut Menu
1. Press the Down
key
2. Select the Wifi setting
3. Swipe the Merchant Card
4. Select Terminal Settings
5. Select Comm Means
6. Select Wifi, followed by Enable
7. Scan the Network and select the available
network
8. Enter your password using the up/down
buttons on the terminal
(use F1 and F4
for side navigation)
9. Select OK (green key)
Wi-Fi Set-Up for Move/3500
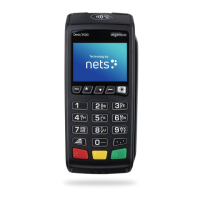
MENU key
CLEAR (yellow) /
feed paper (long press)
Desk/3500
• Power supply cable
(with MagicBox)
• Integration cable
• Receipt roll
• Merchant card
Dot key (press Dot key plus
F3 or F2 to increase/decrease
screen contrast)
CANCEL (red)
VALIDATION key (green)
Navigation keys (F1, F3, F2, F4)
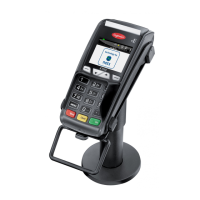
MENU key
Feed paper
Move/3500
• Power supply cable
• Charging unit/base
station
• Battery
• Network cable (BT)
• Receipt roll
• Merchant card
Navigation keys
(F1, F3, F2, F4)
CLEAR (yellow)
CANCEL (red)
VALIDATION key
(green)
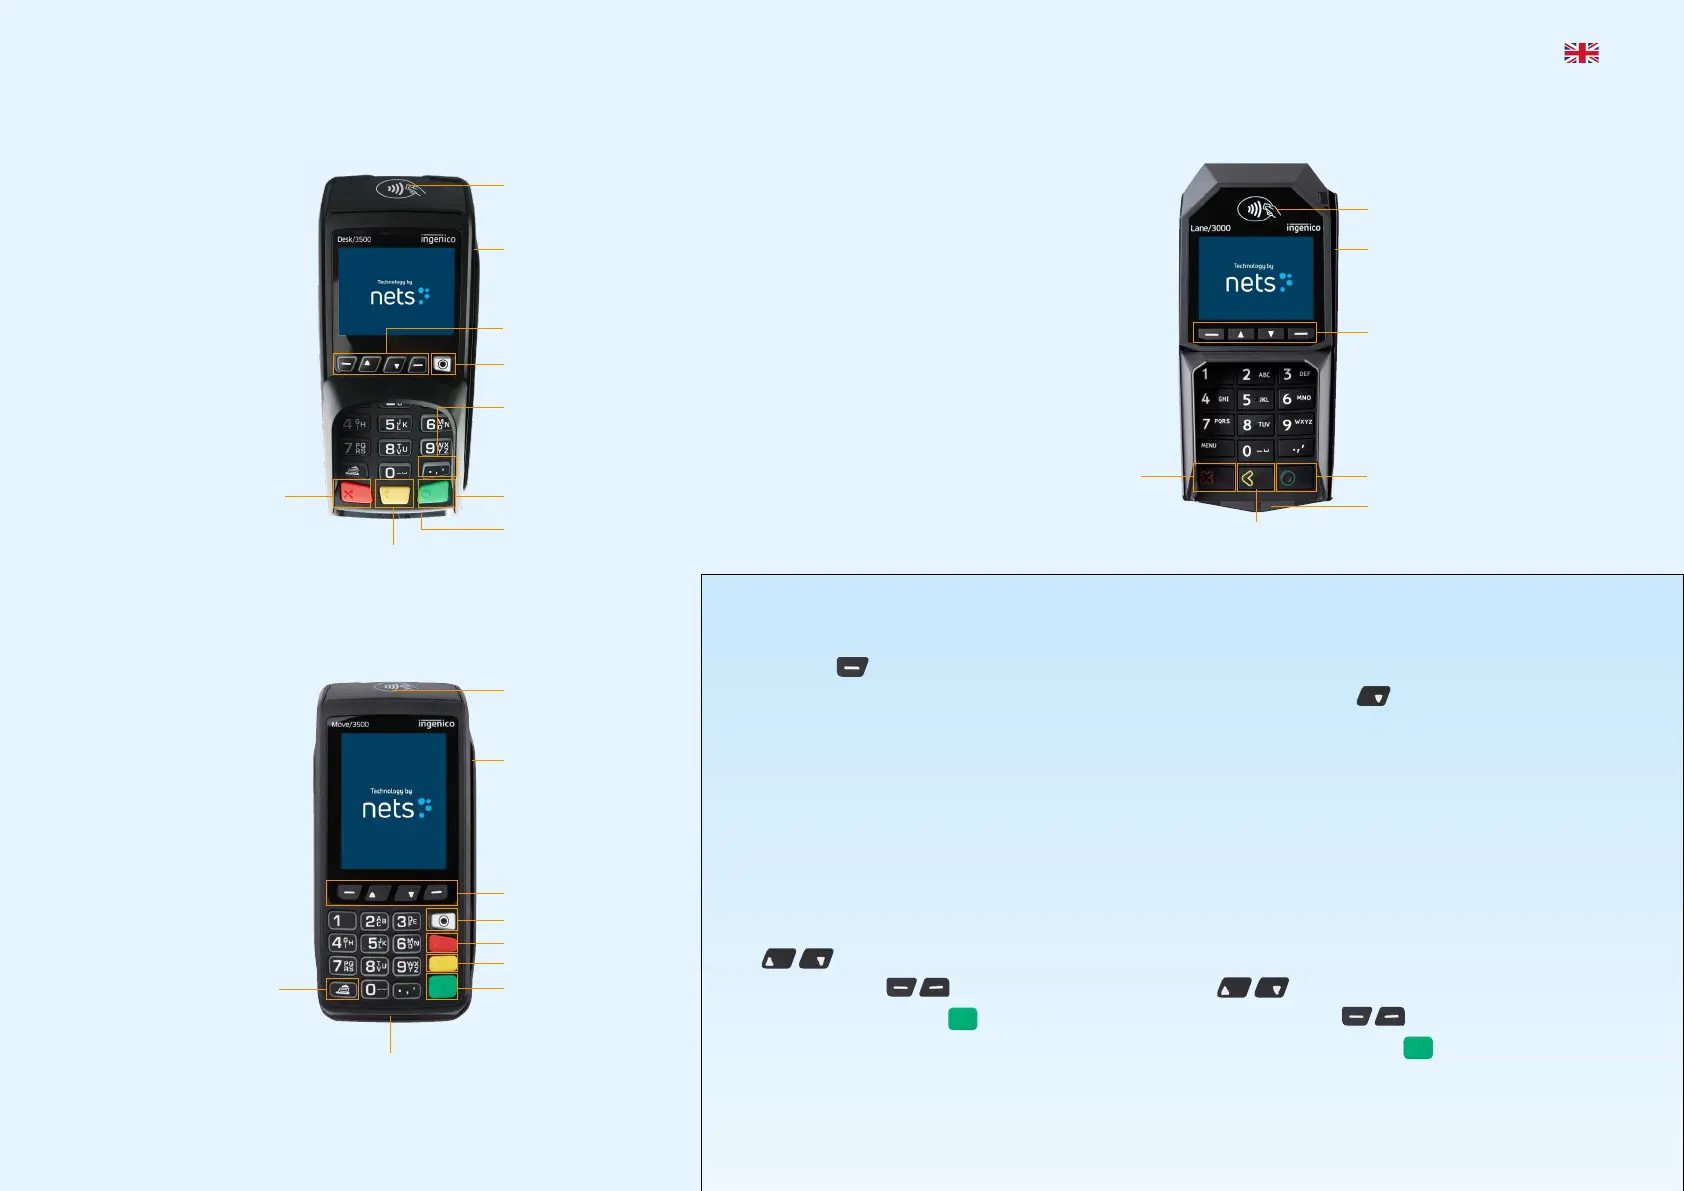
Navigation keys
(F1, F3, F2, F4)
Lane/3000
• Power supply cable
( applicable for Ethernet,
RS232 and, in some cases,
USB connections)
• Integration cable
• Merchant card
CLEAR (yellow)
CANCEL (red)
VALIDATION key (green)
Restarting the terminal
If you experience terminal malfunction, try first to restart the terminal. Ingenico
terminals: Press the yellow CLEAR key simultaneously with the dot/comma key for
approx. 3 seconds. Spire terminals: Press the power button approx. 3 seconds,
select Restart with the arrow key and press the green ENTER key.
Offline transactions
If the terminal loses network connection, transactions are carried out offline. Read
more about offline transactions at nets.eu/payments/contact-us
Terminal menu structure Software: One PA 2.3.0
Communication
1 Host
2 Ethernet
3 GPRS
Sound volume
1 Silent
2 Normal
3 Loud
Properties
1 Tipping
2 Receipt printing
8 Reboot time
9 Double charging
Reports
1 X total
2 Z total
3 Transaction list
Refunds
1 Reversal
2 Refund
Receipt copy
1 Latest approved
2 Latest transaction
3 Latest reconciliation
4 Latest X report
5 Latest Z report
Settings
1 Properties
2 Check for updates
4 Communication
5 Sound volume
8 Print terminal
settings
Main menu
1 Purchase
3 Refunds
5 Receipt copy
6 Reconciliation
7 Offline transactions
8 Reports
9 Administration
0 Settings
Transaction list
1 Current session
2 Previous session
Tipping
1 Disable
2 By total amount
3 By tip amount
Receipt printing
1 Paper saving
2 Ask to print
3 Always print
Reboot time
Enter timestamp hh:mm
Double charging
1 Warning on
2 Warning off
Host
1 Host IP
2 Host port
5 Ping TMS
7 Delete blocking trans.
Ethernet
1 DHCP
2 Static IP
GPRS
1 GPRS APN
2 GPRS PIN
Quick Guide Payment Terminals | 4
Terminals & Accessories
Each terminal is delivered with the following corresponding accessories:
Contactless reader
Magnetic strip reader
Chip reader
Contactless reader
Magnetic strip reader
Chip reader
Contactless reader
Magnetic strip
reader
Chip reader
 Loading...