1
The Newmac NS220E (Status EPA ), NC100E (Classic I EPA) and NCM120E (Classic II EPA) are listed for USA and
Canada under Solid-Fuel Space/Room Heater Standards UL1482, Underwriter’s Laboratories, and ULC S627,
Underwriter’s Laboratories of Canada, by the Canadian Standards Association, a Nationally Recognized Testing
Laboratory (NRTL/C).
INSTALLATION REQUIREMENTS
The installation must comply with the requirements of the regulatory authority in your area. In the United States, the
installation must conform to the National Fire Protection Association Standard NFPA 211, Standard for Chimneys,
Fireplaces, Vents, and Solid Fuel Burning Appliances and Codes. In Canada, the installation must conform to
CAN/CSA-B365 Installation Code for Solid-Fuel-Burning appliances. Also in the United States, install in accordance
with such codes as the BOCA National Mechanical Code, the Standard Mechanical Code, and the Uniform Mechanical
Code.
Information that is provided on the appliance certification label takes precedence over that presented here.
When this heater in not properly installed, a house fire may result. To reduce the risk of fire, follow the installation
instructions. Contact your local building or fire officials about inspection requirements in your area.
WARNINGS
DO NOT CONNECT THIS UNIT TO A CHIMNEY FLUE SERVING ANOTHER APPLIANCE.
DO NOT INSTALL MODEL NS220E (NEWMAC STATUS EPA) IN A MOBILE HOME.
DO NOT CONNECT HEATER TO ANY AIR DISTRIBUTION DUCT OR SYSTEM
DO NOT BURN GARBAGE OR FLAMMABLE FLUIDS SUCH AS GASOLINE, NAPTHA OR ENGINE OIL.
HOT WHILE IN OPERATION, KEEP CHILDREN, CLOTHING AND FURNITURE AWAY. CONTACT MAY CAUSE
SKIN BURNS.
Please read this entire manual before you install and use your new room heater. Failure to follow instructions may result
in property damage, bodily injury, or even death.
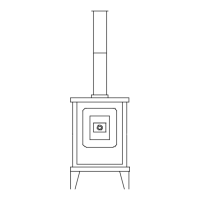
CHIMNEY
This room heater requires at least a 6” diameter chimney flue and must be connected to either:
1. a chimney complying with the requirements for Type HT chimneys in the Standard for Chimneys, Factory-Built,
Residential Type and Building Heating Appliance UL103 HT(USA) such as GSW type JSC, or CAN/ULC S629,
650C Factory Built Chimneys (Canada), such as GSW type JM or
2. a code-approved masonry chimney with an approved flue liner.
INSTALLING HEATER
Newmac recommends that the room heater be professionally installed.
1. If a factory built chimney is required, install a suitable chimney listed for solid fuel according to chimney
manufacturer’s requirements.
2. If a masonry chimney is to be used check with your local regulatory authority that it is suitable for solid fuel
operation.
3. Ensure that all other openings into the chimney flue are sealed shut and that the heater will be the only appliance
connected to the chimney flue.
4. Select location for heater close to chimney location and allowing for clearances to combustible materials. Install
additional protection for combustible materials if clearances are reduced – see REDUCED CLEARANCES.
5. If the chimney connector must pass through a wall or partition of combustible construction, the installation must
conform to the requirements of NFPA211 (USA) or CAN/CSA B365 (Canada). Note that the chimney connector
must NOT pass through a ceiling or a roof space.
6. Place heater on a listed non combustible and non-heat conducting stove-board or durable pad, equivalent to
asbestos mill-board of at least 3/8” (10mm) thickness, according to the requirements of NFPA 211 (USA),
CAN/CSA B365 (Canada) and the requirements of the regulatory authority.
7. Using 6” (150mm) diameter mild steel (not galvanized) connector pipe and fittings suitable for solid fuel, connect the
breech outlet of the room heater to the chimney. Secure each chimney connector joint with three sheet metal
screws and connections to the appliance with a minimum of 2 sheet metal screws. For better performance, seal
each connector pipe joint with a small amount of furnace cement. When laying out the connector pipe plan for a
method of dismounting the assembly for inspection and cleaning of the connector pipes and the chimney flue.
8. Ensure that the room heater and the connector pipe locations conform to the required clearance to combustibles.
9. Ensure that a source of fresh outside air for combustion is available to the room heater. This is important as
replacement air for the gases, which the heater will be exhausting up the chimney.
 Loading...