NILES AUDIO CORPORATION – 1-800-BUY-HIFI – 1-305-238-4373
9
INSTALLATION
MOUNTING ThE DBI-2
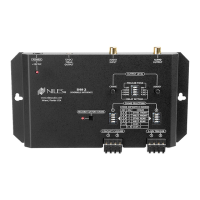
Once you have decided on the location for the DBI-2 (generally near the location of the Niles
MultiZoneControlSystem),makesurethatthe12VDCpoweradapterandallcablesare
disconnected before mounting.
The DBI-2 can be either mounted on the back of a cabinet or on a wall using screws (not included).
Also, it can be placed on a shelf using the included adhesive rubber feet (see Figure 1 on page 7).
CONNECTING ThE DBI-2
1. Connect the Audio Output of the DBI-2 to the Paging Input of a compatible Niles MultiZone
System (see Figure 2onpage10).
2. (Optional) Connect the Audio Output of a paging system to the Audio Input of the DBI-2
(see Figure 2onpage10).
3. Connect standard or illuminated doorbell buttons to the Contact Closure connections
(see Figure 2onPage10).
4. For homes with existing doorbell chimes that will be retained, connect the existing wiring to the
3-30VTrigger(seeFigure 3 on page 11)
5.(Optional)Connectthe12VDCVoltageTriggerOutputtoavoltageactivateddevice.
(see Figure 2onpage10).
6.Connecttheincluded12VDCin-linepoweradapter’svoltageoutputplugintotheDBI-2’spower
jack and then plug its AC power cord into an unswitched AC outlet (see Figure 1 on page 7). The
red LED power indicator will illuminate to confirm proper power connection.