Regulator assembly information
1 The regulator and hose assembly supplied
with this grill must be used. This regulator
has a flow-limiting device built into the
grill that will restrict the flow of gas in the
event that a leak is detected.
2 Regulator is designed for vapor
withdrawal. Cylinder must be upright when
grill is in use.
3 Only a replacement regulator and
hose assembly specified by SharkNinja
Operating LLC must be used. (UL-listed
Type 1 (CGA 791) tank-connection device
as described in the latest edition of ANSI
Z21.81).
LP gas CYLINDER TANK PLACEMENT
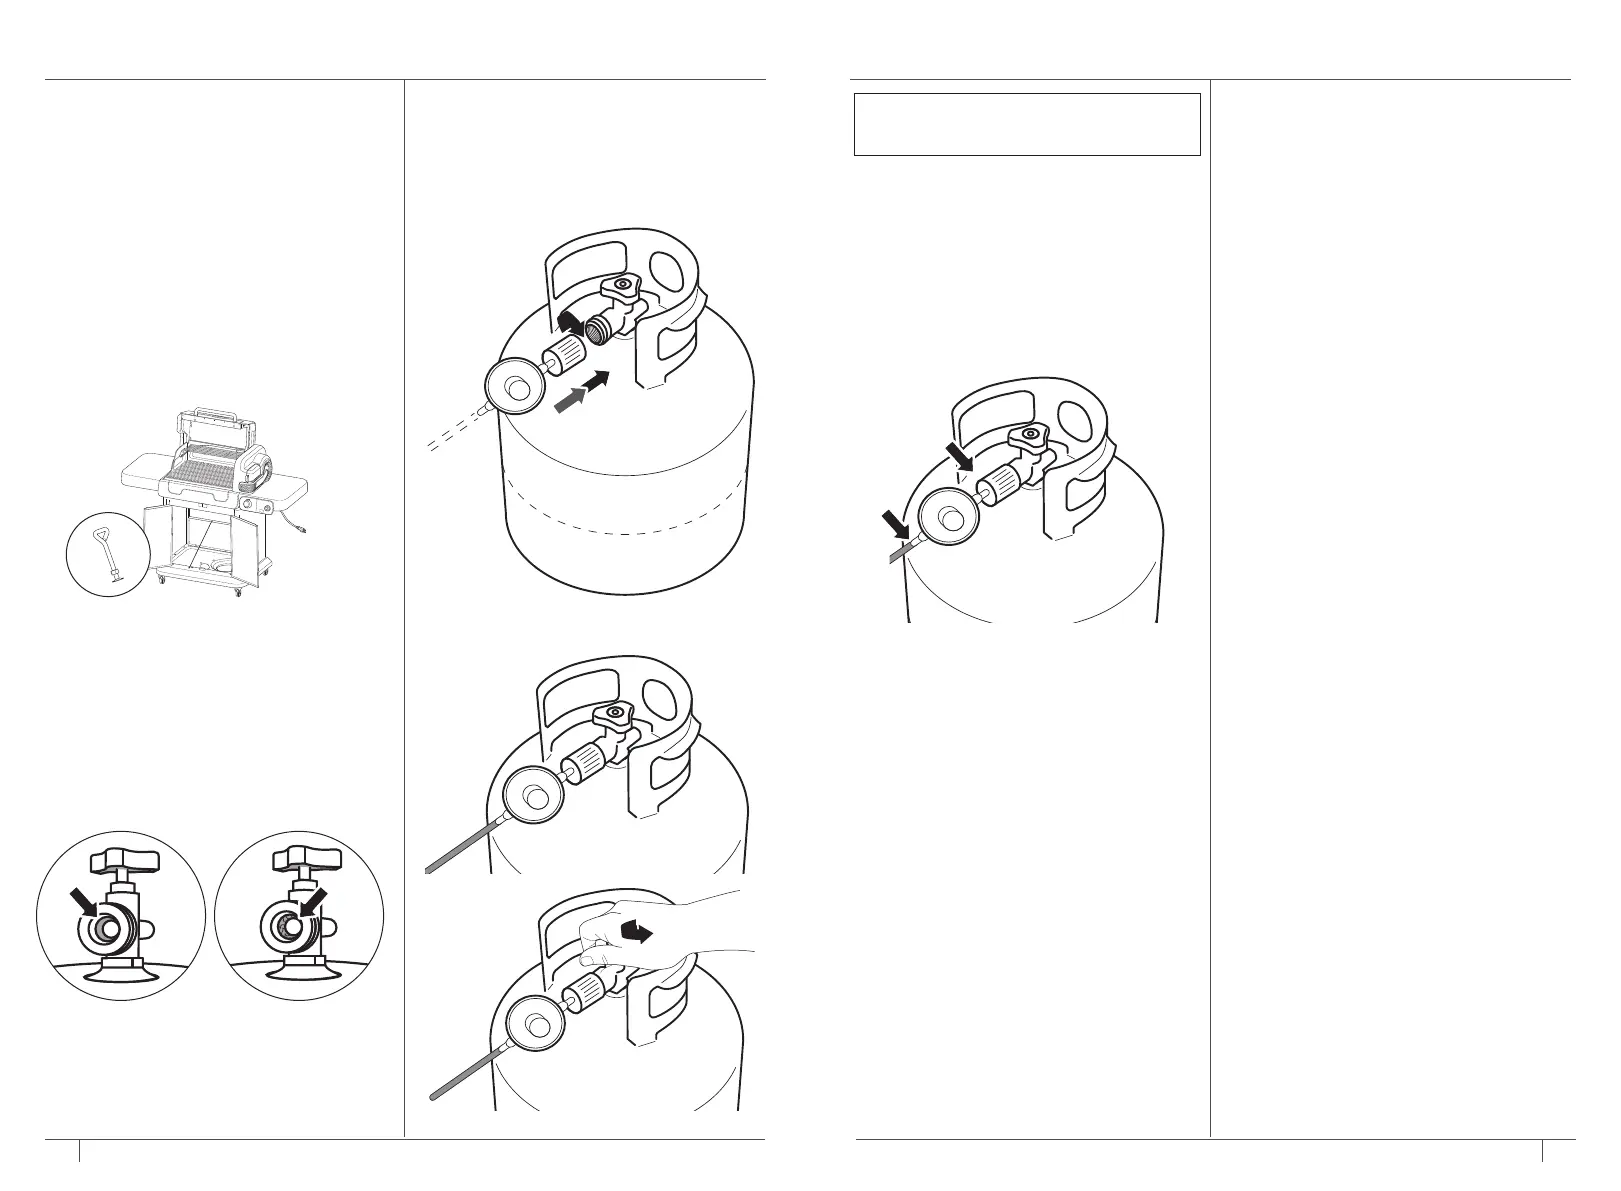
1 Open cabinet doors. Loosen tank clamp.
ATTACHING LP GAS CYLINDER TANK AND REGULATOR GAS LEAK CHECK
ninjakitchen.com
5
ninjakitchen.com
2 Place LP gas tank cylinder into opening
slot area.
3 Rotate cylinder into position so the valve
opening faces the front.
4 Hand-tighten tank clamp. DO NOT use any
tools.
5 Prior to connecting regulator to LP
tank, inspect rubber seal for damage. If
deterioration is observed, such as visible
cracks and/or pitting, the tank must be
returned unused to the seller.
6 Inspect regulator valve, port, and assembly.
Look for any damage or debris. Remove as
necessary.
7 Inspect hose for damage.
8 Check and confirm the LP gas tank valve is
closed. Turn clockwise.
9 Attach regulator assembly, ensuring the
vent hole is facing down.
10 Hand-tighten regulator connector to tank
valve, turning clockwise to a complete
stop.
DOT 4BA24
02 21
11 Open tank valve counterclockwise fully.
Never perform leak check with an open flame.
Do not smoke while performing leak check.
1 Before lighting the grill, test all connections.
See below illustrations.
2 Apply an approved noncorrosive leak-
detection or soap solution* to all gas
connections.
3 Turn on LP tank valve.
4 If growing bubbles appear in the solution
applied, this indicates connection is not
secure or a leak exists.
DOT 4BA24
02 21
*Soap solution: Fill spray bottle with one part
water and one part liquid detergent.
5 Turn off tank valve.
6 Recheck connection or replace connection if
unable to resecure on own.
7 Repeat gas leak check. If leak is still present,
refer to the Troubleshooting Guide in your
Owner's Manual.
8 Additionally, perform leak check on cylinder
and seams. If any leaks appear, turn off tank
valve and contact gas supplier or local fire
department for assistance.
DISCONNECTING LP GAS CYLINDER AND
REGULATOR
1 Turn off burner valve.
2 Turn o tank valve counterclockwise fully to
a stop.
3 Detach regulator assembly from tank valve,
turning counterclockwise.
ADDITIONAL AND IMPORTANT INFORMATION
ABOUT LP GAS AND CONNECTIONS.
1 A dented or rusty liquid propane tank may
be hazardous and should be checked by your
liquid propane supplier.
2 DO NOT use a liquid propane tank with a
damaged valve.
3 Even if your liquid propane tank may appear
to be empty, gas may still be present, and
the tank should be transported and stored
accordingly.
4 The LP tank must be installed, transported,
and stored in an upright, secure position.
LP tanks should not be dropped or handled
roughly.
5 NEVER store or transport the LP tank where
temperatures can reach 125°F (51.7°C).
6 DO NOT store a spare LP gas cylinder under
or near this appliance.
7 Place dust cap on cylinder valve outlet
whenever the cylinder is not in use. Only install
the type of dust cap on the cylinder valve
outlet that is provided with the cylinder valve.
Other types of caps or plugs may result in
leakage of propane.
8 Use only a reputable propane gas dealer to fill,
inspect, and requalify at each filling.
HANDLING AND STORAGE
1 When grill is not in use, turn off gas at LP gas
tank.
2 Indoor storage is acceptable ONLY if the LP
cylinder is disconnected and removed from
the grill.
3 Tank shall be stored outdoors, out of the
reach of children, and shall not be stored in a
building, garage, or any other enclosed area.
4 DO NOT store or use gasoline or other
flammable vapors and liquids in the vicinity of
this or any other appliance.
6
DOT 4BA24
02 21
DOT 4BA24
02 21
GOOD DAMAGE OR DEBRIS
NOTE: We test all gas connections before the
grill gets to you, but we recommend doing a
gas leak check before first use.
 Loading...