EasyManua.ls Logo

Noctua NM-i115x-1200 - User Manual

Noctua NM-i115x-1200
2 pages
Print Icon
To Next Page IconTo Next Page
Loading...
NOCTUA NM-i115x-1200
INSTALLATION MANUAL
Scan this code to display
multilingual manuals on
your phone.
Dear customer,
Thank you very much for choosing a Noctua cooler for your Intel
LGA1200/LGA115x system. We always like to think of our coolers
as safe long-term investments: Not only are they built to last,
but we also provide upgrade kits so that you can keep using
your trusty Noctua heatsink whenever you do a system upgrade.
Enjoy your Noctua cooler on LGA1200/LGA115x!
Yours sincerely,
Roland Mossig, Noctua CEO
Required mounting parts:
Caution: Choose the alignment of the mounting bars according to
the desired final orientation of the cooler:
Orientation A Orientation B
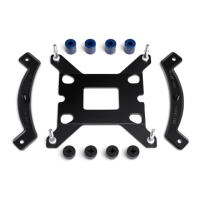
First put the NM-IPS1 plastic spacers onto the bolts of the
backplate, then add the NM-IMB2 mounting bars. Use hole
position 1 on the mounting bars.
Installing the mounting bars
4
Place the NM-IBP2 backplate on the rear side of the motherboard
so that the bolts stick through the mounting holes.
Caution: Please make sure that the three cut-outs in the
supplied backplate align with the screws of the motherboard’s
stock backplate.
Caution: Make sure to install the fastening brackets in the correct
position.
Attaching the backplate3
In case you want to use the cooler on an assembled system and
your case doesn’t have a cut-out at the rear side of the mother-
board tray, you first have to remove the motherboard from the
case in order to be able to install the supplied backplate.
Removing the motherboard2
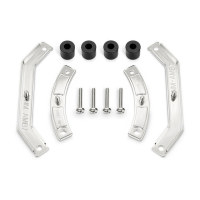
Then fix the new NM-SFB2 fastening brackets to the cooler (you
can either use the original screws or the supplied NM-SSC1
screws). Tighten the screws until they stop, but do not use exces-
sive force (max. torque 0.5 Nm).
Fixing the fastening-brackets to the cooler1
Caution: The following cooler models already use the NM-SFB2 or
compatible fastening brackets, so if you use one of these models,
please skip this step and directly proceed to the next one:
NH-D14 SE2011, NH-D15 SE-AM4 and NH-L9x65 SE-AM4. If
you use the NH-U12S SE-AM4 you can also skip this step, but in
this case, you need to use the NM-IMB3 mounting bars supplied
with the cooler rather than the NM-IMB2 bars supplied with this
kit in step 2.
First take off the original fastening-brackets from the cooler by
unscrewing the four short screws.
Caution: The supplied backplate will install over the motherboard’s
stock backplate, so the motherboard’s stock backplate must not
be taken off.
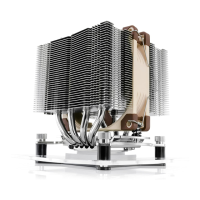
This manual will guide you through the installation process step
by step using an NH-U12P heatsink as an example. Please note
that the installation procedure is identical for all models.
Prior to installing the cooler, please consult the compatibility
centre on our website (ncc.noctua.at) and verify that the cooler
is fully compatible with your motherboard.
Please also make sure that your PC case offers sufficient clearance for
the cooler and that there are no compatibility issues with any other
components (e.g. tall RAM modules).
Double check that the heatsink and fan clips do not make contact with
the VGA card, other PCIe cards, motherboard heatsinks or any other
components.
Noctua cannot be held responsible for any damage or losses
caused by compatibility issues.
Should you encounter any difficulties, please check the FAQs on our
website (www.noctua.at/faqs) and don’t hesitate to contact our
support team at support@noctua.at.
Multilingual versions of this manual are available on our
website: www.noctua.at/manuals
2x NM-IMB2
mounting-Bars
2x NM-SFB2
fastening brackets
1x NM-IBP2
LGA115x backplate
4x NM-ITS1
thumb screws
4x NM-SSC1
short screws
4x NM-IPS1
black plastic spacers
Position 1:
LGA1200/115x
Question and Answer IconNeed help?

Do you have a question about the Noctua NM-i115x-1200 and is the answer not in the manual?

Summary

Fixing Fastening Brackets to Cooler

Removing the Motherboard

Attaching the Backplate

Installing the Mounting Bars

Position 1 LGA1200;115 x

Instructions for positioning mounting bars for LGA1200/115x socket.

Mounting Bar Orientation Options

Guidance on selecting the correct orientation for mounting bars.

Applying the Thermal Paste

Fastening the Heatsink to the CPU

Installing the Fan

Transporting Your System

Warranty, Support and FAQs

Overview

The Noctua NM-i115x-1200 is an installation manual for a Noctua cooler designed for Intel LGA1200/LGA115x systems. This manual guides users through the process of installing their Noctua CPU cooler, emphasizing its long-term investment value and upgradeability. The cooler is presented as a reliable and durable component, with Noctua offering upgrade kits to ensure continued compatibility with future system upgrades.

Function Description:

The Noctua NM-i115x-1200 manual outlines the steps required to securely mount a Noctua CPU cooler onto an Intel LGA1200 or LGA115x motherboard. The installation process involves several key stages:

  1. Fixing the fastening-brackets to the cooler: This initial step involves removing the cooler's original fastening brackets and replacing them with the new NM-SFB2 brackets supplied with the kit. Specific instructions are provided for certain cooler models that may already use compatible brackets or require different mounting bars. The process involves unscrewing four short screws, attaching the new brackets, and tightening them to a specified torque of 0.5 Nm. Proper orientation of the fastening brackets is crucial.
  2. Removing the motherboard: For systems where the PC case lacks a cut-out at the rear side of the motherboard tray, users are instructed to remove the motherboard from the case to facilitate the installation of the backplate. This ensures proper access and alignment for the subsequent steps.
  3. Attaching the backplate: The NM-IBP2 backplate is placed on the rear side of the motherboard, ensuring that its bolts protrude through the mounting holes. A critical caution highlights that the supplied backplate installs over the motherboard's existing stock backplate, which should not be removed. Additionally, users must ensure that three specific cut-outs in the supplied backplate align with the screws of the motherboard's stock backplate.
  4. Installing the mounting bars: This step involves placing NM-IPS1 plastic spacers onto the backplate's bolts, followed by the NM-IMB2 mounting bars. The manual specifies using hole position 1 on the mounting bars for LGA1200/115x compatibility. A crucial aspect of this step is choosing the correct alignment of the mounting bars (Orientation A or B) based on the desired final orientation of the cooler. The curved sides of the mounting bars must point outwards. The mounting bars are then secured using four NM-ITS1 thumb screws, tightened gently to a maximum torque of 0.6 Nm.
  5. Applying the thermal paste: Before mounting the heatsink, any residual thermal paste or pads on the CPU must be cleaned off. Users are then instructed to apply a small drop of NT-H1 thermal paste (3-4mm diameter) onto the center of the CPU's heatspreader. A warning is included against applying too much thermal paste, as this can reduce heat conductivity and cooling performance.
  6. Fastening the heatsink to the CPU: If it's the first time using the cooler, the protection cover at the bottom of the heatsink must be removed. The heatsink is then placed onto the CPU and screwed onto the mounting bars' screw threads. The screws should be tightened gently until they stop, with a maximum torque of 0.6 Nm, to avoid excessive force.
  7. Installing the fan: The final step involves installing the fan as described in the cooler's specific manual. Users are directed to Noctua's website if they do not have the fan manual at hand.

Important Technical Specifications:

  • Compatibility: Designed for Intel LGA1200/LGA115x sockets.
  • Mounting Hardware: Includes NM-IBP2 LGA115x backplate, NM-IMB2 mounting bars, NM-SFB2 fastening brackets, NM-IPS1 black plastic spacers, NM-SSC1 short screws, and NM-ITS1 thumb screws.
  • Torque Specifications:
    • Fastening brackets to cooler: Max. 0.5 Nm.
    • Mounting bars to backplate: Max. 0.6 Nm.
    • Heatsink to CPU: Max. 0.6 Nm.
  • Thermal Paste Application: A 3-4mm diameter drop of NT-H1 thermal paste is recommended.

Usage Features:

  • Multilingual Manuals: The manual is available in multiple languages on Noctua's website (www.noctua.at/manuals), accessible via a QR code.
  • Compatibility Centre: Users are advised to consult Noctua's compatibility centre (ncc.noctua.at) to verify full compatibility with their motherboard and to check for clearance issues with PC cases or other components (e.g., tall RAM modules, VGA cards, PCIe cards, motherboard heatsinks).
  • Orientation Options: The mounting bars offer two orientations (A and B) to allow users to choose the desired final orientation of the cooler, providing flexibility in system building.
  • Upgradeability: Noctua emphasizes its commitment to providing upgrade kits, ensuring that users can continue to use their existing Noctua heatsinks with new system upgrades, promoting long-term investment.

Maintenance Features:

  • Thermal Paste Application: Instructions for proper thermal paste application are provided, which is crucial for optimal cooling performance and longevity of the CPU and cooler.
  • Transporting the System: A critical warning is issued regarding system transport. For safety reasons, Noctua generally recommends removing coolers with a total weight (including fan) exceeding 700g. If the heatsink alone is below 700g but the total weight with the fan exceeds 700g, removing the fan is recommended to reduce the weight. Noctua explicitly states it cannot be held responsible for damage due to excessive stress during transport if the heatsink remains installed.
  • Warranty and Support: Noctua offers a 6-year warranty period, highlighting the high-grade products and strict quality control. Users encountering problems are encouraged to contact Noctua's support team (support@noctua.at) and consult the FAQ section on their website (www.noctua.at/faqs) for troubleshooting. This robust support system ensures users can maintain their cooler effectively.
  • Cleaning: The manual implicitly suggests cleaning residual thermal paste from the CPU before applying new paste, a standard maintenance practice for optimal thermal transfer.

Noctua NM-i115x-1200 Specifications

General IconGeneral
BrandNoctua
ModelNM-i115x-1200
CategoryComputer Hardware
LanguageEnglish

Related product manuals