EasyManua.ls Logo

Noctua REDUX NH-U12S - User Manual

Noctua REDUX NH-U12S
10 pages
Print Icon
To Next Page IconTo Next Page
Loading...
Fastening the heatsink to the CPU4
If there are residual traces of thermal paste or thermal
pads on your CPU from previous usage, please clean
them off rst.
The cooler comes with high quality Noctua NT-H1 thermal
paste pre-applied, so if you are installing it for the rst
time, there is no need to apply extra thermal paste.
If you are not using the heatsink for the rst time and
it therefore no longer has a fresh layer of pre-applied
thermal compound, you will need to apply some
thermal compound (e.g. Noctua NT-H1 or NT-H2,
available separately) to the CPU before installing the
heatsink. In this case, please remove residual traces
of thermal paste or pads from both the CPU and the
heatsink before applying new thermal compound.
Then put the heatsink onto the CPU and screw it to
the screw threads of the mounting bars. Perform 2-3
turns on each screw, then repeat until both are fully
tightened.
Caution: Please rst take off the fan as well as the
protection cover at the bottom side of the heatsink.
Installing the mounting bars3
Caution: Choose the alignment of the mounting bars
according to the desired nal orientation of the cooler:
Orientation A Orientation B
First put the plastic spacers onto the bolts of the back-
plate, then add the mounting bars.
Caution: Make sure that the curved sides of the mounting
bars are pointing outwards.
Fix the mounting bars using the 4 thumb screws.
Caution: Gently tighten the screws until they stop, but do
not use excessive force (max. torque 0.6 Nm).
In case you want to use the cooler on an assembled
system and your case doesnt have a cut-out at the
rear side of the motherboard tray, you rst have to
remove the motherboard from the case in order to be
able to install the supplied backplate.
Removing the motherboard
1
Required mounting parts:
2x NM-IMB3
mounting bars
1x NM-IBP2
backplate
4x NM-ITS1
thumb screws
4x NM-IPS1
black plastic spacers
Installation Manual LGA115x & LGA1200
Attaching the backplate2
Caution: The supplied backplate will install over the
motherboard’s stock backplate, so the motherboard’s
stock backplate must not be taken off.
Place the backplate on the rear side of the motherboard
so that the bolts stick through the mounting holes.
Caution: Please make sure that the three cut-outs in the
supplied backplate align with the screws of the mother-
board’s stock backplate.
Caution: Gently tighten the screws until they stop, but do
not use excessive force (max. torque 0.6 Nm).
Fan setup5
Reattach the fan to the heatsink using the supplied steel
clips:
Connect the fan to the motherboards CPU fan header.
If you would like to further improve the cooling perfor-
mance of your NH-U12S redux, the optional NA-FK1
second fan kit allows you to install a second NF-P12
redux-1700 PWM for even better efciency.
Transporting your system!
As it is not possible to reliably calculate or control the
forces that act upon a system during transport (e.g. in
shipping), we generally recommend, for safety reasons,
taking the cooler off. Noctua cannot be held responsible
for any damage that may arise due to excessive stress
during transport if you keep the heatsink installed.
Warranty, support and FAQs!
Even with high-grade products and strict quality control,
the possibility of defects cannot be eliminated entirely.
Therefore, we aim at providing the highest possible level
of reliability and convenience by offering a warranty
period of 6 years and direct, fast and straightforward
RMA service.
Should you encounter any problems with your NH-U12S
redux, please don’t hesitate to contact our support team
(support@noctua.at).
Please also consult the FAQ section on our website:
www.noctua.at/faqs
Scan this code to
display multilingual
manuals on your
phone.
This manual will guide you through the installation
process of the SecuFirm2™ mounting system step by
step.
Prior to installing the cooler, please consult the
compatibility list on our website (ncc.noctua.at) and
verify that the cooler is fully compatible with your moth-
erboard.
Please also make sure that your PC case offers
sufcient clearance for the cooler and that there are no
compatibility issues with any other components (e.g. tall
RAM modules).
Double check that the heatsink and fan clips do not
make contact with the VGA card or other PCIe cards.
Noctua cannot be held responsible for any damage or
losses caused by compatibility issues.
Should you encounter any difculties, please check
the FAQs on our website (www.noctua.at/faqs)
and don’t hesitate to contact our support team at:
support@noctua.at.
Multilingual versions of this manual are available on our
website: www.noctua.at/manuals
Dear customer,
Thank you very much for choosing the Noctua
NH-U12S redux.
True to the spirit of Noctua’s redux line, the NH-U12S
redux is a streamlined, accessibly priced version of
the iconic NH-U12S that has established itself as a
benchmark for slim, highly compatible 120mm CPU
coolers.
I’m condent that you will be able to sense some
of the research, attention and care we’ve put into
making this product.
Enjoy your Noctua NH-U12S redux!
Yours sincerely,
Roland Mossig, Noctua CEO
NOCTUA NH-U12S REDUX
1.
2.
3.
Question and Answer IconNeed help?

Do you have a question about the Noctua REDUX NH-U12S and is the answer not in the manual?

Summary

LGA115 x & LGA1200 Installation Guide

Fastening the Heatsink to the CPU

Instructs on applying thermal paste (if needed) and securely mounting the heatsink onto the CPU.

Fan Setup

Details how to attach the fan to the heatsink using clips and connect it to the motherboard's CPU fan header.

LGA20 xx Installation Guide

Fastening Heatsink to CPU (LGA20 xx)

Refers to step 4 of the LGA115x/LGA1200 manual for fastening the heatsink to the CPU.

Fan Setup (LGA20 xx)

Refers to step 5 of the LGA115x/LGA1200 manual for setting up the fan.

AMD AM4 Installation Guide

Fastening Heatsink to CPU (AMD AM4)

Refers to step 4 of the LGA115x/LGA1200 manual for fastening the heatsink to the CPU.

Fan Setup (AMD AM4)

Refers to step 5 of the LGA115x/LGA1200 manual for setting up the fan.

Overview

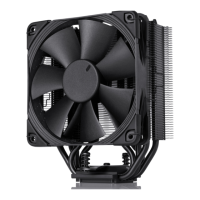
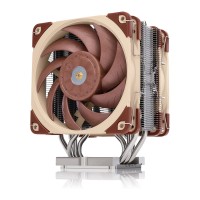
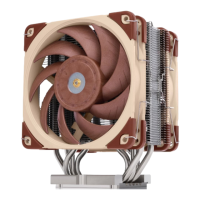
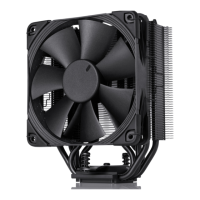
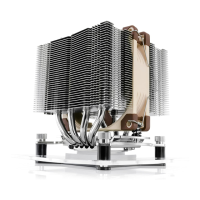
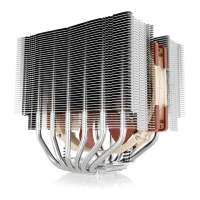
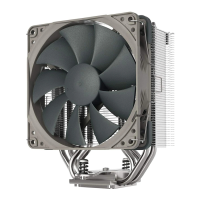
The Noctua NH-U12S redux is a CPU cooler designed to provide efficient cooling for computer systems. It is a streamlined and accessibly priced version of the NH-U12S, which has established itself as a benchmark for slim, highly compatible 120mm CPU coolers. The cooler is designed with research, attention, and care to ensure optimal performance and user satisfaction.

Function Description

The primary function of the Noctua NH-U12S redux is to dissipate heat generated by the Central Processing Unit (CPU) of a computer. By effectively removing heat, it helps maintain stable operating temperatures for the CPU, preventing thermal throttling and ensuring consistent performance. The cooler achieves this through a heatsink and fan combination, which works in conjunction with thermal paste to transfer heat away from the CPU. The SecuFirm2™ mounting system ensures a secure and reliable installation on various CPU sockets.

Usage Features

The Noctua NH-U12S redux is designed for ease of installation and broad compatibility.

Installation Process:

The manual provides detailed, step-by-step instructions for installing the cooler on different CPU sockets, including LGA115x & LGA1200, LGA20xx, and AMD AM4.

  • LGA115x & LGA1200 Installation:

    • Motherboard Removal (if necessary): If the PC case lacks a cut-out at the rear of the motherboard tray, the motherboard must be removed to install the backplate.
    • Attaching the Backplate: The supplied NM-IBP2 backplate is placed on the rear side of the motherboard, over the motherboard's stock backplate. It is crucial to ensure the three cut-outs in the supplied backplate align with the screws of the motherboard's stock backplate. The motherboard's stock backplate should not be removed.
    • Installing Mounting Bars: NM-IPS1 plastic spacers are placed onto the backplate bolts, followed by the NM-IMB3 mounting bars. Users can choose between Orientation A or Orientation B for the mounting bars, depending on the desired final orientation of the cooler. The curved sides of the mounting bars must point outwards.
    • Securing Mounting Bars: The mounting bars are fixed using four NM-ITS1 thumb screws. These screws should be gently tightened until they stop, without using excessive force (max. torque 0.6 Nm).
    • Fastening Heatsink to CPU: Before fastening, any residual thermal paste or pads from previous CPU usage must be cleaned off. The cooler comes with high-quality Noctua NT-H1 thermal paste pre-applied. If it's the first installation, no additional thermal paste is needed. If the heatsink has been used before and the pre-applied thermal compound is no longer fresh, users must apply new thermal compound (e.g., Noctua NT-H1 or NT-H2, sold separately) after cleaning both the CPU and heatsink. The fan and protection cover at the bottom of the heatsink must be removed first. The heatsink is then placed onto the CPU and screwed to the mounting bars' threads. Screws should be tightened in 2-3 turn increments until fully tightened.
    • Fan Setup: The fan is reattached to the heatsink using the supplied steel clips and connected to the motherboard's CPU fan header.
  • LGA20xx Installation:

    • Installing Mounting Bars: NM-IBT2 bolts are screwed into the LGA20xx socket frame's screw threads. Then, NM-IMB3 mounting bars are placed onto these bolts. Similar to LGA115x/1200, users choose between Orientation A or B, ensuring the curved sides of the mounting bars point outwards.
    • Securing Mounting Bars: The mounting bars are fixed using four NM-ITS1 thumb screws, tightened gently (max. torque 0.6 Nm).
    • Fastening Heatsink to CPU & Fan Setup: These steps refer to the same procedures as described for LGA115x & LGA1200 (Step 4 and Step 5, respectively).
  • AMD AM4 Installation:

    • Removing Stock Retention Module & Placing Backplate: If the motherboard has a pre-installed CPU cooler retention module, it must be removed by unscrewing it from the backplate. The SecuFirm2™ mounting system installs directly to the AMD stock backplate, which should be kept in place. If the motherboard does not include a pre-installed retention module, the AMD stock backplate (usually included with motherboard accessories) should be placed on the rear side of the motherboard, ensuring its screw threads stick through the mounting holes.
    • Installing Mounting Bars: NM-APS4 grey plastic spacers are placed onto the backplate's screw threads. Then, the NM-AMB7 mounting bars are fixed using four NM-ALS1 long screws. The curved sides of the mounting bars must point outwards.
    • Securing Mounting Bars: Screws are gently tightened until they stop, without excessive force (max. torque 0.6 Nm).
    • Fastening Heatsink to CPU & Fan Setup: These steps refer to the same procedures as described for LGA115x & LGA1200 (Step 4 and Step 5, respectively).

Compatibility:

Users are advised to consult the compatibility list on Noctua's website (ncc.noctua.at) to verify full compatibility with their motherboard. It is also important to ensure sufficient clearance within the PC case for the cooler and to check for compatibility issues with other components, such as tall RAM modules. Users should double-check that the heatsink and fan clips do not contact the VGA card or other PCIe cards. Noctua is not responsible for damages or losses due to compatibility issues.

Optional Performance Enhancement:

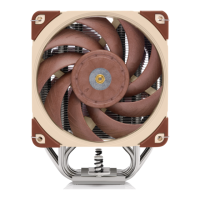
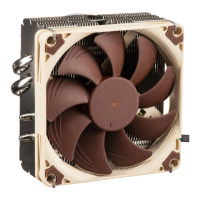
For further cooling performance improvement, an optional NA-FK1 second fan kit is available, allowing the installation of a second NF-P12 redux-1700 PWM fan for enhanced efficiency.

Transporting the System:

For safety reasons, especially during shipping, it is generally recommended to remove the cooler from the system. Noctua cannot be held responsible for any damage caused by excessive stress during transport if the heatsink remains installed. This highlights the importance of proper handling and preparation when moving a system with the cooler installed.

Maintenance Features

The Noctua NH-U12S redux is designed for reliable long-term operation, with minimal specific maintenance requirements beyond proper installation and occasional checks.

Thermal Paste Management:

The cooler comes with pre-applied Noctua NT-H1 thermal paste for convenience during the initial installation. If the heatsink is being reinstalled after prior use and the thermal paste is no longer fresh, users are instructed to clean off any residual thermal paste or pads from both the CPU and the heatsink before applying new thermal compound. This ensures optimal thermal transfer and cooling performance.

Support and Warranty:

Noctua provides comprehensive support and a robust warranty for the NH-U12S redux.

  • Warranty: The product comes with a 6-year warranty period, reflecting Noctua's confidence in its high-grade quality and strict quality control. This warranty ensures reliability and convenience, offering direct, fast, and straightforward RMA (Return Merchandise Authorization) service.
  • Troubleshooting: Should users encounter any difficulties during installation or operation, they are encouraged to consult the FAQs section on Noctua's website (www.noctua.at/faqs).
  • Customer Support: For issues not resolved by the FAQs, users can contact Noctua's support team directly at support@noctua.at. This direct line of communication ensures that users can receive expert assistance for any problems they might face.
  • Multilingual Manuals: Multilingual versions of the manual are available on the Noctua website (www.noctua.at/manuals), and a QR code is provided to easily access these manuals on a smartphone, enhancing accessibility for a global user base.

Overall, the Noctua NH-U12S redux is a user-friendly and high-performance CPU cooler, designed with a focus on compatibility, ease of installation, and long-term reliability, backed by strong customer support and warranty.

Noctua REDUX NH-U12S Specifications

General IconGeneral
TypeCPU Cooler
Fan Size120 mm
Weight (with fan)755 g
Max Fan Speed1500 RPM
Number of Heatpipes4
Socket CompatibilityIntel LGA1700, LGA1200, LGA1156, LGA1155, LGA1151, LGA1150, AMD AM4, AM5
Bearing TypeSSO Bearing
MTBF>150, 000 hours
Fan ModelNF-P12 redux-1700 PWM
Dimensions (with fan)158 mm x 125 mm x 71 mm (H x W x D)
Heatsink MaterialCopper (base and heat-pipes), Aluminium (cooling fins)

Related product manuals