VENTILAZIONE FRONTALE
Smontaggio
- Aprire lo sportello premendo sulla parte posteriore degli sportellini, i
quali si apriranno verso l’interno del casco.
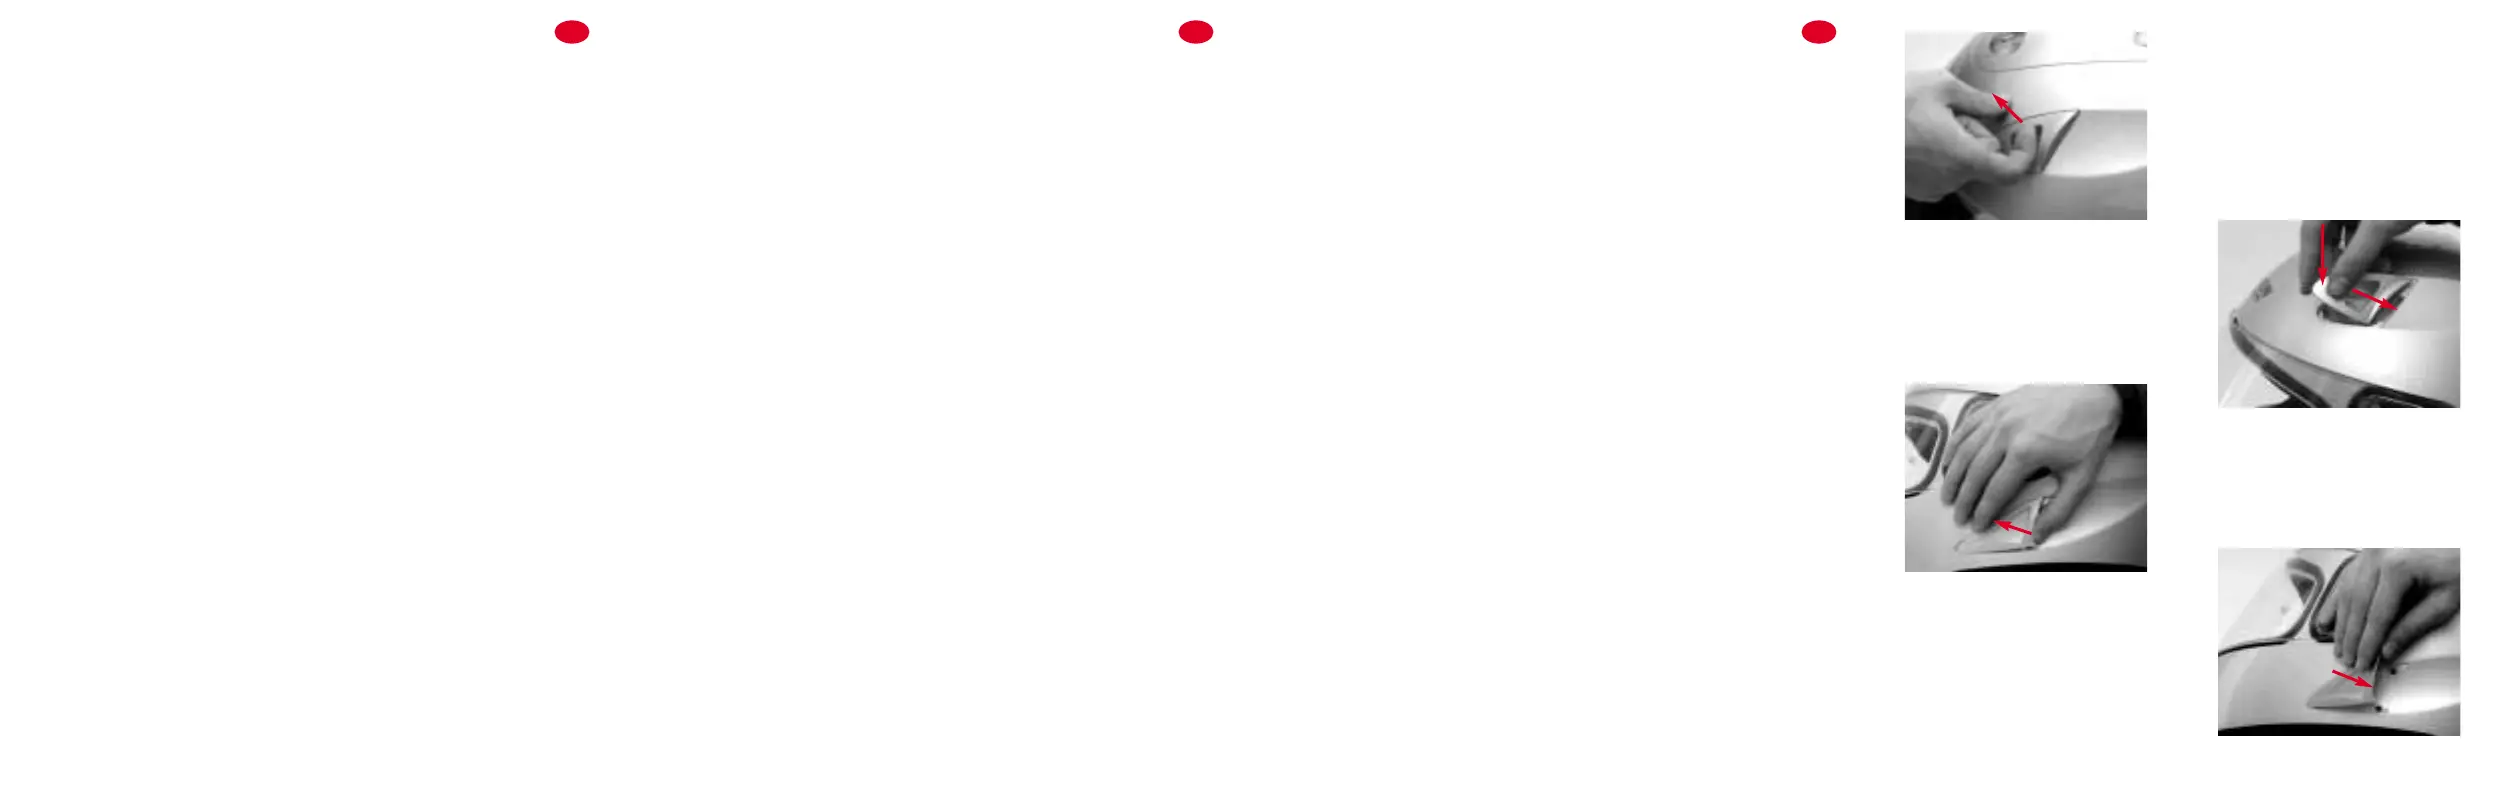
- Tirare leggermente la presa aria verso l’esterno del casco fino al suo
completo distacco dalla calotta (fig. 1).
Montaggio
- Posizionare il dente posteriore della presa aria completa nella feritoia
presente sulla calotta (fig. 2 - A).
- Ruotare la presa d’aria verso la calotta e premere leggermente la stes-
sa verso l’interno del casco (fig. 2 - B) agganciandola alla stessa.
SPOILER LATERALI
Smontaggio
- Tirare verso l’esterno del casco (fig. 3).
- Ripetere l’operazione anche per lo spoiler dell’altro lato del casco.
Montaggio
- Posizionare lo scatto dello spoiler in corrispondenza del foro d’aggan-
cio presente sulla calotta.
- Premere lo spoiler verso l’interno del casco agganciandolo alla calotta
(fig. 4).
- Ripetere l’operazione anche per lo spoiler dell’altro lato del casco.
MANUTENZIONE E PULIZIA
- Non utilizzare il casco senza il sistema di ventilazione frontale corretta-
mente montato sul casco.
- Il polistirolo interno è un materiale facilmente deformabile ed ha lo
scopo di assorbire gli urti mediante alterazione o parziale distruzione.
- NON MODIFICARE IN NESSUN MODO LE COMPONENTI INTERNE
DEL CASCO IN POLISTIROLO.
- Per le operazioni di pulizia utilizzare solo acqua, sapone neutro e
asciugare aiutandosi con aria compressa.
- NON USARE MAI BENZINA, DILUENTE, BENZOLO O ALTRI SOLVEN-
TI E/O SOSTANZE CHIMICHE.
I
FRONT VENTILATION
Disassembly
- Open the flap by pressing on the rear part of the ports, which will open
inside the helmet.
- Pull the air intake slightly towards the exterior of the helmet until it
detaches completely from the shell (fig. 1).
Assembly
- Position the rear ratchet of the complete air intake in the relevant hole
on the shell (fig. 2 - A).
- Rotate the air intake towards the shell, push it slightly inside the hel-
met (fig. 2 - B), and fasten it to the shell.
SIDE SPOILERS
Disassembly
- Pull towards the exterior of the helmet (fig. 3).
- Repeat the step for the spoiler on the other side of the helmet.
Assembly
- Position the spoiler catch in line with the fastening hole on the shell.
- Push the spoiler inside the helmet and fasten it to the shell (fig. 4).
- Repeat the step for the spoiler on the other side of the helmet.
MAINTENANCE AND CLEANING
- Do not use the helmet without the front ventilation system correctly
assembled on the helmet.
- The polystyrene can easily be deformed. Its function is to absorb
impacts by alteration and partial destruction.
- DO NOT MODIFY IN ANY WAY THE HELMET INTERNAL POLYSTY-
RENE COMPONENTS.
- Use only neutral soap and water for cleaning and compressed air as a
drying aid.
- NEVER USE PETROL, THINNERS, BENZOL OR OTHER SOLVENTS
AND/OR CHEMICAL SUBSTANCES.
GB
BELÜFTUNG IM STIRNBEREICH
Abnehmen
- Die Klappe durch Drücken auf den hinteren Teil der Klappen öffnen.
Letztere öffnen sich nach innen.
- Die Belüftungsöffnung leicht nach außen ziehen, bis sie ganz von der
Schale gelöst ist (Abb. 1).
Anbringen
- Den hinteren Zahn der vollständigen Belüftungsöffnung auf dem
Schlitz der Schale positionieren (Abb. 2 - A).
- Die Belüftungsöffnung zur Schale hin drehen und dabei leicht nach
innen drücken (Abb. 2 - B), um sie in der Schale einzurasten.
SEITLICHE SPOILER
Abnehmen
- Den Spoiler nach außen vom Helm abziehen (Abb. 3).
- Den Vorgang beim Spoiler auf der anderen Seite wiederholen.
Anbringen
- Den Zapfen des Spoilers in Übereinstimmung mit der Einrastöffnung
auf der Schale bringen.
- Den Spoiler zur Innenseite des Helms drücken und auf der Schale ein-
rasten (Abb. 4).
- Den Vorgang für den Spoiler auf der anderen Seite wiederholen.
WARTUNG UND REINIGUNG
- Den Helm nicht ohne das korrekt auf dem Helm angebrachte
Belüftungssystem im Stirnbereich verwenden.
- Das innenliegende Polystyrol ist leicht verformbar und hat den Zweck,
Stöße durch Verformung oder teilweise Zerstörung zu absorbieren.
- DIE INNENTEILE DES HELMS AUS POLYSTYROL DÜRFEN IN KEI-
NER WEISE VERÄNDERT WERDEN.
- Zur Reinigung nur Wasser und neutral Seife verwenden und mit
Druckluft trocknen.
- NIEMALS BENZIN, VERDÜNNUNGSMITTEL, BENZOL ODER ANDERE
LÖSUNGSMITTEL BZW. CHEMISCHE SUBSTANZEN VERWENDEN.
D
Fig. 1
Fig. 2
Fig. 3
Fig. 4
B
A
 Loading...