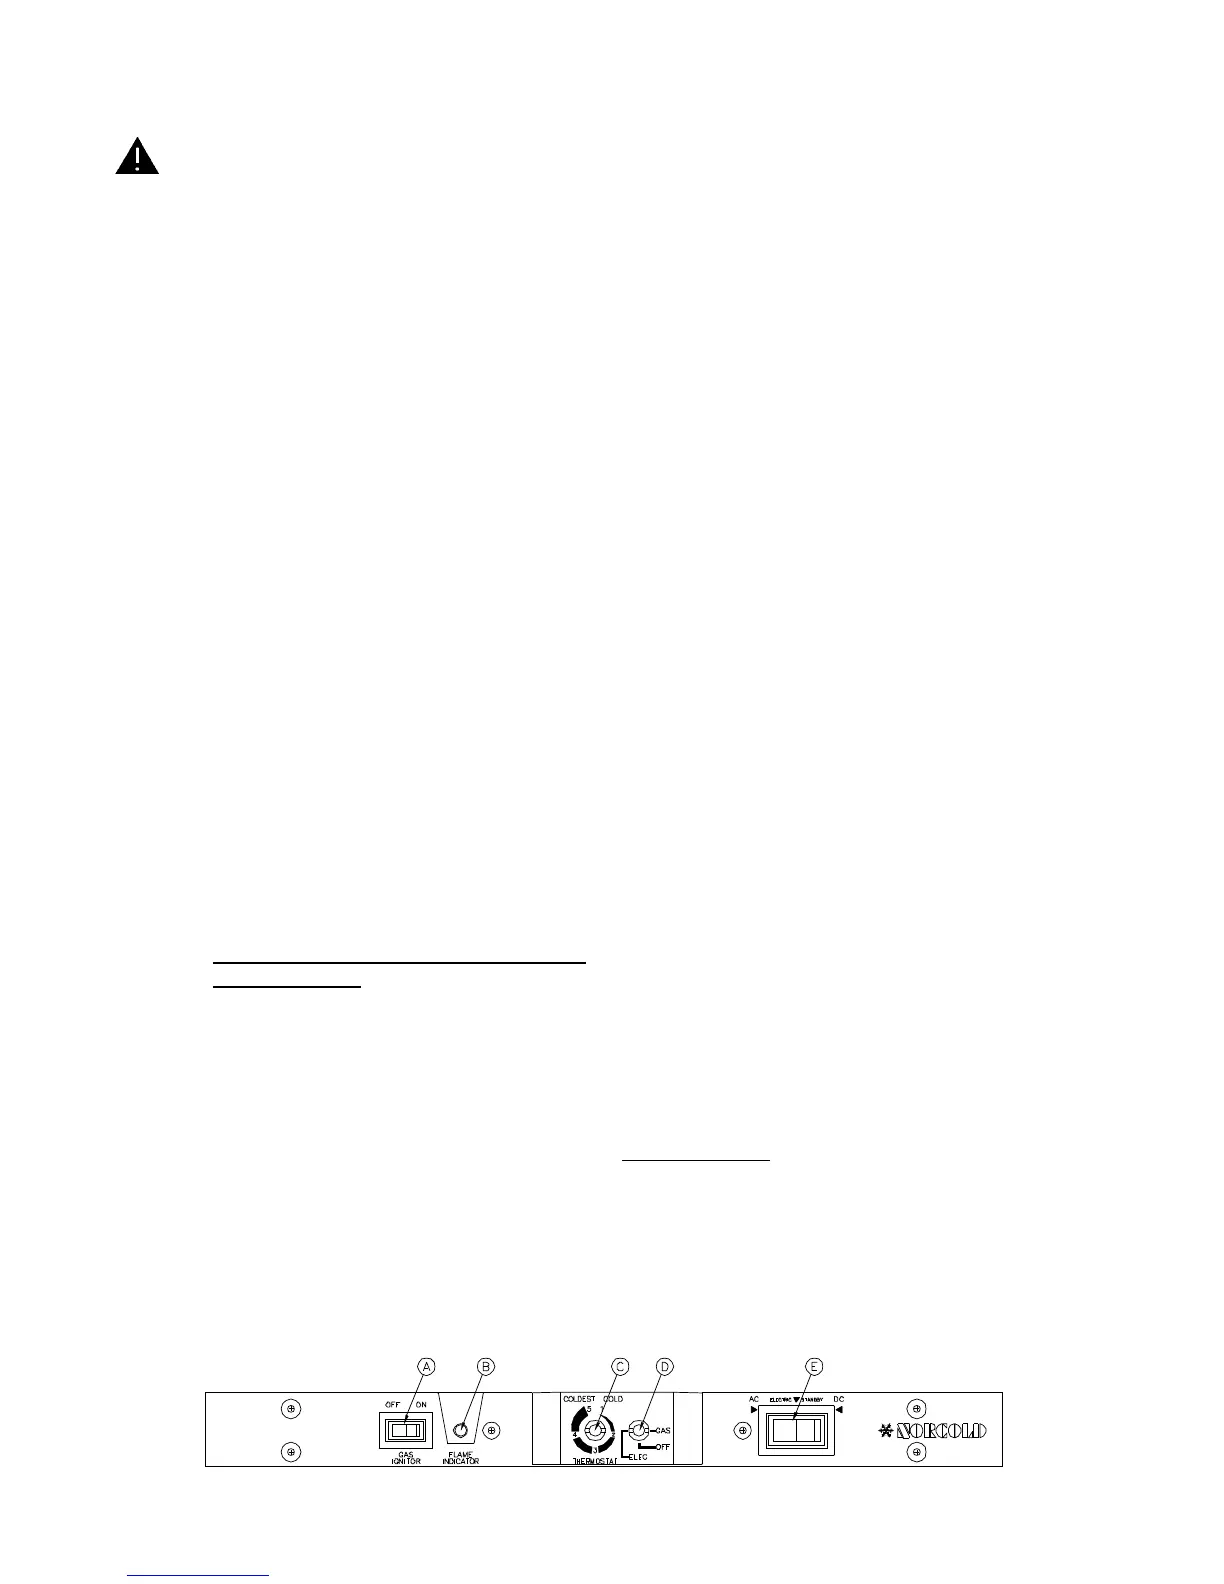
Lighting and Start Up Procedures
WARNING:
DO NOT HOLD GAS VALVE (D) IN MORE THAN 30 SECONDS. IF FLAME IS NOT INDICATED WITHIN
THIS TIME, TURN GAS TO OFF, WAIT 2 MINUTES AND RETRY. CONTINUING TO HOLD GAS VALVE IN
WILL CAUSE GAS BUILD-UP IN THE BURNER AREA AND CAN RESULT IN AN EXPLOSION WHICH
CAN CAUSE PERSONAL INJURY OR DEATH.
2-Way and 3-Way Models
Lighting Instructions: Gas Operation
1. Make certain that 12 Volts DC is available to
the refri
erator and divider switch is in NOR-
MAL position.
2. Turn on
as suppl
at the tank.
3. Set thermostat control
C
to COLDEST settin
.
4. Set i
nitor switch
A
to "ON" position. The to
-
le li
ht
A
located on the switch will illuminate
if 12 volts DC is present.
5. Push and rotate the "ELEC-OFF-GAS" control
D
counter-clockwise so that "GAS" is visible
on the knob. Push the control knob
D
in and
hold until the flame indicator
B
illuminates
continuous
low
. Continue to hold approxi-
matel
5 seconds, then release. The flame indi-
cator
B
will remain on. If not repeat this step.
NOTE: In normal use the flame should i
nite
within 10 seconds. On initial refri
erator
start-up, it ma
take lon
er than 10 sec-
onds to allow air to be pur
ed from the
as line, as indicated b
the flame indica-
tor
B
failin
to illuminate.
Do not hold
as control valve
D
in more
than 30 seconds. See WARNING above.
6. Move thermostat control
C
to desired settin
7. The i
nitor switch
A
should be left in the
"ON" position durin
as operation. If the
switch is turned off, the refri
erator will c
cle
normall
. However, in case of flame blowout,
the reli
hter does not function.
Start-Up Instructions: AC Electric Operation
1. Make certain that 120 Volts AC and 12 Volts
DC are available to the refri
erator and divider
switch is in NORMAL position.
2. Set thermostat control
C
to desired settin
.
3. Set i
nitor switch
A
to "OFF" position.
4. Push and rotate the "ELEC-OFF-GAS" control
D
clockwise so that "ELEC" is visible on the
knob. Upon release, note that the knob moves
toward
ou, indicatin
that the control is locked
into electric operation.
Start-Up Instructions: DC Electric Opera-
tion - 3-Way models
1. Make certain that 12 Volts DC is available
to the refri
erator, divider switch is in NOR-
MAL position, and "GAS IGNITOR" switch
A
is "OFF".
2. Set thermostat control
C
to desired settin
.
3. Set "AC-STDBY-DC" switch
E
to "DC" posi-
tion.
4. Set i
nitor switch
A
to "OFF" position.
5. Push and rotate the "ELEC-OFF-GAS" control
D
clockwise so that "ELEC" is visible on the
knob. Upon release, note that the knob moves
toward
ou, indicatin
that the control is locked
into electric operation.
Operation Shut-Down: All Modes
1. Set i
nitor switch
A
to "OFF" position.
2. Push and turn "ELEC-OFF-GAS" control
D
to "OFF".
3. For lon
er periods of shut-down, set NORMAL-
STORAGE-HUMIDITY switch to STORAGE.
Operation Note
: Use the "ELEC-OFF-GAS" control
C
to shut off all coolin
operation
both Gas and
Electric
. The "GAS IGNITOR" switch and the "NOR-
MAL-STORAGE-HUMIDITY" switch must be shut off
independentl
. The "STDBY" position of the "AC-
STDBY-DC" switch
E
can be used to temporaril
shut off AC or DC operation.
14