NOTTINGHAM ANALOGUE STUDIO
128 CORDY LANE, UNDERWOOD, NOTTINGHAM NG16 5FD
Design and Manufacture of Quality Audio Equipment
Telephone: +(44) (0) 1773 762947
Fax: +(44) (0) 1773 533566
V.A.T. REGISTRATION NO. 667 3729 92
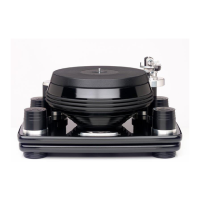
DAIS INSTRUCTIONS
Well done, you have found the instructions! Now, carefully unpack both boxes. OK – we know it
looks like a ‘kit’ to build a turntable. Put the plinth onto the surface you are going to use for your
turntable with the ‘U’ shape cut out facing away from you. Put the motor into the ‘U’ shape with
the lobe of the motor inside. Lift up the bearing chassis and you will find at the back a small ‘u’
shape cut out. This has to fit centrally around the motor, approximately 3mm away. With the
spirit level provided, level the chassis with the three leveling feet. Carefully remove the sealing
tape from around the bottom of the bearing. This will allow you to take the ‘male’ out of the
‘female’ part of the bearing. Half fill the bearing with the oil provided (do not worry if you slightly
over fill it). Gently lower the male spindle into the hole and let it settle slowly down for a few
minutes – it may take a long time to go right down, but it will reach its final level when the platter
is put on.
Before placing the platter onto the bearing, make sure the mating surfaces are clean. Then,
using the lifting handles provided, lower the platter very gently onto the bearing. Once the platter
has settled, check the level again with the spirit level on top of the platter. Unscrew the lifting
handles and gently place the graphite ‘mat’ on top of the platter. Place the drive belt around the
platter and motor (top groove for 45rmp, bottom for 33 1/3rpm). Now you can fit your arm in the
usual way. It is self-explanatory how to adjust the armboard ‘lobes’ with the tools provided.
Happy listening!