Do you have a question about the NOVAK ATOM AND CYCLONE ESC and is the answer not in the manual?
Warning against water, moisture, and foreign materials entering the ESC.
Specifies maximum cell counts for Cyclone (10) and Atom (6) models.
Mandates installation of three 0.1µF (50V) ceramic capacitors on motors and power capacitor.
Covers reverse voltage, transistor tab contact, battery disconnection, and transmitter power-on sequence.
Advises insulating exposed wiring with heat shrink tubing to prevent short circuits.
Highlights high frequency, discrete steps, fast response, low-voltage operation, and advanced transistor technology.
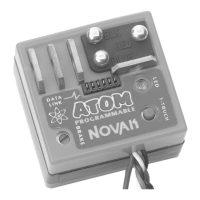
Details adjustable brake, user-selectable profiles, and Data Link connectivity.
Covers Radio Priority Circuitry, BEC, solder posts, and brake light circuitry.
Converts Futaba J plug to Airtronics/Sanwa, KO, Kyosho, JR/Hitec/AIR Z receivers.
Illustrates included plugs and the technique for removing wires from connectors.
Details lifting metal locking tabs and inserting pins correctly into plug slots.
Warns that improper wiring installation can damage the receiver, servo, and speed control.
Explains wiring for Z-style receivers and correct plug orientation for signal wire.
Guides on locating ESC away from receiver/antenna and mounting the receiver for minimal interference.
Covers mounting the speed control, on/off switch, and antenna for optimal performance.
Details soldering three 0.1µF capacitors to the motor to reduce radio noise.
Explains installing the external Schottky diode on the Atom ESC for improved efficiency.
Stresses the necessity of installing the power capacitor to dissipate noise and prevent damage.
Describes two methods for connecting the power capacitor to solder posts or power wires.
Guides on soldering power wires to ESC solder posts, noting wire gauge options and tips.
Details connecting the ESC to the receiver, battery pack, and motor in the correct order.
Recommends quality connectors and twisting motor wires to reduce radio noise.
Outlines essential transmitter settings like ATV, EPA, TRIM, and THROW adjustments.
Provides detailed settings for popular transmitters to optimize linearity and control.
Defines abbreviations used in transmitter settings charts for clarity.
Specific settings for Airtronics CL-3PS, CS-2P, and M8 transmitters.
Specific settings for KO PROPO PRECIOUS, KO PROPO MARS, and FUTABA 3PJ transmitters.
Procedures for powering on the transmitter/ESC and initiating the 1-TOUCH setup.
Guides on setting full throttle and full brake positions for ESC calibration.
Returning the throttle to neutral and confirming proper programming completion.
Describes factory profiles and how to activate the profile selection mode.
Guides on identifying the selected profile via LED blinks and selecting the next profile.
Explains how the speed control stores the selected profile in non-volatile memory.
Details creating custom profiles using Novak Pit Wizard or ESC Profile Software.
Covers adjusting the starting value of brake throw using the ESC's BRAKE pot.
Explains the fourth wire connection and warns against shorting the blue FET servo wire.
Suggests installing a 10μH inductor in series with the blue wire to fix radio glitching.
Details when an external receiver battery pack is needed and how to install it.
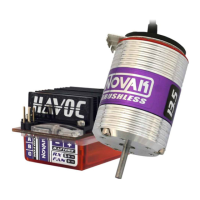
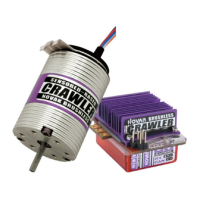
Notes that the Cyclone has built-in brake light circuitry, while the Atom does not.
Step-by-step instructions for connecting brake light wires to the Cyclone ESC.
Guides on inserting LEDs into brackets and connecting them to the JST connector harness.
Provides options for mounting brake light brackets to the car body or chassis.
Addresses ESC programming failures and loss of throttle control with potential causes and solutions.
Diagnoses motor not running, ESC not set, and bad connections with LED status checks.
Covers receiver glitches, throttle stutters, and melted/burnt ESC indicating internal damage.
Covers service fees, harness integrity, dealer authorization, and component availability.
Details submitting service cards and backing up custom profiles before sending for service.
Specifies items for service and requirements for making warranty claims.
Outlines service options, customer responsibility for costs, and expedited shipping.
Provides customer service hours, phone, fax, and mailing address for assistance.
Gives the mailing address for sending units and highlights website resources.
| Brand | NOVAK |
|---|---|
| Model | ATOM AND CYCLONE ESC |
| Category | Controller |
| Language | English |