5
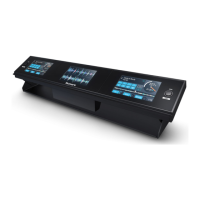
REAR PANEL FEATURES
141414446789
10
13
14
11
5
2
33312
1. LINE | PHONO INPUTS (RCA) – Connect your audio sources to these inputs. These inputs can
accept both line and phono-level signals.
2. GROUNDING TERMINAL – If using phono-level turntables with a grounding wire, be sure to connect
the grounding wire to these terminals. If you experience a low “hum” or “buzz”, this could mean that
your turntables are not grounded.
Note: Some turntables have the grounding wire built into the RCA connection and, therefore, nothing
needs to be connected to the grounding terminal.
3. LINE | PHONO SWITCH – Flip this switch to the appropriate position, depending on the device
connected to the PHONO INPUTS. If using phono-level turntables, set this switch to “PHONO” to
provide the additional amplification needed for phono-level signals. If using a line-level device, such as
a CD player or sampler, set this switch to “LINE.”
4. LINE INPUTS (RCA) – Connect line-level devices, such as CD players, samplers or audio interfaces,
to these inputs.
5. MIC 2 INPUT – If you would like to use an additional ¼” microphone, connect it to this input. Adjust the
levels for this input with the MIC GAIN CONTROLS.
6. CUE / SEND OUTPUT – Connect external monitors to this output to monitor pre-fader audio sent to the
Cue Channel (see #20 under TOP PANEL FEATURES).
7. RECORD OUTPUT (RCA) – Use standard RCA cables to connect this Record output to a recording
device, such as a CD recorder or tape deck. The level of this output is based upon pre-master levels.
8. BOOTH OUTPUT (RCA) – Connect an external monitoring device, such as powered monitors, a PA
system, or a home stereo, to this output. The controls this output are located on the front panel.
9. MASTER OUTPUT (RCA) – Use standard RCA cables to connect this Master output to a speaker or
amplifier system. The level of this output is controlled by the Master knob on the top panel.
10. MASTER OUTPUT (BALANCED) –
Connect this low-impedance XLR output to a PA system or powered
monitors.
The level of this output is controlled by the Master knob on the top panel.
11. FADER START – If you would like to use the mixer’s “fader start” to automatically start and cue music
from external devices via the CROSSFADER, connect these outputs to your fader start-compatible
device. You can use standard 1/8” stereo cables to make these connections.
12. EQUALIZER DEFEAT – Switch this to turn off the GRAPHIC EQUALIZER (see #12 under TOP
PANEL FEATURES).
13. POWER IN – Use the included power cable to connect the mixer to a power outlet. While the power is
switched off, plug the power supply into the mixer first, then plug the power supply into a power outlet.
14. VOLTAGE SELECTOR – This 2-position switch sets the AC input voltage for the speaker. U.S. users
should set this switch to “100-120V” whereas U.K. and most European users will need to set this to
“220-240V.”