17
GB
SPECIFIC SAFETY INSTRUCTIONS
Warning!
Somewoodandwoodtypeproducts,especiallyMDF(Medium
DensityFibreboard)canproducedustthatcanbehazardousto
yourhealth.Werecommendtheuseofanapprovedfacemask
with replaceable filters when using this machine in addition to
using the dust extraction facility.
Ensure that power tools are disconnected from the mains
supply when not in use, before servicing, lubricating, making
adjustments, changing accessories and router bits.
Do NOT stop the machine by forcing the router bit into the work
piece.
Alwaysusethecorrecttypeofrouterbitfortheoperationtobe
carried out.
Do NOT use router bit’s that are bent, have chipped or missing
teeth. This is highly dangerous and could result in a serious
accident causing injury to the operator, bystanders and damage
to the machine.
Only use router bits that are recommended by the supplier and
that are in good condition.
Whenroutinglongworkpiecesusesawhorsesorworkbenches
to support the work piece.
Ensure that all securing clamps are tight and check for
excessive play.
Always keep the collets and locking nut clean and free from
sawdustbuild-up.
Wheneverreplacingrouterbitsensurethattheshankisinserted
into the collet by a minimum of 20mm or half its length for safest
operation.
Ensure that the collet nut is securely tightened using the
wrenches provided. Do not over tighten.
Before commencing any cut allow the router to reach its full
speed and let it run for a few seconds. If any unusual noise
or vibration is heard STOP the machine immediately and
investigate the cause.
Do NOT start the machine with the router bit in contact with the
work piece.
Check the work piece for any protruding nails, screw heads or
anythingthatcoulddamagetheRouterbit.
Do NOT attempt to modify the machine or its accessories in
any way.
Do NOT force the machine let the machine do the work this will
reduce the wear on the machine, reduce the life of the battery
and blade and increase its efficiency and operating life.
Approvedeardefendersshouldbewornwhenusingarouterfor
extended periods.
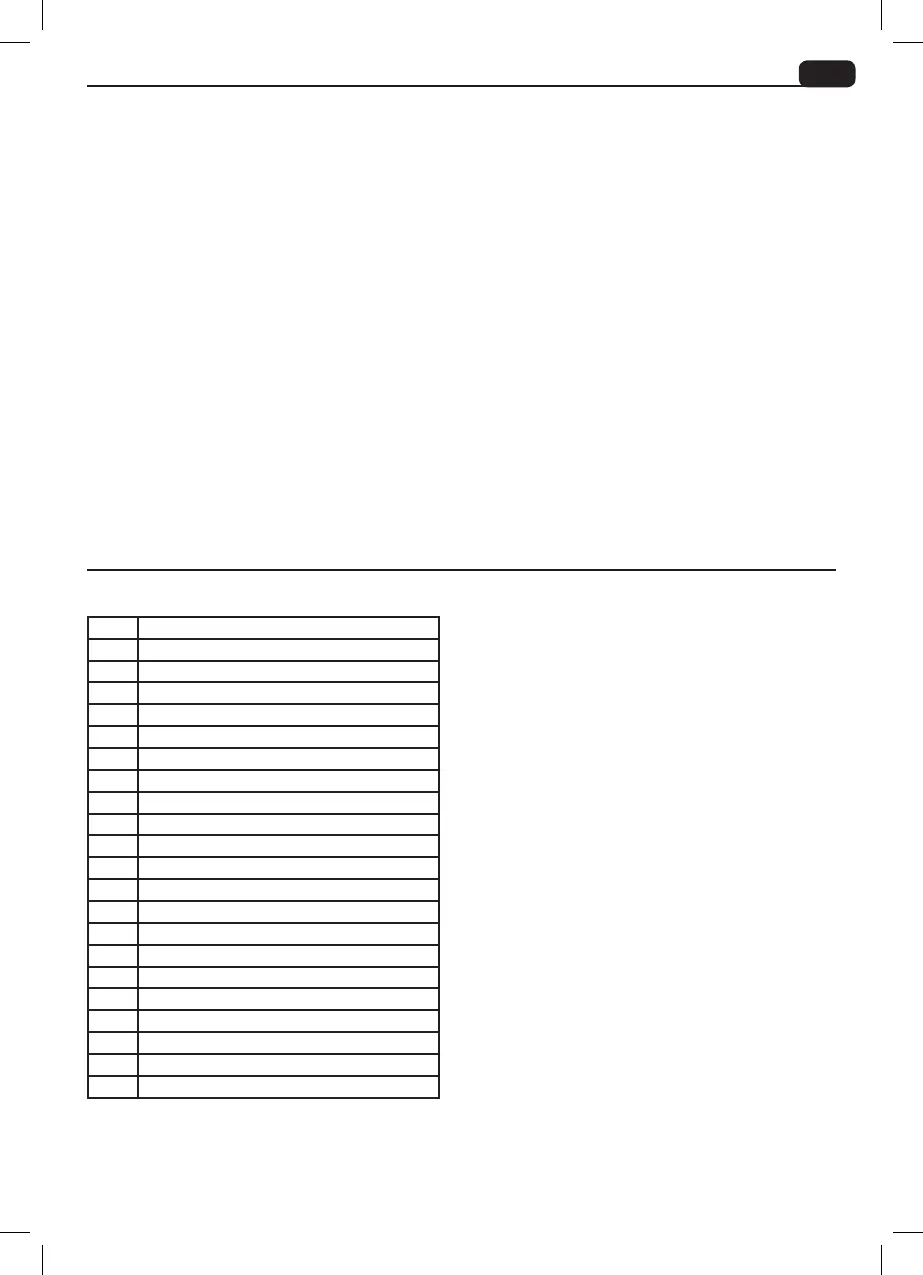
COMPONENTS AND CONTROLS (PIC. 1)
ASSEMBLY INSTRUCTIONS
Before attempting to use your Router read the following
instructions.
WARNING:Isolatethemachinefromthepowersupplybefore
anyadjustments,maintenanceorwhenchangingRouterbits.
LifttheRouterfromtheboxalongwiththeaccessories.
Retaintheboxuntilallpartshavebeenaccountedfor.
DEPTH STOP (PIC.2)
Locate the depth stop spindle. Slacken the securing knob
(Pic.2.1)andlowerthespindleintotheRoutercasting(Pic.2.2).
Leavingthedepthscaleinitsuppermostposition,tightenthe
securing knob. Note the depth scale.
ROUTER BODY LOCKING LEVER (PICS.3&4)
TotherearandtotherightoftheRouteristhelockinghandle.
Makesureitisinthereleaseposition(Pic.3.1).Thisenablesyou
tolock(Pic.3.2)theRouterbodyinanyverticalposition.
PLUNGE OPERATION (PIC.4)
Adopt a well balanced body position. Grip both handles and
press downwards to plunge the Router. The Router body to
move downwards. Release the downward pressure and the
springswill allow theRouter body toreturnto theuppermost
position.
DUST EXTRACTION OUTLET (PICS.5&6)
Itisrecommendedthatthedustextractionoutletisused(read
specific safety instructions relating to dust particles that are
harmful to your health). A suitable commercial dust extractor
can be purchased or a vacuum cleaner pipe can be used to
extract dust particles as the machine is cutting.
Make sure the collet securing nut is loosely tightened in a
clockwise direction. This allows the dust extraction adapter to
slideinfromtherearoftheRouter(Pic.5).
1
Motor casing
2
Depth stop securing screw
3
On/Off switch
4
Motor brush cover
5
Spindle lock
6
Handle
7
Parallel fence securing screw
8
Depth stop turret
9
Depth stop scale
10
Depth stop
11
Mains cable
12
Depth lock lever
13
Routerbase
14
Dust extraction unit
15
Mitre fence
16
Mitre fence extension bars
17
Routerguideplate
18
Spanner
19
Hexagonal key
20
Collet
21
Routerbitx12
22
Bit/pantograph for curve routing