EOS SERVICE PROCEDURE 12-2810-R02 (10/3/10)
!"##$%&'(&$))*+%,,'((-..*/01*0/-0(2(+34 '((15.*167*1/./(2(,839)'((:;<=>?;@A?;BC>?D:BE?AF 8
5. Lubricate!and!carefully!work!the!MBQ= ;(ZAD:>CU($*<>CU (W_7Y!ont o!the!plastic!portion!of!the!MBQ=;(ZAD:>CU(W(Y(tube!
until!seated!into!the !groove.!
!
6. If!the!K;FBCO();=;<(W_-Y(was!removed,!reinstall!by!holding!th e!MB Q=;(ZAD:>CU(W_\(A<(// Y(with!the!small!flat!molded!
onto!the!plastic! part!of!the!h ousi ng!tube!facing!upwards.!Care fully !insert!one!leg!of!the!K;FBCO();=;<(W_-Y!without!
excessiv ely!bending!it!into!the!sq uare!bro ached!hole!on!one!si de!o f!the!MBQ =;(ZAD:> CU(W_\(A<(//Y (tube!W+>UE(_.Y;!pull!
the! opposite!leg!of!the!K;FBCO();=; <(W_-Y!outwards!and!i nser t!the!end!into!the!square!broached!hole!in!the!
opposite!side!of!the!MBQ=;(ZAD:>CU(W_\(A< (//Y( tube.!Th e!K;FBCO();=;<(W_-Y (should!now!rest !on!the!f lat!mold ed!o n!
top!of!the!housing!tube;!this !will!insure!that!the!square!aspirator!hole!on!one!side!of!the!tube!will!face! the!
mouthp iece!ope ning !inside!the!Z AD:>CU(W6Y.!
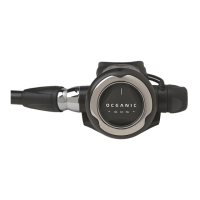
7. Lightly!lubricate!and !inst all!the!3 OhD:RF;CR(&Dd;($*<>CU(W5_Y(onto!the!narrow!g roove!in!the! middle!of!the!
3OhD:RF;CR(&Dd;(W55Y(W+> UE(_5Y.!
8. Lightly!lubricate!and !inst all!a !new!JBQBC?;(!NBSR($*<>CU(W50Y(int o!the!small!opening!of!the!3OhD:RF;CR(&Dd;(W55Y(by!
pressing!it!into!place!wit h!the!narrow!end!of!the!#ATT;R(W05Y(s haft.!Remove!the!#ATT;R(W05Y (shaft!and!look!into!t he!
small!opening!of!the!3Oh D:RF;CR (&Dd ;(W55Y;!you!should!be!able!to! see!clear!through.!If!not,!remove!o‐ring!and!
rein stall !until!correctly!seated.!
9. Inspect!and! install!a!new!#ATT;R(!;BR(W0.Y(onto!the!#ATT;R(W05Y,!large!flat!end!facing!out!until!it!is!fully!seated!and!
flush!wi th!the!edge!of!the!#A TT;R(W05Y!W+>UE(__ Y.!Examine!the!hole!in!the!center!of!the!#ATT;R(!;BR(W0 .Y!to!insure!that!
it(is!clear!and!not!plugge d.!Do!not!use!any!adhesive!or!lubricant.!
! ! !
! ! !!!+>UE(__(( ( ( (((((+>UE(_0( ( ( ( ((((((( +>UE(_/(
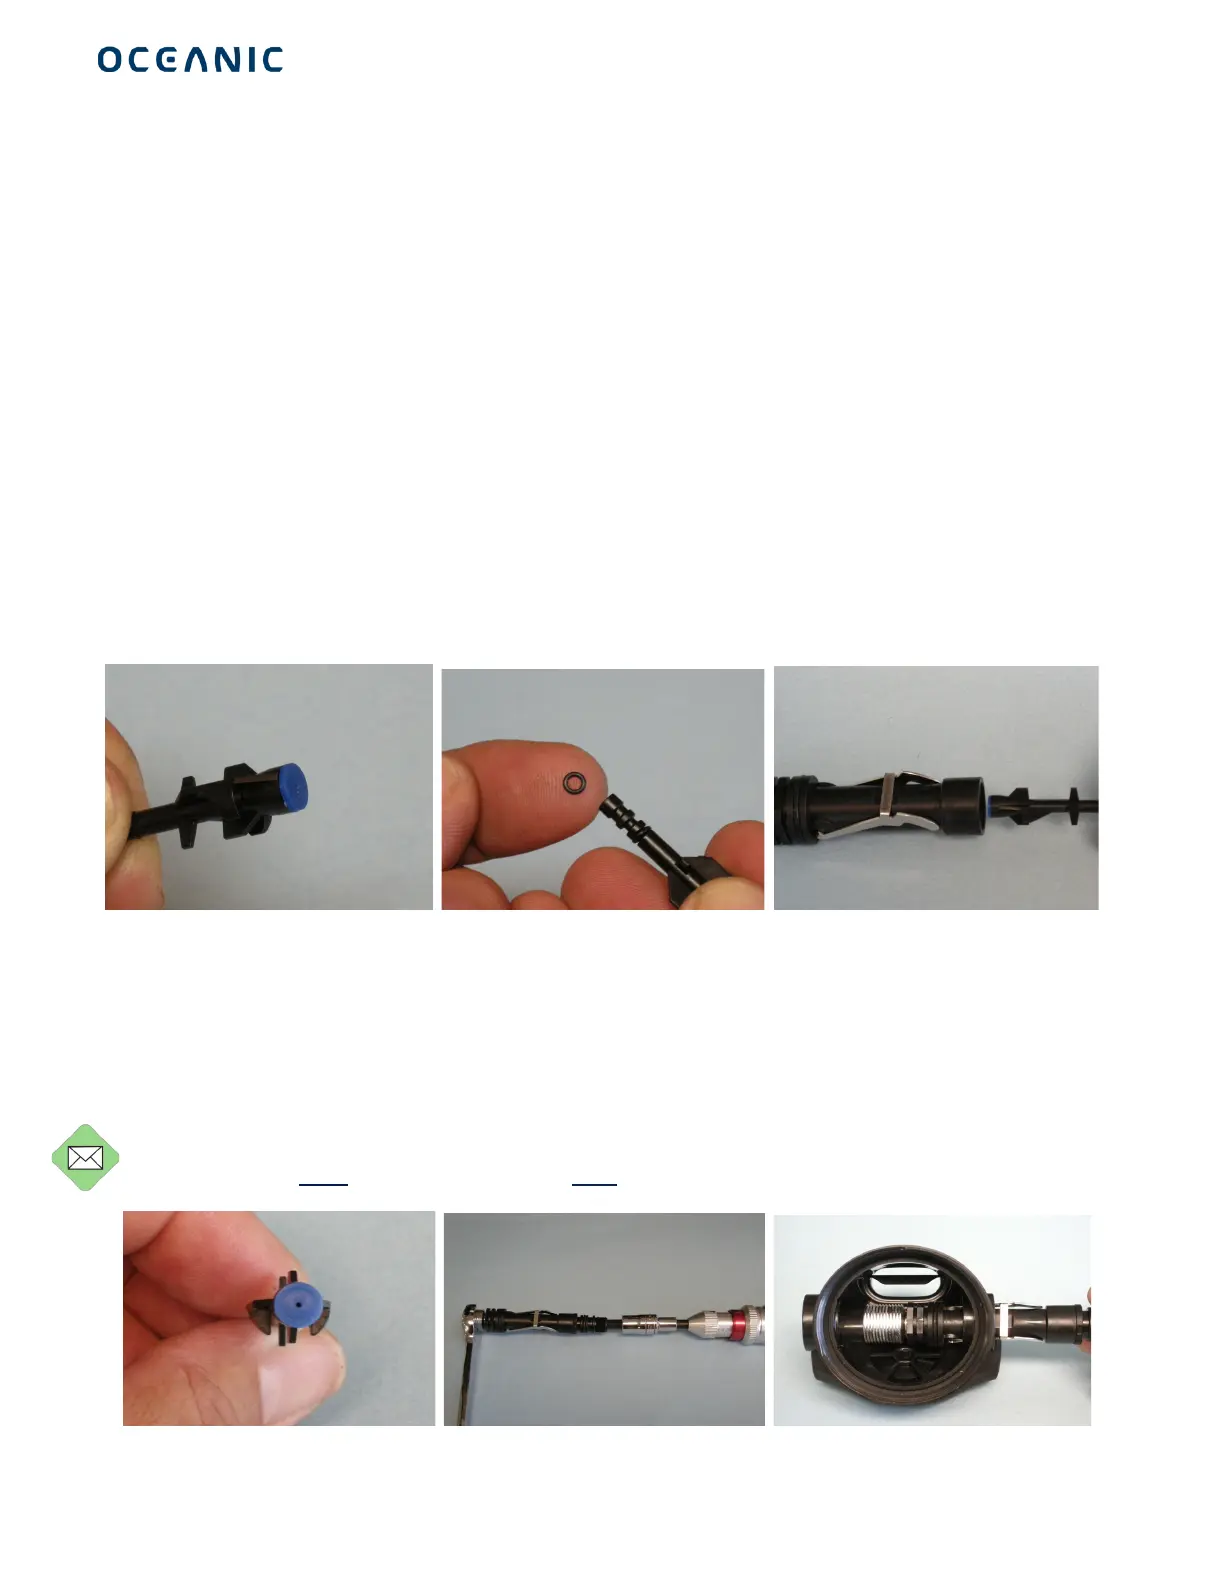
10. Lig htly!lubricate!and!install! both!#ATT;R ($*<>CU:( W0_f( 00Y!i nto!the!narrow!grooves!of!the!shaft!of!the!#ATT;R(W05Y !W+>UE(
_0Y.!
11. Insert!the!#ATT ;R(W05Y!seat!end!f irst!into! the!round!opening!of!the!MBQ =;(ZAD:> CU(W_\(A<(//Y ,!pre ssing!it!into!place!
with!a(cotton!swab!( +>UE(_0Y;! the!K;FBCO();=;<(W_-Y(shoul d!pop!up!momentarily.!Make !sure!the!side!of!the!poppet!
with!4!“fins”!face!downward !to!insure!that!the!poppe t!engage s!the!legs!of!the!K;FBCO();=;<(W_-Y.!
G$&,'(^N;C(>C:RBQQ>CU(RN;(#ATT;R(W05Y(>CRA(RN;(MBQ=;(ZAD:>CU(W_\(A<(//Yf(>R( FD: R(d;(A<>; CRBR;O(V>RN(RN;(:>O;(AS(RN;(
#AT T;R(W05Y(NB=>CU(/(S>C:(SB?>CU(OAVCk(RN;(:>O;(V>RN(_( S>C:(SB?>CU(DT(W+>UE(_1 YE(
(((( ( ( ((
( ( ((((+> UE(_1(( ( ( ((((+>UE(_6(( ( ( ((((+>UE(_\(