4
Operating Instructions and Parts Manual 24669
4/18
2018 OEMTOOLS
™
3/8" DRILL
PRODUCT SPECIFICATIONS
Motor: 4 Amp, 120V, 60Hz
Variable Speed: 0-3,000 RPM (No-load)
Chuck: 3/8" Keyless
Max. Drilling Capacity: 1" (Wood) and 3/8" (Metal)
Trigger Lock: Yes
Rocker Switch: Forward/Reverse
Cord: 6 Ft.
Weight: 3.5 Lbs.
WARNING: Double insulated tools are equipped
with a polarized plug (one blade is wider than the
other). This plug will fit in a polarized plug only one
way. If the plug does not fit fully in the outlet, reverse
the plug. If it still does not fit, contact a qualified
electrician to install a polarized outlet. DO NOT change
the plug in any way. Double insulation eliminates the
need for the three wire grounded power cord and
grounded power supply system.
OPERATING INSTRUCTIONS
WARNING: Be sure you read, understand and apply
safety instructions before use.
1. Always inspect, maintain and operate in accordance
with ANSI safety code for power tools and other local
safety codes and regulations.
2. Use clamps or other practical ways to secure and
support the workpiece to a stable platform.
3. DO NOT force the tool. Use the correct tool for the job.
4. Disconnect the plug from the power source before
making any adjustments, changing accessories or
storing the tool.
5. Check for misalignment or binding moving parts,
breakage of parts, and any other condition that may
affect the tool’s operation. If damaged, have the tool
serviced before using.
6. Use only accessories that are recommended by the
manufacturer for your model.
7. Always make sure the work surface is free from nails
and other foreign objects.
8. Never hold the workpiece in one hand and the tool in
the other hand when in use. Never place hands near or
below the cutting surface.
9. Never lay workpiece on hard surfaces like concrete,
stone, etc.
10. Always check accessory bits, grinding stones, cut-off
wheels, etc. for damage before each use.
11. To avoid shock or fire, replace power cord immediately
if it is worn, cut or damaged in any way.
12. Avoid accidental starting. Be sure switch is OFF before
plugging in.
13. Remove adjusting keys or wrenches before turning the
tool ON.
WARNING: If any part is missing or damaged, DO NOT
plug the Drill into the power source until the missing or
damaged part is replaced.
WARNING: To avoid fire or toxic reaction, never use
gasoline, naphtha, acetone, lacquer thinner, or similar
highly volatile solvents to clean the tool.
ASSEMBLY AND OPERATION
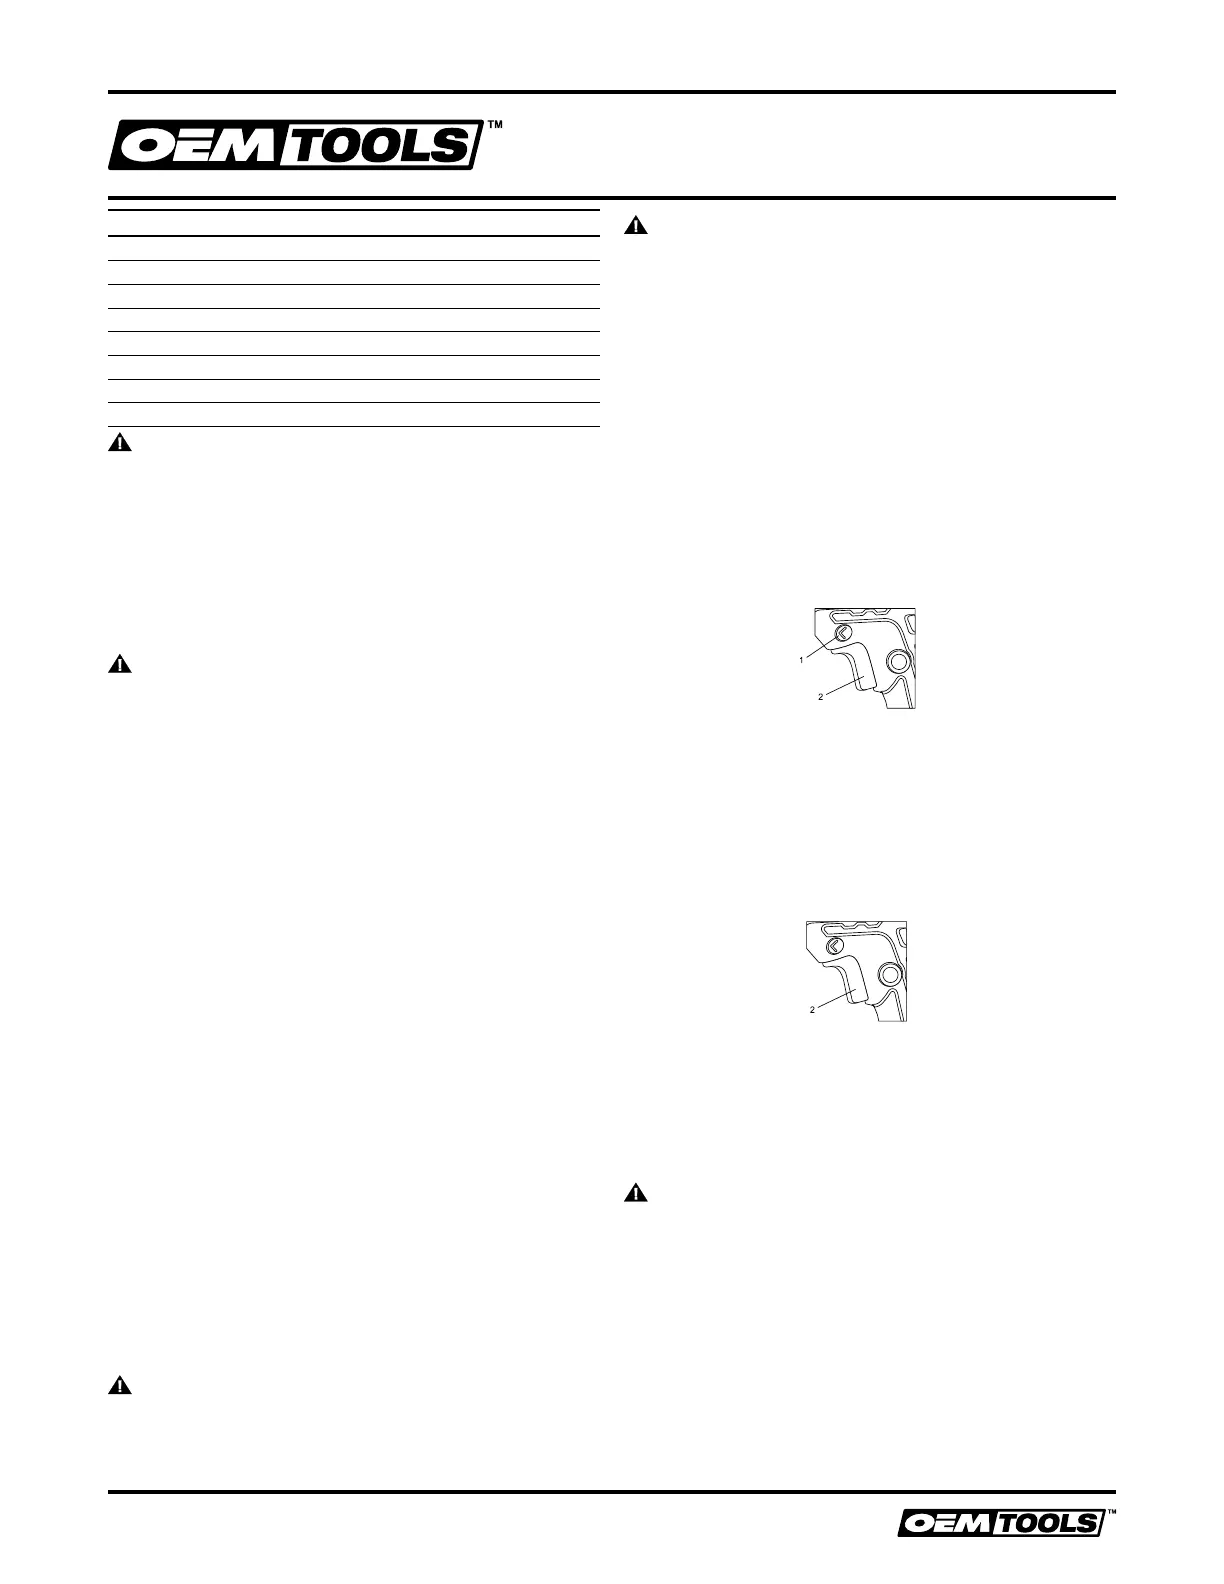
FORWARD/REVERSE SWITCH
The forward/reverse switch (1) is conveniently mounted
above the trigger switch (#2 in Fig. 1). To make the drill
rotate clockwise for drilling, push the forward/reverse switch
to the right. To make the drill rotate counterclockwise, push
the forward/reverse switch to the left.
NOTES: Never change the position of the forward/
reverse switch while the chuck is turning.
There is no dead center position for the forward/reverse
switch.
The tool will run only when it is in either the full left or full
right position.
VARIABLE SPEED TRIGGER SWITCH
This drill is equipped with a variable-speed ON/OFF
trigger switch.
1. To start drill, gently squeeze the trigger switch
(#2 in Fig. 2). NOTE:The drill will turn at its slowest
speed when the trigger switch is depressed slightly.
The drill will turn at its fastest speed when the trigger
switch is fully depressed.
2. To stop the drill, release the trigger switch.
NOTE: Drilling at a slow speed for an extended period of
time may cause the drill motor to overheat. If drill gets hot,
stop drilling and allow it to cool for at least 15 minutes.
INSTALLING DRILL BITS
WARNING: Never hold the chuck body with one hand
and use the drill power to rotate the drill body to loosen
or tighten bits. Serious injury may result.
This drill is equipped with a keyless chuck.
This chuck is designed to provide easy two-handed
tightening and loosening of the chuck jaws.
1. To open the keyless drill chuck, grasp and hold the
chuck collar (1) with one hand (Fig. 3). Rotate the chuck
body (2) in a counterclockwise direction until the chuck
jaws (3) open wide enough to accept the bit (4).
Fig. 1
Fig. 2
 Loading...