22 23
<MANUAL>
In this mode, the flash is emitted according to the light intensity setting.
1. The control panel shows the light intensity ratio.
Light intensity ratio: Ratio of the current light intensity with
respect to the full flash light intensity.
* The light intensity ratio display can be changed to the guide number
(GN) display in the Custom Setup operation (page 48).
2. Tu rn dial A to set the desired light intensity ratio.
The available light intensity ratios are 1/1, 1/2, 1/4, 1/8,
1/16, 1/32, 1/64, 1/128 and 1/256.
Guide numbers (GN) and light intensity ratio
Light inten-
sity ratio
How to determine the lens iris (F), light intensity or guide number (GN)
Since the distance to the subject is very short and the shooting magnification is very high in
Macro shooting, the light intensity is lower than would normally be the case with the lens iris
(F) setting. This is because the light intensity for the lens iris is based on a distance setting of
infinity.
The F-number at this time Is referred to as the effective F-value, which is variable depending
on the shooting magnification and lens type. In consequence, the above facto should be taken
in consideration when determining the flash light intensity and lens iris in the MANUAL mode.
1.When using an Olympus Four Thirds System SLR camera:
• Check the light control range of the lens used and set the combination of the lens iris (F) and
light intensity ratio according to the shooting distance (page 24).
• If optimum exposure cannot be obtained, take some test shots and adjust the lens iris, light
intensity ratio and other conditions as required.
2.When using any other camera:
•Take some test shots and set the lens iris (F) and light intensity ratio as required.
Light intensity adjustment
The light intensity ratio (guide number) can be adjusted in 1/3-step increments.
The light intensity adjustment must be set to ON in the Cus-
tom Setup operation (page 46).
• The indicator appears in the control panel.
1. Tu rn dial B to select a light intensity adjustment value in
the following steps.
0 → +0.3 → +0.7
→
Tu r ning the dial further increases the light intensity ratio.
0 → –0.3 → –0.7
→
Tu r ning the dial further decreases the light intensity ratio.
2. Even if the camera’s flash adjustment mode is selected, it
will not be applied. Only the adjustment set on the Ring
Flash is applied.
[Example]
Adjustment
setting
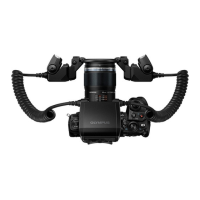
MACRO FLASH CONTROLLER
FC-1
MODE
LAMP
AUTO
CHECK
TEST/
CHARGE
POWER
LIGHT
RATIO GN/
MACRO FLASH CONTROLLER
FC-1
MODE
LAMP
AUTO
CHECK
TEST/
CHARGE
POWER
LIGHT
RATIO GN/
GNm 11 8.0 5.6 4.0 2.8 2.0 1.4 1.0 0.7
GNft 36 26 18 13 9.2 6.6 4.6 3.3 2.3
1/1 1/2 1/4 1/8 1/16 1/32 1/64 1/128 1/256
Light intensity adjustment
display on the control panel
Actual adjustment
value
RF-11 +0.3
Camera +0.3
+0.3 +0.3
Light intensity setting
Light intensity
ratio
Adjustment
setting