Recording
..
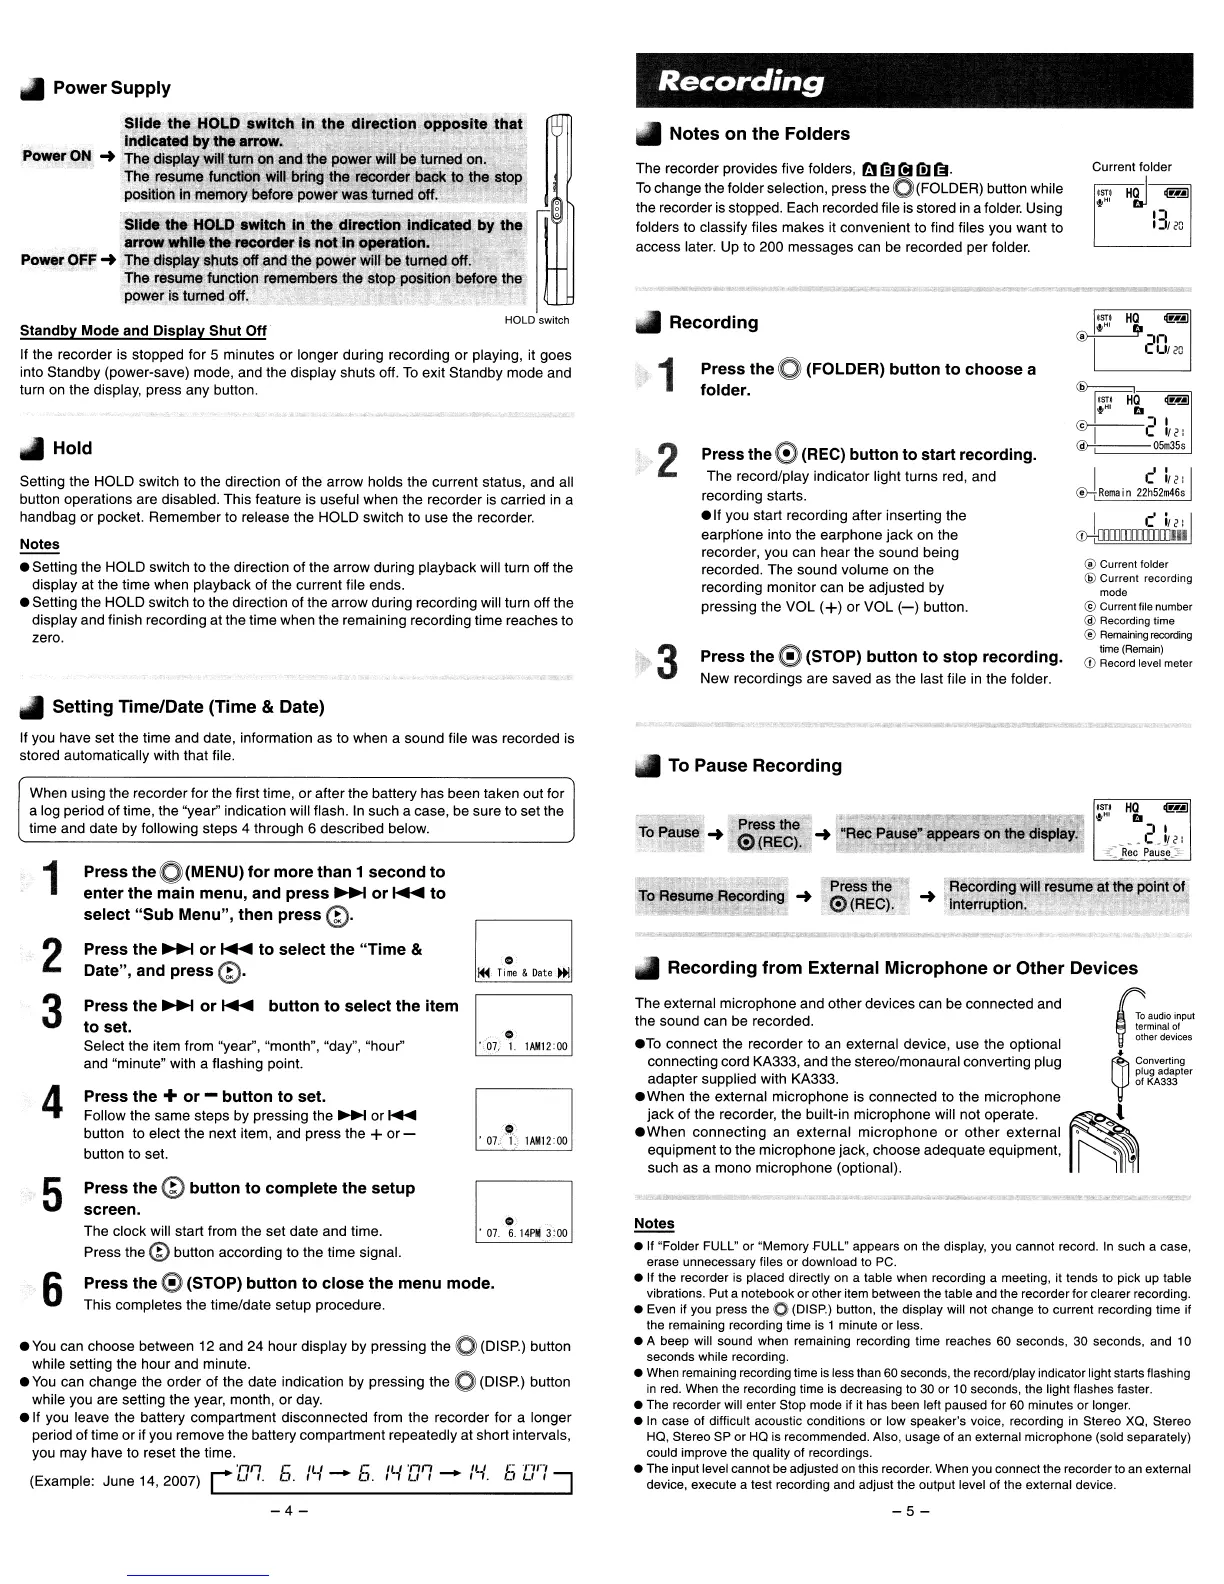
Recording
Current folder
ISTI
HQ.
1
olmJ
\!pHI
i1J
I)
I:lUG
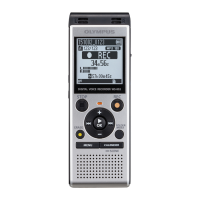
@ Current folder
@ Current recording
mode
@ Current file number
@ Recording time
® Remaining recording
time
(Remain)
Q)
Record level meter
I c'lu:
®-+
Rem.
in
22h52m46s
1ST'
HQ
olmJ
.--..
I
...
HI
£I
~2n
U/2G
I
C'
i/
2
:
I
<D-tWIDIWIID111
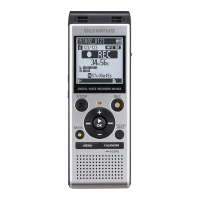
Press the0 (REC) button
to
start recording.
The record/play indicator light turns red, and
recording starts.
elf
you start recording after inserting the
earplione into the earphone
jack
on the
recorder, you can
hear
the sound being
recorded. The sound volume on the
recording monitor can be adjusted by
pressing the
VOL
(+)
or
VOL
(-)
button.
Press the0 (FOLDER)
button
to
choose
a
folder.
Press the
G)(STOP)
button
to
stop
recording.
New recordings are saved
as
the last file in the folder.
2
3
1
The recorder provides five folders,
fl't
fiJ
f!l1!J
lEI·
To
change the folder selection, press the
O(FOLDER)
button while
the recorder is stopped. Each recorded file is stored in a folder. Using
folders to classify files makes it convenient to find files you want to
access later. Up to 200 messages can be recorded per folder.
• Notes
on
the Folders
• Power
Supply
Slide tlleH.OLD
a~wlt~h
;
In,:
th~
~Ir.ctlon
0Jl,poalte t.!lat
In~!catedl;lyth.
arrow.;
'.~~'
..
.'
.
-,
:,
Power
O.N
~
The:dlsplay
WilfAlJin'
orrand the power
will
be
MnM
on,
The
resume
luilCtiOri'
will
brin$l
tfie
f
recol'd8f
baG!<.l()
the stop
positio~
i.runemOrv~before
power was'turned off! '
·t
~
!
SIIJift
he
HOLD
awltchln
the
d!.reCtion.~ndlcated
by
.th,l~
arrow
Wh!Ie'tI18
nM:Qrderia
n0tJlI
Operatlon:~'
,t;;;.}
Power
OFF
~~1"he
dlsplay
~uts
Off
aildthejl9\yer
will
betumed
off.
TheT~suri1efuriqtion
remembers
the~
stop
~ition
before the
po"!'er is
tU'1:!ed
oU.· .
~...~
'f
'.,
HOLD switch
Standby Mode and Display Shut
Off
If the recorder
is
stopped for 5 minutes
or
longer during recording or playing, it goes
into Standby (power-save) mode, and the display shuts off.
To
exit Standby mode and
turn on the display, press any button.
Setting the HOLD switch to the direction of the
arrow
holds the current status, and all
button operations are disabled. This feature is useful when the recorder is carried in a
handbag
or
pocket. Remember to release the HOLD switch to use the recorder.
Notes
e Setting the HOLD switch to the direction of the arrow during playback will turn off the
display at the time when playback of the current file ends.
e Setting the HOLD switch to the direction
of
the arrow during recording will turn off the
display and finish recording at the time when the remaining recording time reaches to
zero.
..
Hold
..
Setting Time/Date (Time & Date)
If you have set the time and date, information as to when a sound file was recorded is
stored automatically with that file.
...
To Pause Recording
When using the recorder for the first time, or after the battery has been taken out for
a log period of time, the "year" indication will flash.
In
such a case, be sure to set the
time and date by following steps
4 through 6 described below.
eYou
can choose between 12 and 24 hour display by pressing the 0 (DISP.) button
while setting the hour and minute.
e
You
can change the order of the date indication by pressing the 0 (DISP.) button
while you are setting the year, month,
or
day.
elf
you leave the battery compartment disconnected from the recorder for a longer
period of time or if you remove the battery compartment repeatedly at short intervals,
you may have to reset the time.
r
'O'I.
5.
1'-1-
5.
1'-1
'0'1-
1'-1.
5 [}'']--,
(Example: June 14, 2007) _ _
~
o
audio
i.npUI
terminal of
other
deVices
•
~
Converting
plug adapter
of KA333
~
PresS-'a
o
(R!=ch.
TiR!SUm&R~ral.ng
~
!AI
.'1"?4'i't
The external microphone and other devices can be connected and
the sound can be recorded.
eTo
connect the recorder to an external device, use the optional
connecting cord KA333, and the stereo/monaural converting plug
adapter supplied with KA333.
eWhen
the external microphone is connected to the microphone
jack
of the recorder, the built-in microphone will not operate.
eWhen
connecting
an
external
microphone
or
other
external
equipment to the microphone jack, choose adequate eqUipment,
such as a mono microphone (optional).
Notes
• " "Folder
FULL"
or
"Memory
FULL" appears
on
the
display,
you
cannot
record.
In
such
a
case,
erase
unnecessary
files
or
download
to
PC.
•
If
the
recorder
is
placed
directly
on
a
table
when
recording
a
meeting,
it
tends
to
pick
up
table
vibrations.
Put
a
notebook
or
other
item
between
the
1able
and
the
recorder for clearer
recording.
•
Even
if
you
press
the
OJ
(DISP.)
bUllon,
the
display
will
not
change
to
current recording
time
if
the
remaining
recording
time
is
1 minute
or
less.
• A
beep
will
sound
when
remaining
recording
time
reaches
60
seconds,
30
seconds,
and
10
seconds
while
recording.
•
When
remaining
recording
time
is
less
than
60
seconds,
the
record/play
indicator
light
starts
flashing
in
red.
When
the
recording
time
is
decreasing
to
30
or
10
seconds,
the
light
flashes
faster.
•
The
recorder
will
enter
Stop
mode
if it
has
been
left
paused
for
60
minutes
or
longer.
•
In
case
of
difficult acoustic conditions
or
low
speaker's
voice,
recording
in
Stereo
XQ,
Stereo
HQ,
Stereo
SP
or
HQ
is
recommended.
Also,
usage
of
an
external microphone
(sold
separately)
could
improve
the
quality
of
recordings.
•
The
input
level
cannot
be
adjusted
on
this
recorder.
When
you
connect
the
recorder
to
an
external
device, execute a
test
recording
and
adjust
1he
output
level
of
the
external device.
..
Recording
from
External
Microphone
or
Other Devices
. 0
',07,
1.
1AM12:oo
o
,
07.
6.
14P~
3:00
o
~.
Time
&
Date
~
Press
the
0 (MENU)
for
more
than 1 second
to
enter the main menu, and press
~
or
~
to
select
"Sub
Menu", then press
@.
Press the
~
or
~
to
select
the
"Time
&
Date", and
press@.
Press the
~
or
~
button
to
select
the item
to
set.
Select the item from "year", "month", "day", "hour"
and "minute" with a flashing point.
Press the +
or
-
button
to
set.
Follow the same steps by pressing the
~
or
~
button to elect the next item, and press the +
or-
button to set.
Press
the
@
button
to
complete
the
setup
screen.
The clock will start from the set date and time.
Press the
@ button according to the time signal.
Press the G) (STOP)
button
to
close
the menu mode.
This completes the time/date setup procedure.
4
5
6
2
3
1
-4-
-5-
 Loading...