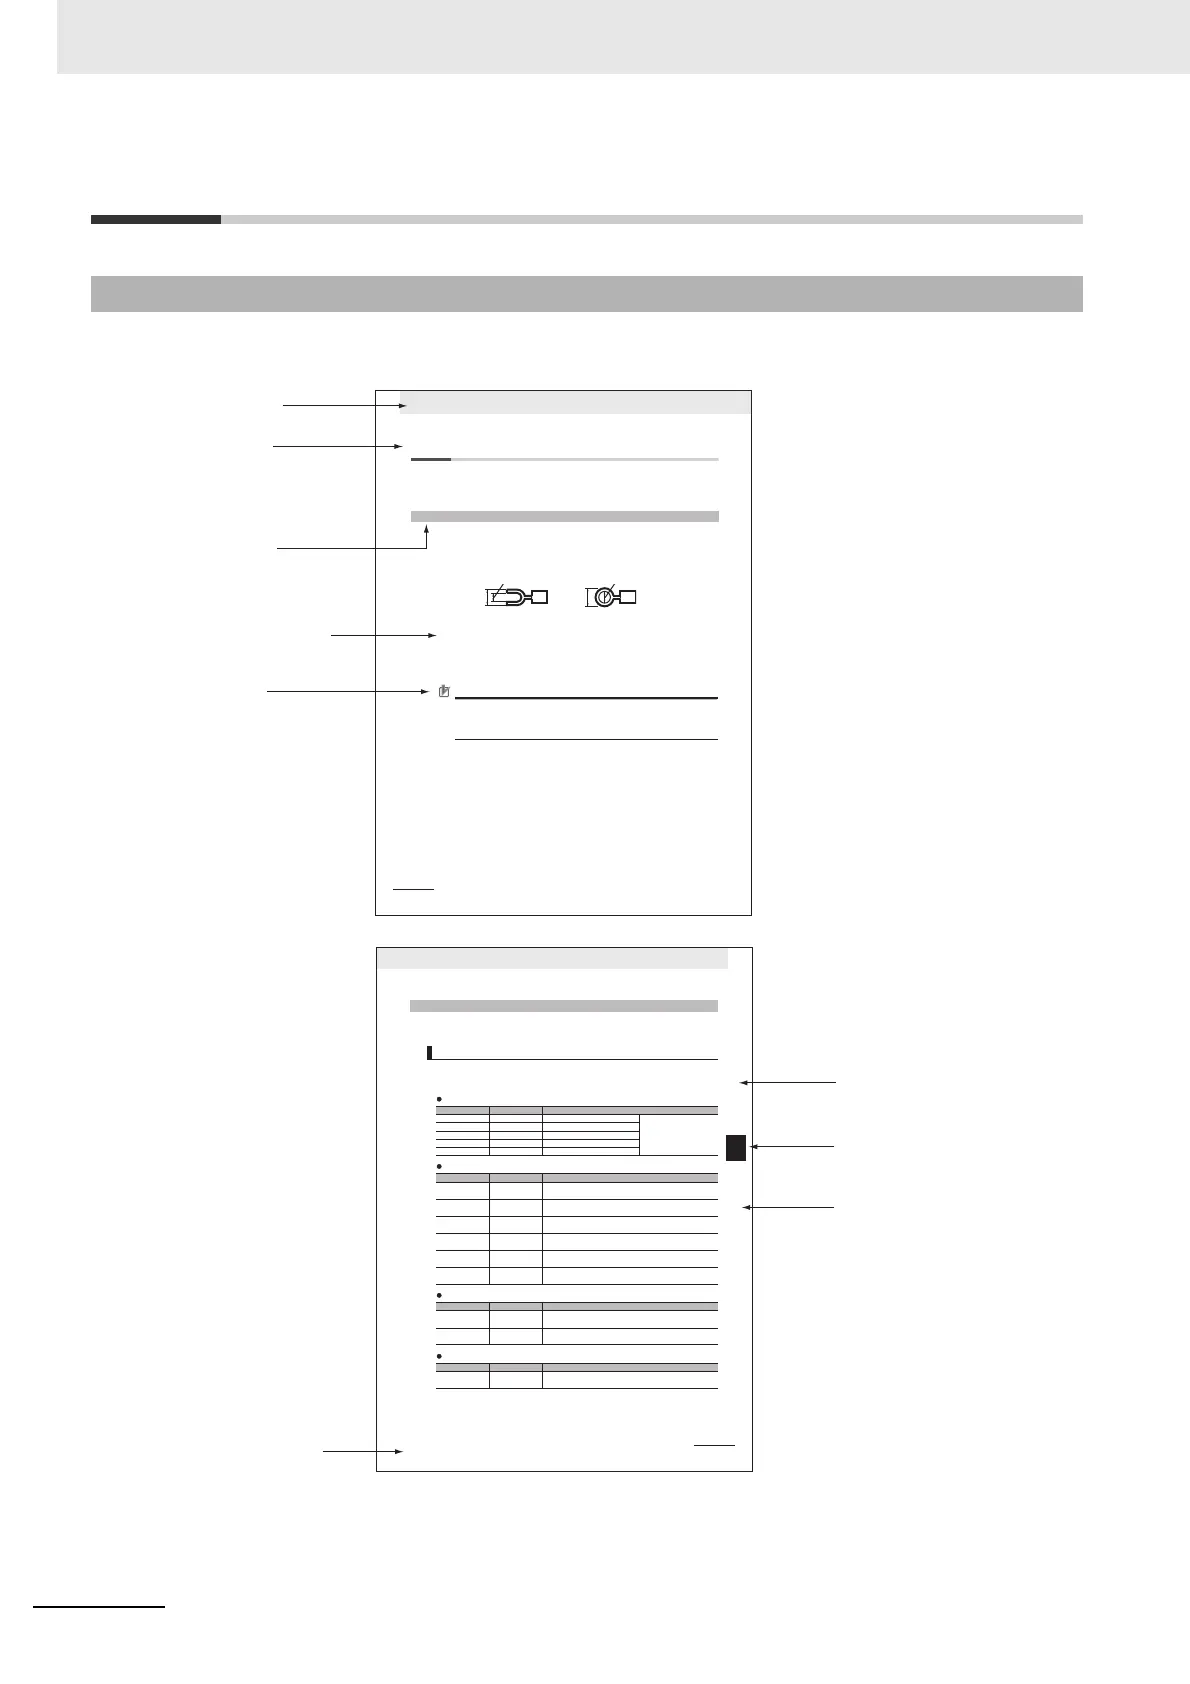
Indexes
Indicates the chapter number
of the current page.
Icon
(Refer to the following section.)
Clause title
Indicates the clause title
of the current page.
Operation
procedure number
Indicates operation procedure.
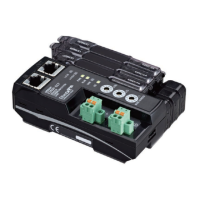
Section title
Name of manuals
Clause title
Indicates the chapter title
of the current page.
Section title
Indicates the section title
of the current page.
Chapter title
4 Installation and Wiring
4 - 10
GX-series EtherCAT Slave Unit User’s Manual
4-4 Connecting an External Device
Connect an external device to the I/O terminal of a Slave Unit.
The method of connection differs between Units with screw terminal blocks and Units with e-CON
connectors.
After mounting a crimp terminal to the cable of the external device to be connected, connect it to the
terminal block.
1
Mount the following crimp terminal to the signal line of the cable.
2
Connect the signal line to the terminal block.
Tighten the terminal block screws to the appropriate tightening torque of 0.5 N • m.
The terminal block is removable; remove the left and right screws if it is necessary to remove
the terminal block to connect the signal line.
Precautions for Correct Use
To remove the terminal block from the Slave Unit, loosen the left and right mounting screws
alternately. When mounting the terminal block as well, tighten the left and right screws
alternately.
If you tighten or loosen only one of the screws all the way without tightening or loosening the
other screw using an electric screwdriver, the terminal block will be distorted and cracked.
4-4-1 Connecting to a Screw Terminal Block
6.0 mm max.
6.0 mm max.
φ3.2 mm min.
3.2 mm min.
4 - 11
4 Installation and Wiring
GX-series EtherCAT Slave Unit User’s Manual
4-4 Connecting an External Device
4
4-4-2 Connecting to e-CON Connector Terminals
Connect the dedicated e-CON connector to the cables of the external device to be connected and then
connect it to the connector terminal.
The wire size and sheath diameter of applicable cables vary by the type of e-CON connector.
Use the next table to check that the e-CON connectors to be used conform to the wire size and sheath
diameter of the cables of the connected device.
Tyco Electronics connectors
Sumitomo 3M connectors
Panasonic Electric Works connectors
OMRON connectors
4-4-2 Connecting to e-CON Connector Terminals
Checking the e-CON connector and cable wire size
Model Housing color Applicable wire range
3-1473562-4 Orange Sheath diameter: 0.6 to 0.9 mm
Cross-sectional area: 0.08 to
0.5 mm
2
1-1473562-4 Red Sheath diameter: 0.9 to 1.0 mm
1473562-4 Yellow Sheath diameter: 1.0 to 1.15 mm
2-1473562-4 Blue Sheath diameter: 1.15 to 1.35 mm
4-1473562-4 Green Sheath diameter: 1.35 to 1.60 mm
Model Housing color Applicable wire range
37104-3101-000FL Red
AWG26 (0.14mm
2
) to AWG24 (0.2mm
2
)
Sheath diameter: 0.8 to 1.0 mm
37104-3122-000FL Yellow
AWG26 (0.14mm
2
) to AWG24 (0.2mm
2
)
Sheath diameter: 1.0 to 1.2 mm
37104-3163-000FL Orange
AWG26 (0.14mm
2
) to AWG24 (0.2mm
2
)
Sheath diameter: 1.2 to 1.6 mm
37104-2124-000FL Green
AWG22 (0.3mm
2
) to AWG20 (0.5mm
2
)
Sheath diameter: 1.0 to 1.2 mm
37104-2165-000FL Blue
AWG22 (0.3mm
2
) to AWG20 (0.5mm
2
)
Sheath diameter: 1.2 to 1.6 mm
37104-2206-000FL Gray
AWG22 (0.3mm
2
) to AWG20 (0.5mm
2
)
Sheath diameter: 1.6 to 2.0 mm
Model Housing color Applicable wire range
AXF12142 Red
AWG22 (0.3mm
2
) to AWG20 (0.5mm
2
)
Sheath diameter: 1.2 to 2.0 mm
AXF12146 Yellow
AWG28 (0.08mm
2
) to AWG24 (0.2mm
2
)
Sheath diameter: 0.7 to 1.2 mm
Model Specification Applicable wire range
XN2A-1430
Spring
clamp type
AWG28 (0.08mm
2
) to AWG20 (0.5mm
2
)
Sheath diameter: 1.5 mm max.