15
Recording to an MD
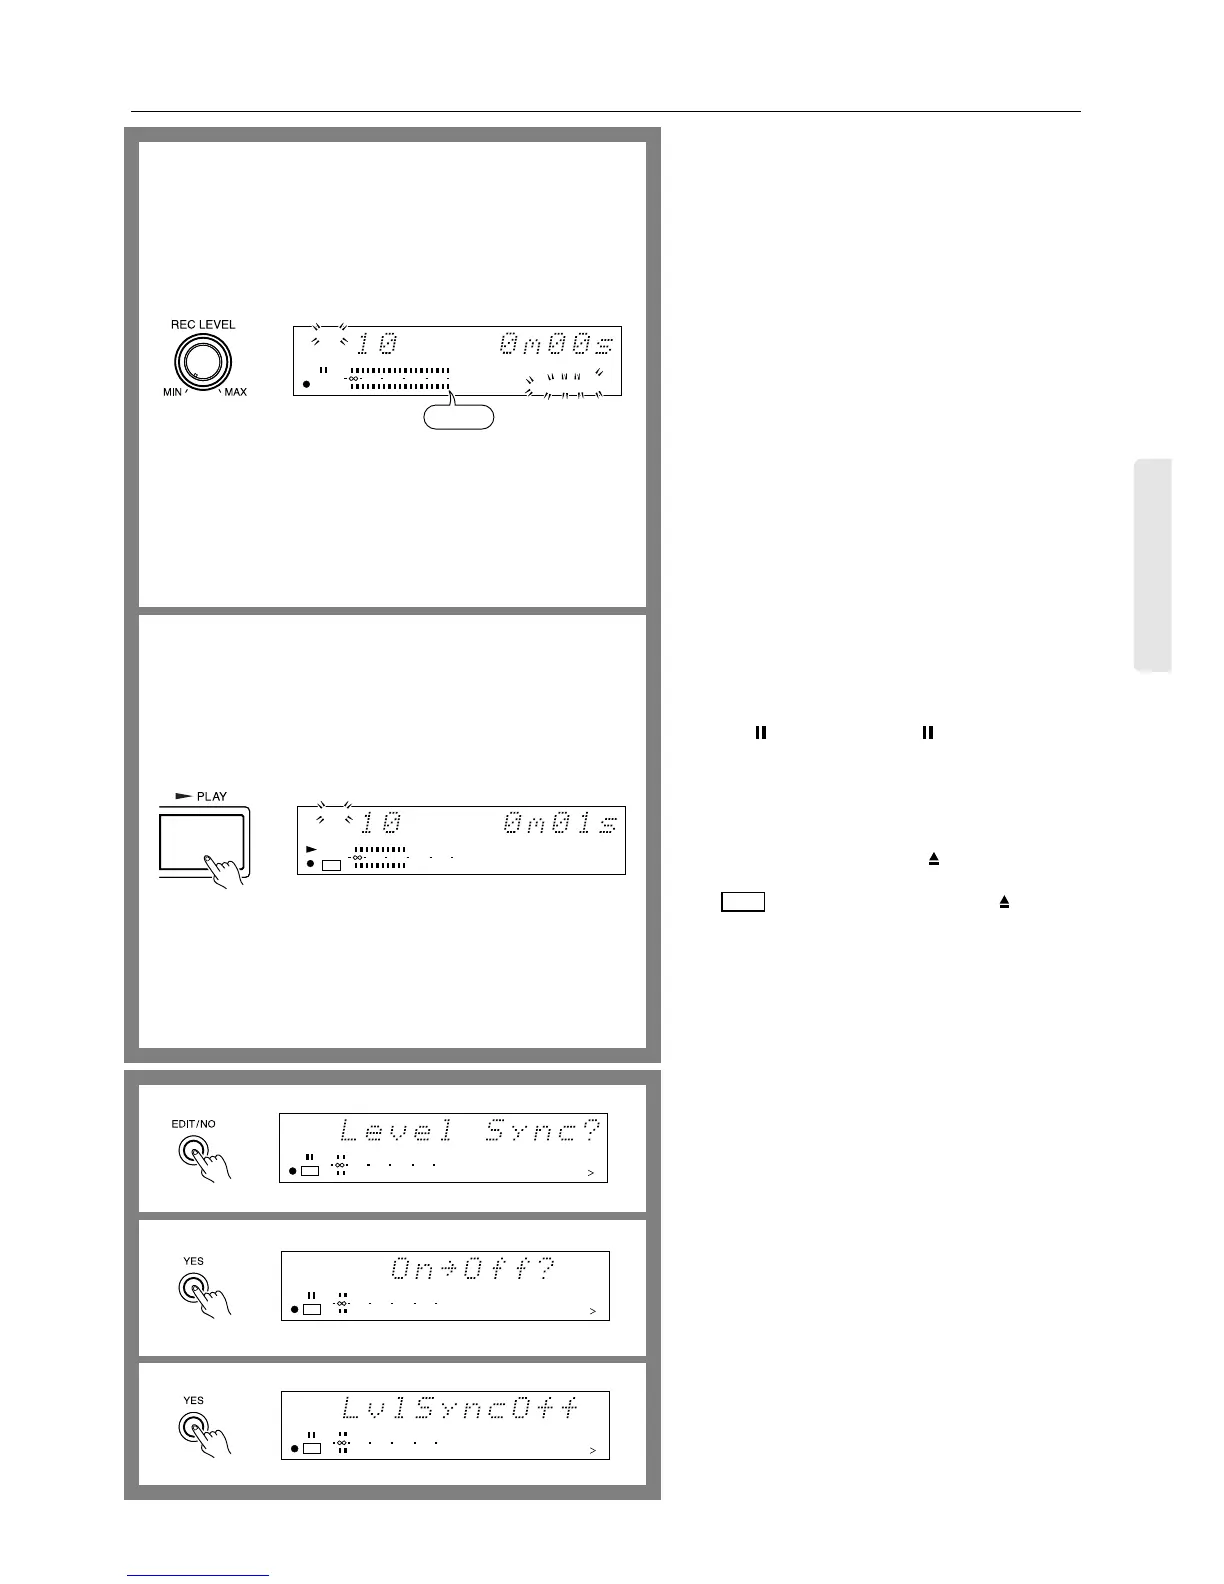
7. Using the REC LEVEL knob, adjust the recording level.
Adjust the position of the REC LEVEL knob so that the
indicator occasionally enters the -6 to -2 dB range.
When adjustment of the recording level is complete, stop
playing the source.
8. Press the ® PLAY button to start recording on the MD-
2321 and start playing the recording source immediately.
The TOC indicator appears as soon as recording starts.
The MD recorder will automatically stop when record-
able time on the disc expires.
The track numbers are recorded automatically.
Since the interval between tracks is detected based on the
sound level, some tracks may not be numbered correctly
in the following cases:
• Recorded condition of the cassette tape is bad (noise
between tracks).
• Low sound level in quiet music.
• Interval between tracks is extremely short.
• Tuner’s reception is bad (noise).
To disable this function refer to the explanation below on
this page.
To manually record a track number
While recording, press the ● REC button when you wish
to mark a track number.
If you wish to mark two or more track numbers sequen-
tially, provide a sufficient interval between each press of
the ● REC button. Too short (about 4 seconds or less) an
interval may lead to a failure in marking track numbers.
To stop recording temporarily...
Press the PAUSE button (or the button on the remote
controller). To resume recording, press the ® PLAY button
again (or press the ® button on the remote controller).
To stop recording...
Press the ■ STOP button.
To eject the MD...
Press the ■ STOP button, then the EJECT button.
Caution:
The indicator flashes: If you press the button or
the STAND-BY/ON button while the MD recorder is still
writing the recorded contents onto the disc. During this
period, do not disconnect the power cord or allow the MD
recorder to vibrate. Doing so may prevent normal record-
ing onto the MD.
If the MD recorder’s power cord is connected to the
SWITCHED service power outlet on the rear panel of
another device, do not turn off the power to the device.
To disable the automatic track numbering function...
Perform the following steps prior to Step 2 or Step 6:
1. Press the EDIT/NO button.
“LevelSync?” appears on the display.
2. Press the YES button.
If the function is currently turned on, “On→Off?”
appears on the display.
3. Press the YES button.
“LvlSyncOff” appears on the display.
Now the tracks will not be numbered during recording.
• Press the EDIT/NO button any time if you wish to
cancel the setting.
To enable the automatic track numbering function...
Perform the following steps prior to Step 2 or Step 6:
1. Press the EDIT/NO button.
“LevelSync?” appears on the display.
2. Press the YES button.
If the function is currently turned off, “Off→On?”
appears on the display.
3. Press the YES button.
“LvlSyncOn” appears on the display.
7
8
TRACK
12345
678910
11 12 13 14 15
010 22040
R
6
L
ANALOG IN
–6〜–2
TRACK
010 22040
R
6
L
DIGITAL IN
TOC
12345
678910
TOC
12345
678910
11 12 13 14 15
TOC
010 22040
R
6
L
15
12345
678910
11 12 13 14 15
TOC
010 22040
R
6
L
15
12345
678910
11 12 13 14 15
TOC
010 22040
R
6
L
15
ANALOG IN
ANALOG IN
ANALOG IN
1
2
3