EasyManua.ls Logo

OPT7 AuraLED User Manual

OPT7 AuraLED
3 pages
To Next Page IconTo Next Page
Page #1 background imageLoading...
Page #1 background image
OPT7AuraLED™WheelWellLightingKit 
Visitwww.OPT‐7.comforadditionalproducts&support
Forquestionsyoumayhave,pleasecontactSupport@OPT‐7.com.Wenormallyrespondwithin24hours.(Monday‐Friday)
Step1:TestTheStrips
1. ConnectallLEDstripsandextensioncordstothecontrolbox.
2. Connectthecontrolboxtothecar12vadapter.Then,plugtheadapterintoanyopenpowerslot.
3. TurnthecarignitionintotheAUXpositionandpush“ON”onthecaradapter.
4. UsingtheincludedE‐ZRemote,testthevariouscolorsandpatterns.
Step2:PreppingTheLEDStrips
1. Startingwiththefrontdriver’swheel,liftandsetthecarontoaliftstand.
DoNOTleaveyourcaronanyjack.
2. Foreaseofinstallation,removethewheel.
3. TemporarilyaffixyourAuraStripsintoyourwheelwellbyusingthe3Mtapeonthebackofeachstrip.
a. Makeyourrimsglow:PlacetheLEDstripbehindtheaxlestrutfacingoutward.
b. Makeyourtiresglow:Placethestriponthetopofthewheelwellfacingdownward.
4. Onceplaced,steerthewheelallthewayleftandrighttoensureatleast2”ofclearance.
BeforedrillingholesforthemorepermanentU‐Clamps,getyourkitconnectedby
followingthestepsbelow.Thiswillallowyoutotestthelightplacementbeforemakingafinalinstall.
Step3:ConnectingYourKitTogether
1. Nearthewiringsideofthestrip,drilla¾inchholeinyourcar’splasticfenderforwiring.
2. Connecttheextensioncordstoyourstripsandguidethemtowardsthefrontofthecar.
3. Runthecordsthroughapre‐existingholeinyourcar’sfirewallintothedriverfootwell.
(Firewallsareusuallylocatedintheenginebaynearthedriverfootwell)
4. Useprovidedziptiestoneatlymountandhideanyloosewiring.
Makesurethecordsarenottouchinganyhotsurfacesormovingparts.
5. Repeatsteps1‐5fortheremainingwheels
Question and Answer IconNeed help?

Do you have a question about the OPT7 AuraLED and is the answer not in the manual?

OPT7 AuraLED Specifications

General IconGeneral
BrandOPT7
ModelAuraLED
CategoryAutomobile Accessories
LanguageEnglish

Summary

Test LED Strips and Components

Connect Control Box and Power

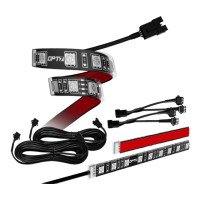
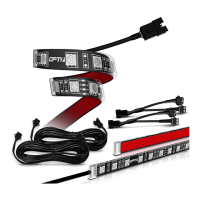
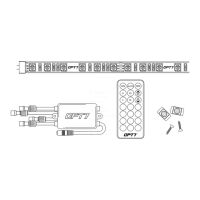
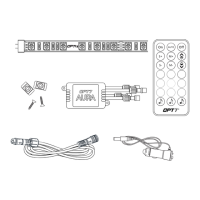
Connect LED strips and extension cords to the control box, then connect to car's 12v adapter.

Activate and Test Lighting

Turn car ignition to AUX, power on the adapter, and test colors/patterns with the remote.

Prepare and Position LED Strips

Vehicle and Wheel Preparation

Safely lift the vehicle on a stand and remove the wheel for installation access.

Affix and Check Strip Clearance

Temporarily attach strips in the wheel well and test steering for clearance.

Route Wiring and Connect Kit

Drill for Wiring and Route Cords

Drill a hole for wiring, connect extension cords, and route them through the firewall.

Secure and Organize Wiring

Use zip ties to neatly mount and hide loose wiring, avoiding hot or moving parts.

Powering and Finishing Installation

Connect Control Box and Power Source

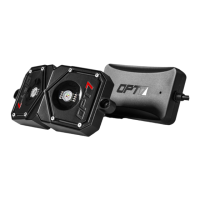
Place control box and connect LED strips. Choose 12V adapter or direct fuse connection.

Secure LED Strips with U-Clamps

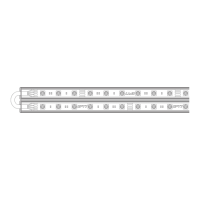
Use provided U-clamps and screws to firmly affix LED strips in the wheel well.

Warranty and Disclaimer Information

Product Warranty Coverage

1-year limited warranty covering manufacturing defects, with conditions for claims.

Installation and Usage Disclaimer

Emphasizes professional installation, warns of electrical risks, and disclaims liability.

Related product manuals