EasyManua.ls Logo

Optimus XL-50 User Manual

Optimus XL-50
15 pages
To Next Page IconTo Next Page
Page #1 background imageLoading...
Page #1 background image
XL-50 Trunk-Mount Stereo Amplifier
(120-2013) Features Faxback Doc. # 40181
Your Optimus XL-50 High-Power Trunk-Mount Stereo Amplifier produces a
total of 50 watts to give added punch and power to your vehicle's existing
autosound system.
The amplifier produces up to 25 watts per channel of clean, powerful sound
at all audio frequencies with minimum distortion. You can connect your
autosound system's low-level or speaker-level outputs to this amplifier.
Its features include:
14K Gold-Plated Speaker Terminals - designed for low impedance, high
conductivity, and minimum corrosion, to provide the highest
signal transfer and lowest sound distortion.
High- or Low-Level Input Signal-Compatible - accepts either high-level
(speaker) or low-level (preamplifier) input signals, to
match your stereo system's output for the best
performance.
Input Level Control - lets you adjust the level of the audio signals that
enter the amplifier.
Automatic Power Switching - can automatically turn the amplifier on or off
when you turn your autosound system on or off
(depending on how you hook up the amplifier).
Power Indicator - lights when power is supplied to the amplifier.
Short Circuit Protection - distorts the amplifier's sound if any output
channel shorts, alerting you to turn off the
autosound system.
Auto-Off - protects the amplifier by temporarily shutting down if it gets
too hot, an output channel shorts, or it detects an input
overload. The amplifier restarts automatically when it cools or
the problem is corrected.
Question and Answer IconNeed help?

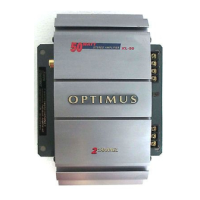
Do you have a question about the Optimus XL-50 and is the answer not in the manual?

Optimus XL-50 Specifications

General IconGeneral
Frequency Response20Hz to 20kHz
Total Harmonic Distortion0.05%
Power Output50 watts per channel into 8 ohms (stereo)
Input Sensitivity150mV
Input Impedance47k ohms (line)

Summary

Amplifier Preparation and Installation

Before Installation Checks

Pre-installation checks and questions regarding vehicle autosound systems for proper setup.

Choosing a Mounting Location

Guidance on selecting an optimal and safe mounting spot for the amplifier.

Connecting Power and Ground

Connecting Ground and Power Cables

Step-by-step instructions for securely connecting ground and primary power wires.

Connecting Remote Power

Instructions for connecting the remote power wire for automatic amplifier activation.

Audio Input Connections

Low-Level Input Connection

Connecting the amplifier using low-level line output jacks from the autosound system.

High-Level Input Connection

Connecting the amplifier using speaker outputs from the autosound system.

Completing the Installation

Connecting Speakers

Procedure for connecting speaker wires to the amplifier's output terminals.

Testing and Mounting

Steps for testing connections, mounting the amplifier, and reconnecting power.

Amplifier Operation

Turning the Amplifier On

Details on how the amplifier automatically turns on with the vehicle's ignition or system.

Adjusting Audio Level

Guide to setting the amplifier's input level for optimal audio performance.

Troubleshooting Common Issues

No Power or No Sound

Diagnosing and resolving issues related to lack of power or sound output.

Distorted Sound

Troubleshooting steps for distorted audio output from the amplifier.

Care, Maintenance, and Fuses

General Care and Maintenance

Recommendations for keeping the amplifier dry, clean, and handling it safely.

Replacing Fuses

Instructions for replacing the SFE-type and blade-type fuses.

Technical Specifications

Related product manuals