To manually set the clock:
(You only need to set the clock and calendar if you have
disabled the clock radio reception.)
to navigate to the Clock Area.
will show next to the Area.
to change the clock setting.
3. Rotate the dial left or right to decrease or increase
5. Repeat steps 1 to 5 to set the time zone offset
hour (+ / -23 hours), 12 / 24 hour format, hour,
minute, year, date / month format, month, date and
If you enter +1 in the time zone setting, this will
give you your regional time plus 1 hour.
The weekday is available in English, French,
German, Italian or Spanish.
To change the clock display:
to navigate to the Clock Area.
will show next to the Area.
The clock has 2 alarms that can be set to sound with
to navigate to the Clock Area.
will show next to the Area.
to toggle between alarm 1
3. When you’ve selected the alarm you wish to
4. Rotate the dial left or right to change the setting.
To activate / deactivate an alarm:
to navigate to the Clock Area.
will show next to the Area.
to toggle between alarm 1
The Calendar must be set for this feature to work (see
Clock / Calendar section).
To activate the outdoor temperature and humidity
T to navigate to the Temperature or
will show next to the Area.
to activate auto-scan. The
temperature and humidity display will scroll from
indoor to ch1 through to ch10.
Channel 1 is used for the outdoor temperature
and humidity sensor in the remote wind sensor.
Additional temperature and humidity sensors can use
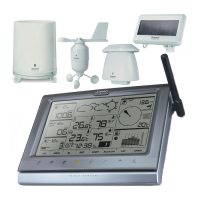
The weather display in the top part of the screen shows
the current weather and the weather forecast for the next
12-24 hours within a 30-50 km (19-31 mile) radius.
WMR100_EN_86L4515-017.indd 8 6/15/06 4:26:18 PM
 Loading...