9
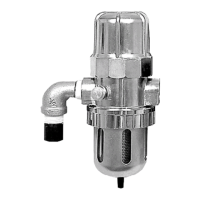
Ball
valve
Auto drain trap
Drain
plug
Disc
Disc cap
Cap
Filter
Disc retainer cap
Washer
Threaded
parts of
the cap
Valve hole
Main body
Packing
O-ring
Disc
Disc cap
Threaded part
Grooved side
Main body
Washer
Packing
Daily inspection and maintenance
Daily inspections / Monthly maintenance
Daily inspections
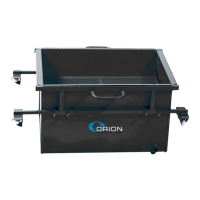
■Inspection of Auto Drain Trap
Visually inspect the Auto Drain Trap every day.
・Check air is not leaking (except outlet).
・Check that the Auto Drain Trap operates correctly (drains water at regular intervals).
・Check that no foreign matter is accumulated in the bowl.
Monthly maintenance
■Disassembly and cleaning of Auto Drain Trap
Each of its parts becomes dirty after long hours of use; it will not
operate correctly.To avoid this problem, remove and disassemble
the Auto Drain Trap and clean it once a month.
1. Required cleaning tools:
・Washing brush ・Small parts container ・Air gun
2. Remove any compressed air from inside the Auto
Drain Trap.
(1)
Close the ball valve.
(2)
Turn the drain plug clockwise to loosen it.
Water in the bowl and compressed air will be
removed from the Auto Drain Trap.
3.
Disassembly and cleaning of cap
(1)
Turn the cap counterclockwise to remove it.
(2)
Remove any foreign matter rom the filter with
air blow.
(3)
Wash the disc and disc cap.
(4)
Remove any foreign matter from the valve
hole with air blow.
(5)
Clean the threaded parts of the cap and main
body.
(6)
Check for damaged parts .
※Worn disc, deformed packing/washer,
worn thread on cap, worn disc cap
retainer, etc.
(7) Assembling procedure
・Perform the disassembling procedure in reverse order.
・When attaching the disc, make sure that its grooved side
is directed downward.
・Attach the packing first and then the washer to the disc cap
(i.e., washer is located on top of the packing) (see the figure
to the right).
・Wipe the threaded parts of the cap and main body carefully
with a rag, and apply grease to them, and then screw them
with hands.
 Loading...