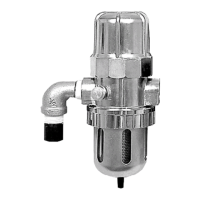
The Orion Auto Drain Trap AD-5 is a device designed for industrial purposes to automatically discharge condensed water from compressed air systems. It operates on a pressure difference principle, where a small amount of air leaks from inside the cap through an auxiliary pipe to the drainage side, causing the pressure inside the bowl to become higher than that inside the cap. This pressure difference causes a disc to move up, allowing air (drainage) to flow towards the drain outlet. When the disc reaches its highest position, air leaks into the cap through a pressure equalizing hole, balancing the pressure inside the bowl and the cap. Subsequently, the pressure under the disc temporarily lowers, causing the disc to move down due to downward pressure, and the cycle repeats. The intervals of operation can be adjusted by turning a needle valve on the main body. Turning it counterclockwise shortens the intervals, while turning it clockwise lengthens them.
Important Technical Specifications:
- Model: AD-5
- Fluid used: Compressed air drainage
- Operating pressure: 0.29 ~ 0.98 MPa (gauge)
- Operating temperature: 2 ~ 60 °C (Freezing to be avoided)
- Applicable medium: Compressed air
- Maximum discharge (drain): 450 L/Hr (at 0.69 MPa)
- Discharge (air): 18 L/min (at 0.69 MPa)
- Connection diameter (Drain inlet/outlet): Rc 1/2
- Dimensions (W × H): 86 × 198 mm
- Weight: 1.2 kg
- Flow path minimal diameter: φ3.5 mm
Usage Features:
- Automatic Drainage: The AD-5 automatically discharges condensed water, eliminating the need for manual intervention.
- Adjustable Drainage Intervals: The needle valve allows users to adjust the intervals of drainage operation based on load, pressure, and other conditions. This helps prevent the bowl from overfilling and minimizes unnecessary air consumption.
- Oil Mist Tolerance: While excessive oil mist can affect drainage performance (decreasing drainage and lengthening intervals), the device can be adjusted to compensate for such conditions.
- Muffler Option: For quieter operation, an optional muffler assembly (part No. 03006716010) can be installed.
- Installation Requirements: The device must be installed vertically with the drain outlet facing downward. A stop valve should be attached to the drain inlet to facilitate maintenance under pressure. It is crucial to ensure that the drain pipe does not have rising portions or is excessively long, as this can hinder proper drainage due to back pressure.
- Environmental Considerations: The product should not be used at ambient temperatures of 2°C or lower to prevent water from freezing. If unavoidable, an antifreeze band should be wrapped around the pipes and the entire trap. The device contains plastic parts and should not be exposed to specific chemical agents (acids, aromatic hydrocarbons, alcohols, phenols, ketones, carboxylic acids, oxyacids, amines) or direct sunlight.
Maintenance Features:
- Daily Inspection:
- Visually inspect the Auto Drain Trap daily.
- Check for air leaks (except from the outlet).
- Verify correct operation (drains water at regular intervals).
- Ensure no foreign matter has accumulated in the bowl.
- Monthly Maintenance (Disassembly and Cleaning):
- Safety First: Always remove any compressed air from inside the trap before cleaning or maintenance. Close the ball valve and loosen the drain plug to release pressure and water.
- Disassembly: Turn the cap counterclockwise to remove it. Remove the ring counterclockwise to access the bowl.
- Cleaning:
- Clean the filter by blowing air through it.
- Wash the disc and disc cap.
- Clean any foreign matter from the valve hole with an air blow.
- Clean the threaded parts of the cap and main body.
- Flush the bowl with water and wipe it dry with a clean cloth. Do NOT use detergent on the bowl.
- Inspection for Damage: Check for worn discs, deformed packing/washers, worn threads on the cap, and worn disc cap retainers. Pay special attention to the O-ring, as a damaged O-ring can cause air leakage.
- Reassembly: Perform the disassembly procedure in reverse order.
- When attaching the disc, ensure its grooved side faces downward.
- Attach the packing first, then the washer, to the disc cap (washer on top of packing).
- Carefully wipe threaded parts of the cap and main body with a rag, apply grease, and screw them in by hand.
- If air leaks after reassembly, parts like the washer, packing, cap (disc retainer), or O-ring may be worn and require replacement.
- Screen Removal: When removing the screen, pull it straight downward to avoid damaging the pipe.
- Replacement Parts: Key parts have recommended replacement intervals:
- Filter: 1.5 years
- Packing: 6 months to 1 year
- Washer: 6 months to 1 year
- Disc: 1 to 1.5 years
- Cap, main body: 4 or 5 years
- O-ring: 1.5 years
- Replacement timing may vary based on installation and operational conditions, especially with less oil or drainage.
- Troubleshooting Guide: The manual provides a detailed troubleshooting section to help identify and resolve common issues such as the bowl not draining, continuous discharge, or air leakage. If problems persist, users are advised to contact the dealer or a qualified service company.
- Storage: If the product is not in use for an extended period, drain all water, disassemble, clean, and store it in a place free from foreign matter, dust, rainwater, or moisture. Failure to remove water can lead to corrosion and damage.
- Disposal: Refrigerant must be collected according to local laws and regulations before disposing of the device.