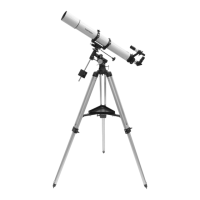
16
telescope is properly polar-aligned using the polar axis finder
scope. Perform the one-star alignment using an eastern star
as the alignment star (see “One-Star Alignment”). After com-
pleting the star alignment, choose a bright star in the western
sky from the Atlas EQ-G object database and press ENTER
to slew the telescope to the star. If the optical axis is perfectly
aligned to the R.A. axis, the telescope will accurately put the
star in the center of the eyepiece. This shows that there is no
“cone” error in your telescope setup and you will not need to
perform the calibration. It is acceptable if the star is slightly off-
center as long as it appears in the eyepiece field of view and
reasonable close to the center. Many factors determine the
pointing accuracy of the Atlas EQ-G. Incorrect star alignment,
loose R.A. or Dec. lock-knobs, or “cone” error. If the Atlas EQ-
G puts the star outside the eyepiece field of view, you need
to determine which of these factors is causing the pointing
inaccuracy. To determine if the inaccuracy is caused by “cone”
error, simply move the telescope about the R.A. axis by press-
ing the Left or Right direction button. If the star can be moved
into the eyepiece field of view without adjusting the Dec. axis, it
is likely that “cone” error exists in your telescope setup.
Calibration Procedure
1. Insert an illuminated reticle eyepiece (not supplied) into
the focuser (or diagonal) of the telescope. Confirm the tele-
scope is properly set up and balanced, and the finderscope
is aligned with the optical tube of the telescope.
Note: Steps 2 to 4 are to identify R.A. and DEC movements
in the reticle eyepiece. If you are already familiar with the
movements, proceed to step 5.
2. Find a bright star and position the telescope so the star is
centered in the eyepiece field of view.
3. Look into the eyepiece. Move the telescope about the R.A.
axis using the R.A. direction buttons on the hand controller
while carefully observing the movement of the star.
4. Keep moving the telescope about the R.A. axis back and
forth to keep the star within the eyepiece field of view.
Rotate the eyepiece in the focuser (or diagonal) until the
movement of the star becomes parallel to one of the illu-
minated crosshairs (Figure 16). This crosshair will repre-
sent R.A. movement in the course of this procedure, and
the perpendicular crosshair will represent Dec. movement.
Tighten the set screws to secure the eyepiece in position.
Make sure the eyepiece will remain stationary while the
telescope is moved.
5. Point the telescope North and set the latitude scale to
your local latitude using the altitude adjustment L-bolts.
Alternatively, place Polaris in the polar axis finder scope if
your polar axis finder scope is accurately aligned with the
mount.
6. Loosen the R.A. lock knob and rotate the telescope about
the R.A. axis until the counterweight shaft is parallel to the
ground (as shown in Figure 18a).
7. Using the Dec. direction button on the hand controller,
adjust the telescope in Dec. so Polaris lies on the R.A.
crosshairs of the illuminated reticle eyepiece (Figure 17).
8. Without moving the R.A. axis, adjust the azimuth control
knobs (Figure 2) to orient Polaris in the center of the eye-
piece field of view. Adjustment in Dec. axis using the hand
controller may be necessary.
9. Loosen the R.A. lock knob and carefully rotate the tele-
scope 180° about the R.A. axis (Figure 18a &18b) This
should be done as accurately as possible referencing the
R.A. mechanical setting circle.
10.Adjust the position of the telescope in the Dec. axis so
Polaris lies on the R.A. crosshairs of the illuminated reticle
eyepiece (Figure 17).
11.Carefully push the telescope in horizontal motion while
observing the movement of Polaris in the eyepiece field of
view (Figure 19). This will determine which direction (left
or right) moves Polaris closer to the center of the eyepiece
field of view.
12.Carefully and gently loosen both the tube ring attachment
screws (Figure 3) by a couple of turns.
13.Make adjustments to the optical axis offset adjustment
screws (the socket head cap screws located at each corner
of the mounting plate, (Figure 3) according to the results
of step 11. If Polaris moves toward the center when the
telescope is pushed as indicated in Figure 19, loosen the
adjustment screws near the front of the tube and tighten the
adjustment screws closer to the back of the tube (Figure
20a). If Polaris moves away from the center when the tele-
scope is pushed as in Figure 19, loosen the adjustment
screws near the back of the tube and tighten the adjust-
Figure 16. Aligning
the R.A. motion of the
star with the crosshairs.
Figure 17. Adjust the telescope in Dec. (with the hand controller)
to place the star on the R.A. crosshair.
.
 Loading...