2
Removing Backing Paper
Your PinPoint mask comes with a protective adhesive backing paper on each side.
To remove it just use a ngernail or knife tip to peel up a small portion at the edge,
then slowly lift the rest off (Figure 2). Be careful not to put undue pressure on the
mask when removing the backing, so as not to crack the mask.
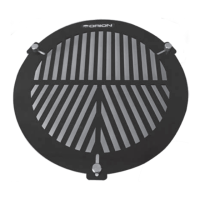
Figure 2. Carefully remove the
adhesive backing paper from the mask.
Figure 3. Attach the three grip
posts to the mask with the included
thumbscrews.
Figure 4. Place the mask over the front of the
telescope, then slide the grip posts inward until
they contact the telescope’s front cell or dew
shield before tightening the thumbscrews.
Assembly
Attach the three rubber-sleeved grip posts to the mask as shown in Figure 3. The
thumbscrew head should be on the logo side of the mask.
Attaching the PinPoint Mask to the Telescope
Loosen the three thumbscrews a turn or two and slide the grip posts outward as
far as they will go. Then place the mask over the front of your telescope. Slide each
of the three grip posts inward until they contact the telescope’s front cell or dew
shield, then tighten the thumbscrews (Figure 4). To make sure the mask is cen-
tered on the front of the scope, adjust the posts so that each is at roughly the same
position in its slot. To ensure a tight grip, loosen one thumbscrew slightly, then
push the grip post inward while pulling the mask gently toward the loosened grip
post. This will make sure that the other two grip posts are contacting the telescope
when you retighten the third thumbscrew.
Now the mask should be well secured in position over the front of the telescope.
You’re ready to focus!
 Loading...