Do you have a question about the Orion StarShoot AutoGuider and is the answer not in the manual?
Details on selecting and using the main telescope for imaging with the autoguider.
Information on choosing and mounting a separate guide scope for accurate guiding.
Instructions for connecting the SSAG with PHD Guiding software.
Instructions for connecting the SSAG with PHD2 Guiding software.
Guide for using the SSAG with ASCOM compatible astronomy software.
Detailed explanation of advanced settings to optimize guiding performance.
Guidance on using a USB extension cable for extended reach.
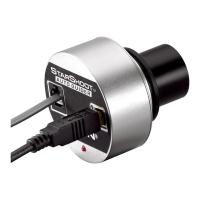
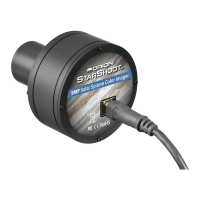
The Orion StarShoot AutoGuider (SSAG) is an essential astro-imaging tool designed to provide trouble-free automatic guiding for telescopes, enabling perfectly round stars in long-exposure astro-images. It automatically fixes on a star and sends tracking corrections to your mount, eliminating the need for constant manual monitoring of your telescope setup. This capability compensates for mechanical imperfections inherent in all telescope mounts, significantly enhancing astro-imaging productivity.
The SSAG works by connecting to your computer via a USB cable and to your equatorial mount's autoguide port via an autoguide cable. It uses a small guide scope, mounted on top of or beside the main imaging scope, to track a guide star. For Cassegrain-style telescopes, an off-axis guider can be used, allowing both the main imaging camera and autoguider to share the same telescope. The SSAG is "ST-4" compatible, meaning it works with most equatorial mounts equipped with an autoguide port. While it can guide with computerized altitude-azimuth or fork-mounted telescopes for short exposures (typically 45 seconds or less), an equatorial mount is recommended for optimal performance in guided deep-space astrophotography, as altitude-azimuth mounts can cause field rotation in exposures longer than one minute.
The SSAG requires a PC or Macintosh computer, with a laptop being highly recommended for field use. Minimum computer hardware requirements include 128MB RAM, 50MB or more disk space, an 800x600 16-bit color (or higher) video display, a mouse, and a USB High Speed 2.0 port. Before connecting the camera, the necessary software and camera drivers must be installed. All software, manuals, and guides can be downloaded from the Orion SAG product support page. Mac OSX users only need to download PHD guiding for Mac OSX, as the camera driver is built into that software. Windows users need to download and install PHD guiding (or PHD2 guiding) and the StarShoot AutoGuider Drivers V4. The drivers include a full installer, a driver-only installer, an ASCOM driver installer, and PHD/PHD2 update patches. If PHD or PHD2 software is re-installed, the corresponding patch installers must also be re-installed.
Initial setup of the SSAG is recommended during the day to familiarize yourself with its basic camera functions. The process involves plugging the SSAG into your computer's USB port, inserting it into the guide scope's 1.25" eyepiece holder, opening PHD Guiding, and selecting the "Connect to Camera" icon. Due to the camera's high sensitivity, the camera gain should be reduced to 5% for daytime use, then returned to 95% for night-time observations. After selecting an exposure time (e.g., 0.05s for daytime), continuous looping exposures can be started to achieve a sharp image by adjusting the telescope's focus. The SSAG focuses approximately 15mm inward from a standard 1.25" eyepiece, often requiring a 1.25" extension tube for refractors. The Gamma Adjustment can be used to achieve a high-contrast image, which may need to be adjusted between day and night.
For autoguiding at night, first locate, center, and focus your desired celestial object in your main imaging scope, ensuring the mount's tracking is engaged. Then, in the guide scope, locate and center a fairly bright star using a low-power eyepiece. Remove the eyepiece and insert the SSAG. Connect the SSAG to your computer via USB and to your mount's autoguide port. Load PHD Guiding, connect to the StarShoot AutoGuider, and set the exposure time (e.g., 2.0s). Begin looping exposures and focus the guide scope until the star is sharp. Once a clearly defined guide star is visible, stop the looping exposures and click on the desired star. A green guide star box should appear; if it's yellow with a "LOW SNR" message, select a brighter star or increase exposure time. Ensure "On-camera" is selected in the Mount menu and click the "Connect to Telescope" icon. Finally, click the PHD Guide icon to begin automatic calibration and guiding. Yellow crosshairs will appear during calibration, turning green when guiding begins. Patience is key during calibration, and the telescope should not be disturbed.
The Advanced Parameters in PHD Guide allow for fine-tuning guiding performance, though major adjustments are typically not needed. Settings include R.A. Aggressiveness (percentage of R.A. correction per step, default 100%), R.A. Hysteresis (percentage of previous tracking corrections), Dec Guide Mode (disable or limit dec correction), Dec Algorithm (Resist switching or Lowpass filter), Calibration Step (duration of guide pulse during calibration, default 500ms), Min. Motion (pixels star must move before correction, default 0.25 pixels), Search Region (area in pixels for guide star search, default 15x15 pixels), Noise Reduction (2x2 mean or 3x3 median), Time Lapse (delay between corrections), Gain (camera's internal brightness, default 95%), Force Calibration (recalibrates every time a new star is chosen), Log Info (logs actions to a text file), and Disable Guide Output (shuts off autoguider output for troubleshooting).
For optimal long-exposure imaging, good polar alignment of your equatorial mount is critical to prevent field rotation. The "drift method" of polar alignment involves roughly aligning the mount to Polaris, then observing the drift of a bright star near the meridian and celestial equator over several minutes to make fine adjustments to the mount's azimuth and altitude.
Differential tube flexure, the unwanted movement between a guide scope and imaging scope, can cause oblong stars. To minimize this, ensure the guide scope's focus lock is tightened, adjustable guide scope tube rings are firmly tightened, and the guide scope tube rings and mounting plate are securely attached to the main imaging scope. The focuser and tube rings on the main imaging scope should also be firmly in place and checked before each imaging session.
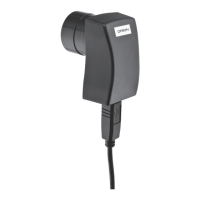
The SSAG uses two lightweight cables: a USB cable and an autoguide cable. It's important to keep an eye on these cables to avoid stress, which can affect tracking. If using heavy-duty cables with your imaging camera, tie them to a secure location on your mount to prevent them from contributing to differential tube flexure. A 10' USB extension cable is recommended for comfortable setup.
For users of Maxim DL Essentials (version 1.08 and later), the SSAG can be operated simultaneously with StarShoot Deep Space Imaging Cameras. After plugging in both cameras, load Maxim DL Essentials, and the Camera Control window will show options for Cam 1 or Cam 2. The Imaginova StarShoot AutoGuider window will appear, allowing adjustment of camera gain and optional noise reduction. Determine which camera is the SSAG by taking a 1-second exposure with each; the one with the larger 1280x1024 image is the SSAG. Select the SSAG camera under the Autoguide tab in the camera control window and click "Settings." In the settings, ensure "Guider Enables" boxes are checked, set "Control Via" to "Camera," and click "Apply." Set the Guide tab to "Expose" and click "Start" to take a single image of a bright star. Then, set to "Calibrate" and click "Start" to begin the five-exposure calibration sequence. The star should move in an "L" shape; if not, adjust the "Calibration Time" fields. After successful calibration, switch to "Track" mode and click "Start."
When not in use, the SSAG's cover cap should be replaced on the nosepiece to prevent dust accumulation on the optical window. The optical window should only be cleaned if significant dust builds up or if it has been touched. Use quality optical lens cleaning tissue and fluid specifically designed for multi-coated optics. Before applying fluid, blow any loose particles off the surface with a blower bulb or compressed air. Apply cleaning fluid to a tissue, not directly on the optics, and gently wipe the optical surface in a circular motion. Remove any excess fluid with a fresh lens tissue, being careful not to rub too hard to avoid scratches.
Dark frames and noise reduction techniques can be employed to improve guiding performance, especially with longer exposures (over 3 seconds) that may show vertical lines and bright dots (hot pixels). The Gamma Adjustment helps clip low-level background noise. Reducing camera Gain or enabling Noise Reduction in the Advanced Autoguider Settings can also help. To take a dark frame, cap the guide scope, set the exposure time to what will be used for guiding, and click "Take Dark." The dark frame will be automatically subtracted from future exposures. To remove a dark frame, go to "Tools" and select "Erase Dark Frame."
| Sensor Size | 1/3 inch |
|---|---|
| Interface | USB 2.0 |
| Power | USB powered |
| Mounting | 1.25" barrel |
| Cooling | No cooling |
| Compatibility | Windows |
| Dimensions | 1.25" diameter |
| Resolution | 640 x 480 pixels |