6
provides dim illumination while pushing the switch all
the way to the right provides brighter illumination. Typi-
cally the dimmer setting is used under dark skies and
the brighter setting is used under light-polluted skies or
in daylight. Position your eye at a comfortable distance
from the rear of the unit. Look through the rear of the
nder scope with both eyes open to see the illuminated
red dot. The target object should appear in the eld of
view somewhere near the red dot.
5. You’ll want to center the target object on the red dot. With-
out moving the telescope, use the nder scope’s altitude
and azimuth adjustment knobs (shown in Figure 9A) to
position the red dot on the object.
6. When the red dot is centered on the distant object, check
to make sure the object is still centered in the telescope’s
eyepiece. If it isn’t, re-center it then adjust the nder
scope’s alignment again. When the object is centered in
the telescope eyepiece and on the nder scope’s red dot,
the nder scope is properly aligned with the telescope.
The red dot nder scope’s alignment should be checked
before every observing session.
Altitude tension
knobs
Azimuth tension knob
Optical tube
10mm
eyepiece
Red dot scope
Flat washer
Spring washer
Screwdriver
Handle
25mm
eyepiece
3x
Barlow
Assembly
screws
Side panels
Front panel
Side braces
Top ground plate
Bottom ground plate
Eyepiece rack
Bearing
cylinders
Dust cap
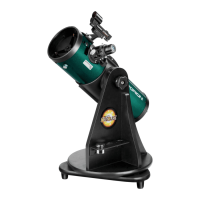
Figure 11. A) The optical tube and other parts of the SkyScanner BL 135mm Dobsonian. B) The main base components.
B
A
 Loading...